Guide: Configuring RADIUS Server with FreeRADIUS on Ubuntu 22.04 Hướng dẫn: Cấu hình Máy chủ RADIUS với FreeRADIUS trên Ubuntu 22.04
This article will guide you step-by-step on setting up a robust RADIUS authentication server using FreeRADIUS, suitable for WiFi Enterprise authentication or VPN services. Bài viết này sẽ hướng dẫn bạn từng bước thiết lập một máy chủ xác thực RADIUS mạnh mẽ sử dụng FreeRADIUS, phù hợp cho xác thực WiFi Enterprise hoặc các dịch vụ VPN.
I. SYSTEM INSTALLATION & BASIC SETUP I. CÀI ĐẶT HỆ THỐNG & THIẾT LẬP CƠ BẢN
1. Install FreeRADIUS 1. Cài đặt FreeRADIUS
First, update your system and install the necessary packages. Đầu tiên, hãy cập nhật hệ thống và cài đặt các gói cần thiết.
| Command Lệnh | Description Mô tả |
|---|---|
sudo apt update |
Refresh package lists Làm mới danh sách gói |
sudo apt install freeradius freeradius-utils -y |
Install FreeRADIUS and utility tools Cài đặt FreeRADIUS và các công cụ tiện ích |
sudo systemctl status freeradius |
Check if the service is running Kiểm tra dịch vụ có đang chạy không |
2. Configure Listen Interfaces 2. Cấu hình Interface lắng nghe
Ensure FreeRADIUS listens on all IP addresses so the Router can connect to it. Đảm bảo FreeRADIUS lắng nghe trên tất cả các địa chỉ IP để Router có thể kết nối tới nó.
Configuration File:
File cấu hình:
/etc/freeradius/3.0/radiusd.conf
listen {
    type = auth
    ipaddr = * # Listen on all IPsLắng nghe tất cả IP
    port = 1812
}

listen {
    type = acct
    ipaddr = *
    port = 1813
}
3. Configure Firewall (UFW) 3. Cấu hình Tường lửa (UFW)
Open ports 1812 (Authentication) and 1813 (Accounting) to allow Router connections. Mở các port 1812 (Xác thực) và 1813 (Tính cước) để cho phép kết nối từ Router.
| CommandLệnh | PurposeMục đích |
|---|---|
sudo ufw allow 1812/udp |
Allow Authentication traffic Cho phép lưu lượng Xác thực |
sudo ufw allow 1813/udp |
Allow Accounting traffic Cho phép lưu lượng Accounting |
II. AUTHENTICATION CONFIGURATION II. CẤU HÌNH XÁC THỰC
1. Configure RADIUS Clients 1. Cấu hình RADIUS Clients
Define the Router or Access Point (AP) that will send authentication requests to the server. Xác định Router hoặc Access Point (AP) sẽ gửi yêu cầu xác thực đến máy chủ.
Configuration File:
File cấu hình:
/etc/freeradius/3.0/clients.conf
client archer_c9 {
    ipaddr = 10.10.93.1        # IP of the Router/APIP của Router/AP
    secret = xxxxxx            # Shared Secret PasswordMật khẩu chia sẻ (Shared Secret)
    shortname = archer-c9      # Friendly NameTên gợi nhớ
    require_message_authenticator = no
}secret in this file must match exactly with the RADIUS Password setting on your Router/WiFi configuration.
Mã secret trong file này phải khớp chính xác với thiết lập RADIUS Password trên cấu hình Router/WiFi của bạn.
2. Create User Accounts 2. Tạo tài khoản người dùng
Create user accounts for WiFi login. Add the following content to the top of the users file.
Tạo tài khoản người dùng để đăng nhập WiFi. Thêm nội dung sau vào đầu file users.
Configuration File:
File cấu hình:
/etc/freeradius/3.0/users
# Syntax: Username Cleartext-Password := "Password"

raito Cleartext-Password := "Raito@1234!"
user1 Cleartext-Password := "password123"
admin Cleartext-Password := "Admin@2024"
3. Restart FreeRADIUS 3. Khởi động lại FreeRADIUS
Apply the changes made. Áp dụng các thay đổi vừa thực hiện.
sudo systemctl restart freeradius
sudo systemctl status freeradius
If successful, you will see the status: Nếu thành công, bạn sẽ thấy trạng thái: active (running)
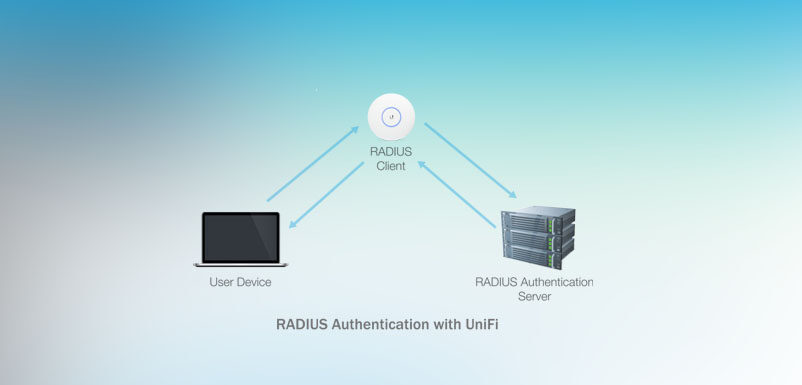
III. INTEGRATION & VERIFICATION III. TÍCH HỢP & KIỂM THỬ
1. Test RADIUS Server (Local) 1. Kiểm tra máy chủ RADIUS (Nội bộ)
Verify if the server is working correctly using the radtest tool directly on the server.
Xác minh xem máy chủ có hoạt động chính xác không bằng công cụ radtest ngay trên server.
# Syntax: radtest <user> <pass> <server-ip> <port> <secret>
radtest raito Raito@1234! localhost 1812 testing123Received Access-Accept message. If you get Access-Reject, double-check the password in the users file.
Bạn sẽ nhận được thông báo Received Access-Accept. Nếu nhận được Access-Reject, hãy kiểm tra lại mật khẩu trong file users.
2. Configure Router/WiFi 2. Cấu hình Router/WiFi
Access your Router’s administration page (e.g., TP-Link, Draytek, Aruba) and set up WiFi Enterprise. Truy cập trang quản trị Router của bạn (ví dụ: TP-Link, Draytek, Aruba) và thiết lập WiFi Enterprise.
| Security Mode | WPA/WPA2-Enterprise |
| Encryption | AES |
| RADIUS Server IP | 10.10.93.249 (IP of Ubuntu Server)(IP của máy chủ Ubuntu) |
| RADIUS Port | 1812 |
| RADIUS Password | xxxxxx (Same as Step 1 in Part II)(Giống Bước 1 – Phần II) |
3. Verify Actual Connectivity 3. Kiểm chứng kết nối thực tế
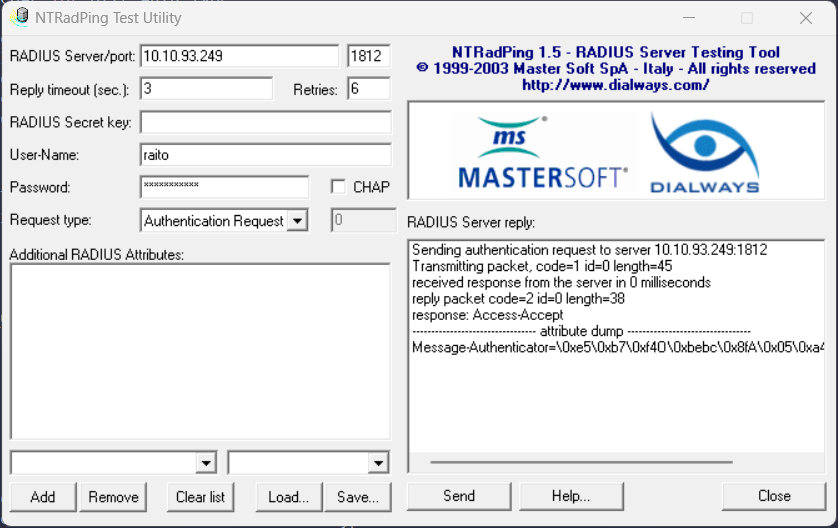
A. Test from Windows (NTRadPing)
Use the NTRadPing tool on Windows to simulate a Router sending an authentication request. Sử dụng công cụ NTRadPing trên Windows để giả lập một Router gửi yêu cầu xác thực.
- Server: IP of Ubuntu Server
- Secret: xxxxxx
- User/Pass: raito / Raito@1234!
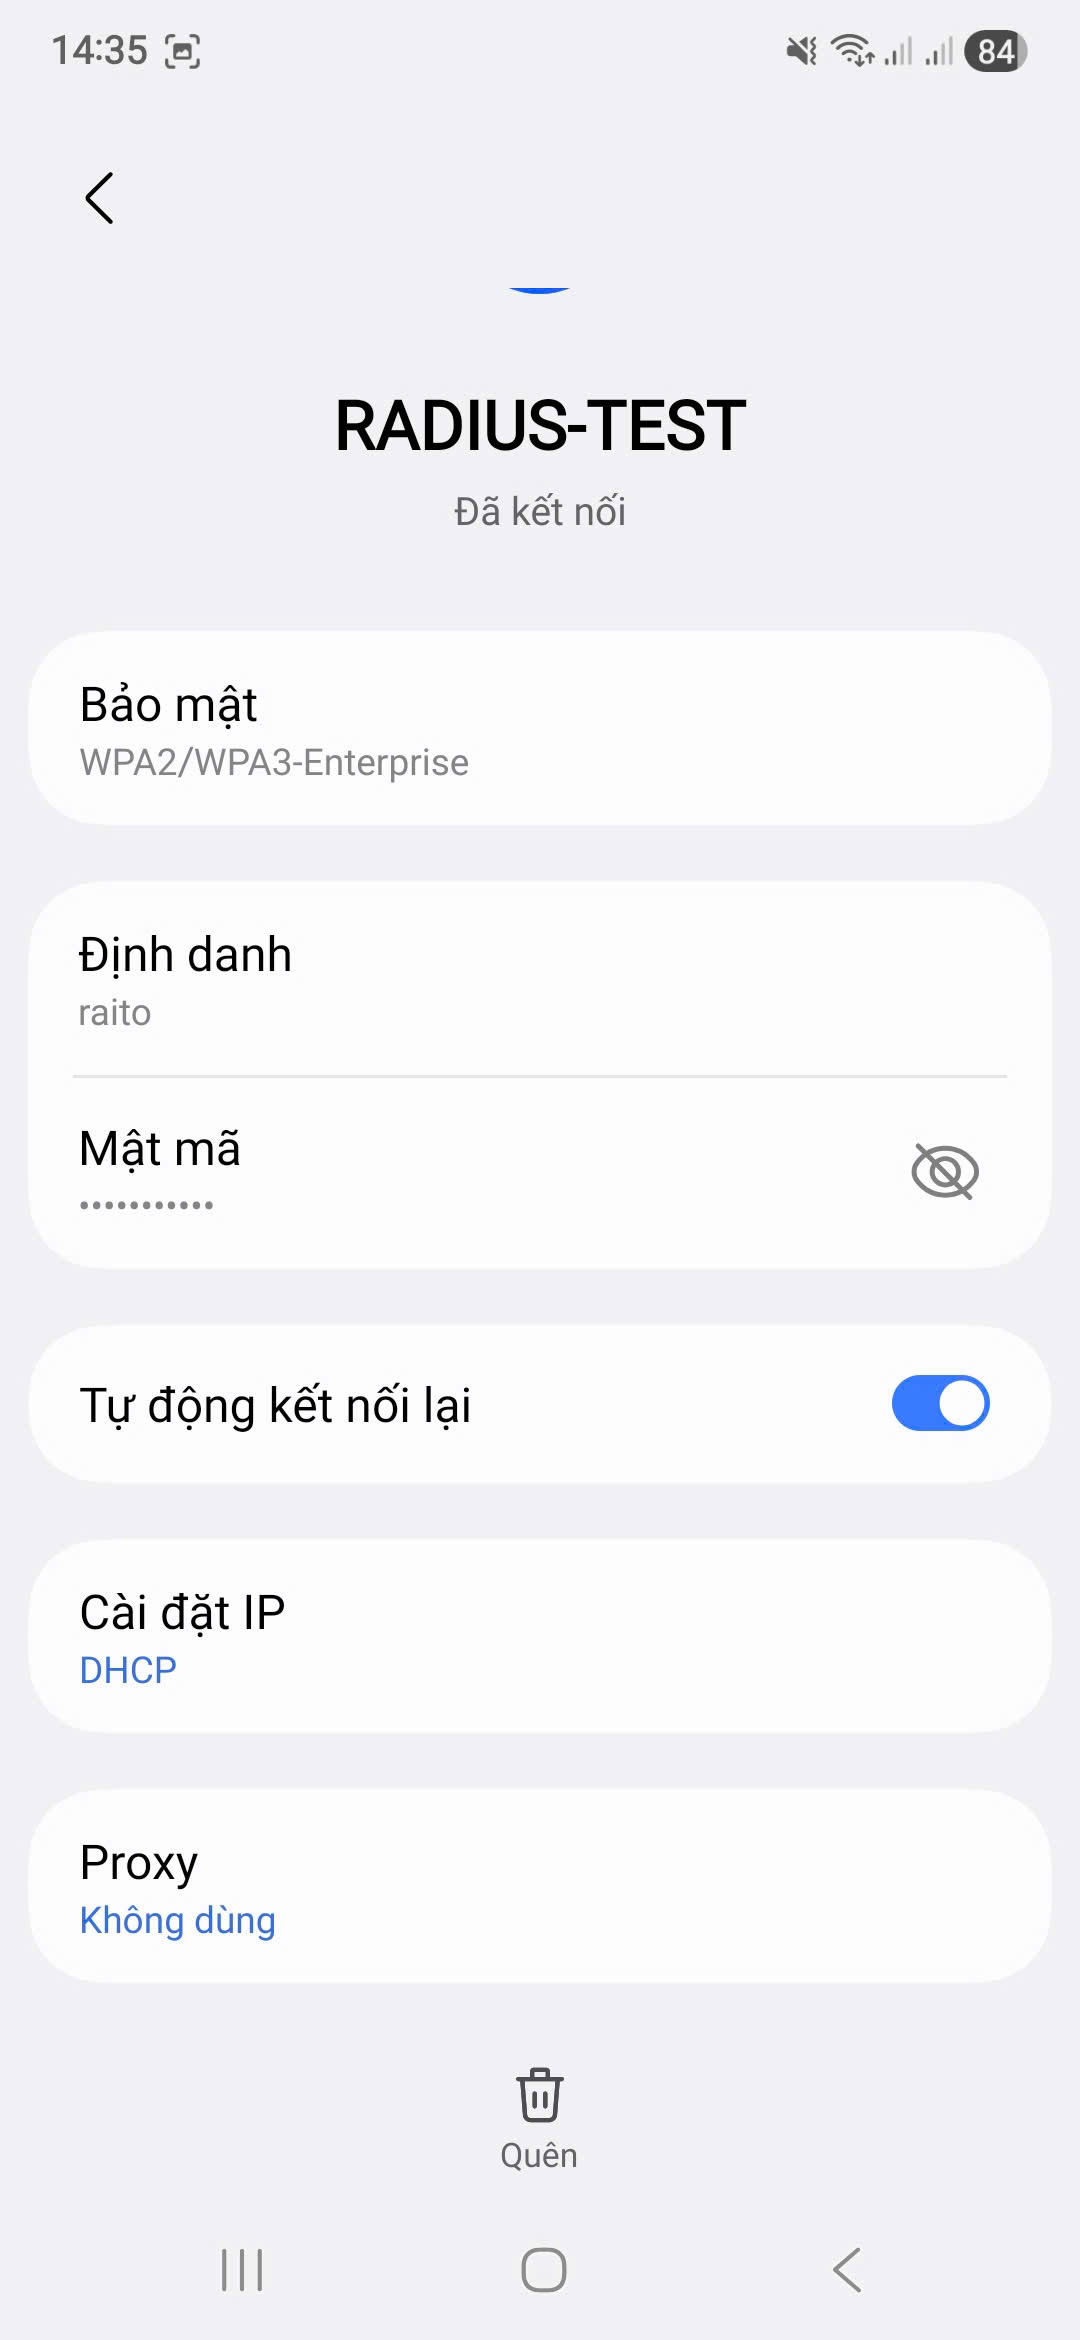
B. Test from Smartphone
Connect to the WiFi network RADIUS-TEST:
Kết nối tới mạng WiFi RADIUS-TEST:
| EAP Method | PEAP |
| Phase 2 Auth | MSCHAPv2 (or GTC/PAP depending on device)(hoặc GTC/PAP tùy thiết bị) |
| Identity | raito |
| Password | Raito@1234! |
| CA Certificate | Don’t validate (hoặc Do not check) |
🛠 DebuggingGỡ lỗi (Debug)
If connection fails, stop the service and run debug mode to see detailed logs: Nếu kết nối thất bại, hãy dừng dịch vụ và chạy chế độ debug để xem log chi tiết:
sudo systemctl stop freeradius
sudo freeradius -X
Read the output logs to identify the issue (Wrong password, wrong client IP, or firewall blocking). Đọc log đầu ra để xác định vấn đề (Sai mật khẩu, sai IP client, hoặc bị chặn bởi tường lửa).