Part 2: Proxmox VE Advanced — Hybrid Migration Phần 2: Proxmox VE Nâng cao — Migration Hybrid (ESXi ↔ Proxmox)
Runbook-style lab notes + screenshot flow (copy-based, cold migration) Tài liệu theo kiểu runbook + flow hình ảnh (copy-based, cold migration)
Updated: Jan 2026 Cập nhật: 01/2026I. Hybrid Operation Documentation I. Tài liệu vận hành Hybrid VMWare & Proxmox
1. VMware vSphere & Proxmox VE Combination Notes 1. Lưu ý khi kết hợp VMware vSphere và Proxmox VE
| CategoryNhóm | Technical NotesLưu ý kỹ thuật | Risk / ImpactRủi ro / Tác động | Best PracticeKhuyến nghị triển khai |
|---|---|---|---|
| Scope & Ops ModelPhạm vi & Mô hình vận hành | Define workload placement: which VMs run on vSphere vs Proxmox.Xác định rõ workload placement: VM nào chạy vSphere, VM nào chạy Proxmox. | Inconsistent SLA, hard to control.Vận hành không nhất quán, khó kiểm soát SLA. | Establish Workload Matrix: Tier 1 (vSphere), Tier 2/3 (Proxmox).Thiết lập Workload Classification Matrix: Tier 1 (vSphere), Tier 2/3 (Proxmox). |
| Migration CapabilityKhả năng di chuyển | No native live migration between vSphere ↔ Proxmox.Không có native live migration giữa vSphere ↔ Proxmox. | Wrong expectations of “cross-platform vMotion”, failed cutover.Kỳ vọng sai về “vMotion cross-platform”, cutover thất bại. | Design Cold migration or Warm migration. Runbook required.Thiết kế Cold migration hoặc Warm migration. Bắt buộc có Runbook. |
| HA BoundaryRanh giới HA | HA is intra-platform. Cross-platform requires DR runbook.HA là intra-platform. Cross-platform cần DR runbook. | If one platform is down, VMs won’t auto-failover.Khi 1 nền tảng down, VM không tự failover. | Cross-platform failover = DR runbook (manual or automation).Cross-platform failover = DR runbook (manual hoặc automation). |
| Network ArchitectureKiến trúc mạng | Standardize VLAN ID, trunk allow-list, MTU (1500/9000).Chuẩn hóa VLAN ID, trunk allow-list, MTU (1500/9000). | Loss of connectivity, vMotion timeout.Mất kết nối, vMotion timeout. | Have VLAN Standard Document. Connectivity test required.Có VLAN Standard Document. Thực hiện connectivity test sau mọi thay đổi. |
2. Prerequisites & Technical Conditions2. Bảng điều kiện / Prerequisites (kỹ thuật)
2.1 Infrastructure Prerequisites2.1 Điều kiện hạ tầng
| CategoryHạng mục | Minimum RequirementĐiều kiện tối thiểu | Recommended Production StandardTiêu chuẩn production khuyến nghị |
|---|---|---|
| Management ConnectivityKết nối management | vCenter/ESXi + PVE nodes reachable.vCenter/ESXi + PVE nodes reachable. | Dedicated Mgmt VLAN, ACL/firewall, OOB console (IPMI).Mgmt VLAN riêng, ACL/firewall rõ ràng, OOB console (IPMI). |
| DNS | Forward/Reverse DNS operational.Forward/Reverse DNS hoạt động. | FQDN for all nodes; consistent naming.FQDN cho toàn bộ node; naming convention thống nhất. |
| NTP | Consistent Time sync.Time sync đồng nhất. | ≥2 trusted NTP sources; drift <100ms.≥2 nguồn NTP tin cậy; drift <100ms. |
| VLAN/Trunk | Unified VLAN mapping: PG VLAN ↔ vmbr tag.VLAN map thống nhất: PG VLAN ↔ vmbr tag. | “VLAN Matrix”; verify ping on each VLAN.“VLAN Matrix”; verify ping trên từng VLAN. |
| MTU | Consistent MTU (1500).MTU consistent (1500). | If jumbo 9000: end-to-end check.Nếu jumbo 9000: kiểm tra end-to-end. |
| Storage | Target storage has IOPS & capacity.Storage đích đủ dung lượng & IOPS. | Headroom ≥30% free; latency monitoring.Headroom ≥30% free; giám sát latency. |
2.2 VM/Workload Prerequisites2.2 Điều kiện theo VM/Workload
| CategoryHạng mục | Verification RequirementĐiều kiện cần xác minh | Technical NotesGhi chú kỹ thuật |
|---|---|---|
| Backup pointBackup point | Must have backup/restore point before cutover.Có backup/restore point trước cutover. | Mandatory; recommend test restore.Bắt buộc; khuyến nghị test restore. |
| Snapshot stateSnapshot state | No long snapshot chains.Không có snapshot chain dài. | Consolidate snapshot before migration.Consolidate snapshot trước migration. |
| Boot modeBoot mode | BIOS/UEFI/SB/vTPM documented.BIOS/UEFI/SB/vTPM documented. | Mismatch → boot failure; BIOS→UEFI needs test.Mismatch → boot failure; BIOS→UEFI cần test lab. |
| Disk/ControllerDisk/Controller | Identify current + target controller.Xác định controller hiện tại + target. | Windows needs VirtIO driver if moving to VirtIO-SCSI.Windows cần VirtIO driver nếu sang VirtIO-SCSI. |
2.3 HA/DR Prerequisites2.3 Điều kiện HA/DR
| GoalMục tiêu | ConditionĐiều kiện cần có | Notes & Best PracticeGhi chú & Best practice |
|---|---|---|
| HA in vSphereHA trong vSphere | vSphere HA cluster + shared datastore.vSphere HA cluster + shared datastore. | Verify HA admission; test host failure.Verify HA admits VMs; test host failure. |
| HA in ProxmoxHA trong Proxmox | PVE cluster quorate + shared storage.PVE cluster quorate + shared storage. | Check `pvecm status`; test node failure.Check `pvecm status`; test node failure. |
| DR cross-platformDR cross-platform | Restore/failover mechanism.Cơ chế restore/failover. | This is DR, not native HA; periodic drills needed.Đây là DR, không phải HA native; cần diễn tập. |
3. Migration Execution Plan3. Migration Execution Plan
| Phase | StepBước | ActionHành động | Note / CriteriaGhi chú / Acceptance criteria |
|---|---|---|---|
| Pre-Migration | 1-5 | Backup, Verify Network, Map Dependencies.Backup, Kiểm tra mạng, Lập danh sách phụ thuộc. | Have restore point; ping/trace test.Có restore point; test ping/trace. |
| Migration | 6-8 | Cold migration: shutdown → export → import.Cold migration: shutdown → export → import. | Downtime per SLA; checksum verify.Downtime theo SLA; kiểm tra checksum. |
| Post-Migration | 9-14 | Update DNS/LB, UAT, Decommission.Update DNS/LB, UAT, Decommission. | Client test pass; decommission old source after 1-2 weeks.Client test pass; huỷ nguồn cũ sau 1-2 tuần. |
II. Experimental Verification (Lab) II. Thực nghiệm Hybrid VMware & Promox
1. Connectivity Test (4 Hosts)1. Test kết nối giữa 4 hosts (2 ESXi & 2 Proxmox)
1.1 On Proxmox-01 (10.10.93.203)1.1 Trên Proxmox-01 (10.10.93.203)
root@pve01-93-203:~# ping -c 5 10.10.93.204
PING 10.10.93.204 (10.10.93.204) 56(84) bytes of data.
64 bytes from 10.10.93.204: icmp_seq=1 ttl=64 time=0.272 ms
...
--- 10.10.93.204 ping statistics ---
5 packets transmitted, 5 received, 0% packet loss, time 4112ms

root@pve01-93-203:~# ping -c 5 10.10.93.201
PING 10.10.93.201 (10.10.93.201) 56(84) bytes of data.
64 bytes from 10.10.93.201: icmp_seq=1 ttl=64 time=0.313 ms
...
--- 10.10.93.201 ping statistics ---
5 packets transmitted, 5 received, 0% packet loss, time 4134ms

root@pve01-93-203:~# ping -c 5 10.10.93.202
PING 10.10.93.202 (10.10.93.202) 56(84) bytes of data.
64 bytes from 10.10.93.202: icmp_seq=1 ttl=64 time=0.314 ms
...
--- 10.10.93.202 ping statistics ---
5 packets transmitted, 5 received, 0% packet loss, time 4110ms
1.2 Proxmox-02 Note1.2 Lưu ý Proxmox-02
Repeat similar steps for Proxmox-02 (10.10.93.204).Làm tương tự cho Promox-02 (10.10.93.204).
1.3 On ESXi-01 (10.10.93.201)1.3 Trên ESXi-01 (10.10.93.201)
[root@localhost:~] vmkping -I vmk0 10.10.93.202
PING 10.10.93.202 (10.10.93.202): 56 data bytes
64 bytes from 10.10.93.202: icmp_seq=0 ttl=64 time=0.388 ms
...
--- 10.10.93.202 ping statistics ---
3 packets transmitted, 3 packets received, 0% packet loss

[root@localhost:~] vmkping -I vmk0 10.10.93.203
PING 10.10.93.203 (10.10.93.203): 56 data bytes
64 bytes from 10.10.93.203: icmp_seq=0 ttl=64 time=0.302 ms
...
--- 10.10.93.203 ping statistics ---
3 packets transmitted, 3 packets received, 0% packet loss

[root@localhost:~] vmkping -I vmk0 10.10.93.204
PING 10.10.93.204 (10.10.93.204): 56 data bytes
64 bytes from 10.10.93.204: icmp_seq=0 ttl=64 time=0.478 ms
...
--- 10.10.93.204 ping statistics ---
3 packets transmitted, 3 packets received, 0% packet loss
1.4 ESXi-02 Note1.4 Lưu ý ESXi-02
Repeat similar steps for ESXi-02 (10.10.93.202).Làm tương tự cho ESXi-02 (10.10.93.202).
2. VLAN 200 Connectivity Test (vMotion/Migration)2. Test kết nối VLAN 200 – migration/vMotion
2.1 On ESXi-01 (vmk1 = 172.16.200.11)2.1 Trên ESXi-01 (vmk1 = 172.16.200.11)
[root@localhost:~] vmkping -I vmk1 172.16.200.12
PING 172.16.200.12 (172.16.200.12): 56 data bytes
64 bytes from 172.16.200.12: icmp_seq=0 ttl=64 time=0.537 ms
...
--- 172.16.200.12 ping statistics ---
3 packets transmitted, 3 packets received, 0% packet loss

[root@localhost:~] vmkping -I vmk1 172.16.200.203
PING 172.16.200.203 (172.16.200.203): 56 data bytes
64 bytes from 172.16.200.203: icmp_seq=0 ttl=64 time=0.559 ms
...
--- 172.16.200.203 ping statistics ---
3 packets transmitted, 3 packets received, 0% packet loss

[root@localhost:~] vmkping -I vmk1 172.16.200.204
PING 172.16.200.204 (172.16.200.204): 56 data bytes
64 bytes from 172.16.200.204: icmp_seq=0 ttl=64 time=0.834 ms
...
--- 172.16.200.204 ping statistics ---
3 packets transmitted, 3 packets received, 0% packet loss
2.2 On Proxmox-01 (vmbr0.200 = 172.16.200.203)2.3 Trên Proxmox-01 (vmbr0.200 = 172.16.200.203)
root@pve01-93-203:~# ping -c 5 172.16.200.204
PING 172.16.200.204 (172.16.200.204) 56(84) bytes of data.
64 bytes from 172.16.200.204: icmp_seq=1 ttl=64 time=0.502 ms
...
--- 172.16.200.204 ping statistics ---
5 packets transmitted, 5 received, 0% packet loss

root@pve01-93-203:~# ping -c 5 172.16.200.11
PING 172.16.200.11 (172.16.200.11) 56(84) bytes of data.
64 bytes from 172.16.200.11: icmp_seq=1 ttl=64 time=0.341 ms
...
--- 172.16.200.11 ping statistics ---
5 packets transmitted, 5 received, 0% packet loss

root@pve01-93-203:~# ping -c 5 172.16.200.12
PING 172.16.200.12 (172.16.200.12) 56(84) bytes of data.
64 bytes from 172.16.200.12: icmp_seq=1 ttl=64 time=0.448 ms
...
--- 172.16.200.12 ping statistics ---
5 packets transmitted, 5 received, 0% packet loss
III. Test Migration ESXi → Proxmox III. Test Migration chiều ESXi → Proxmox
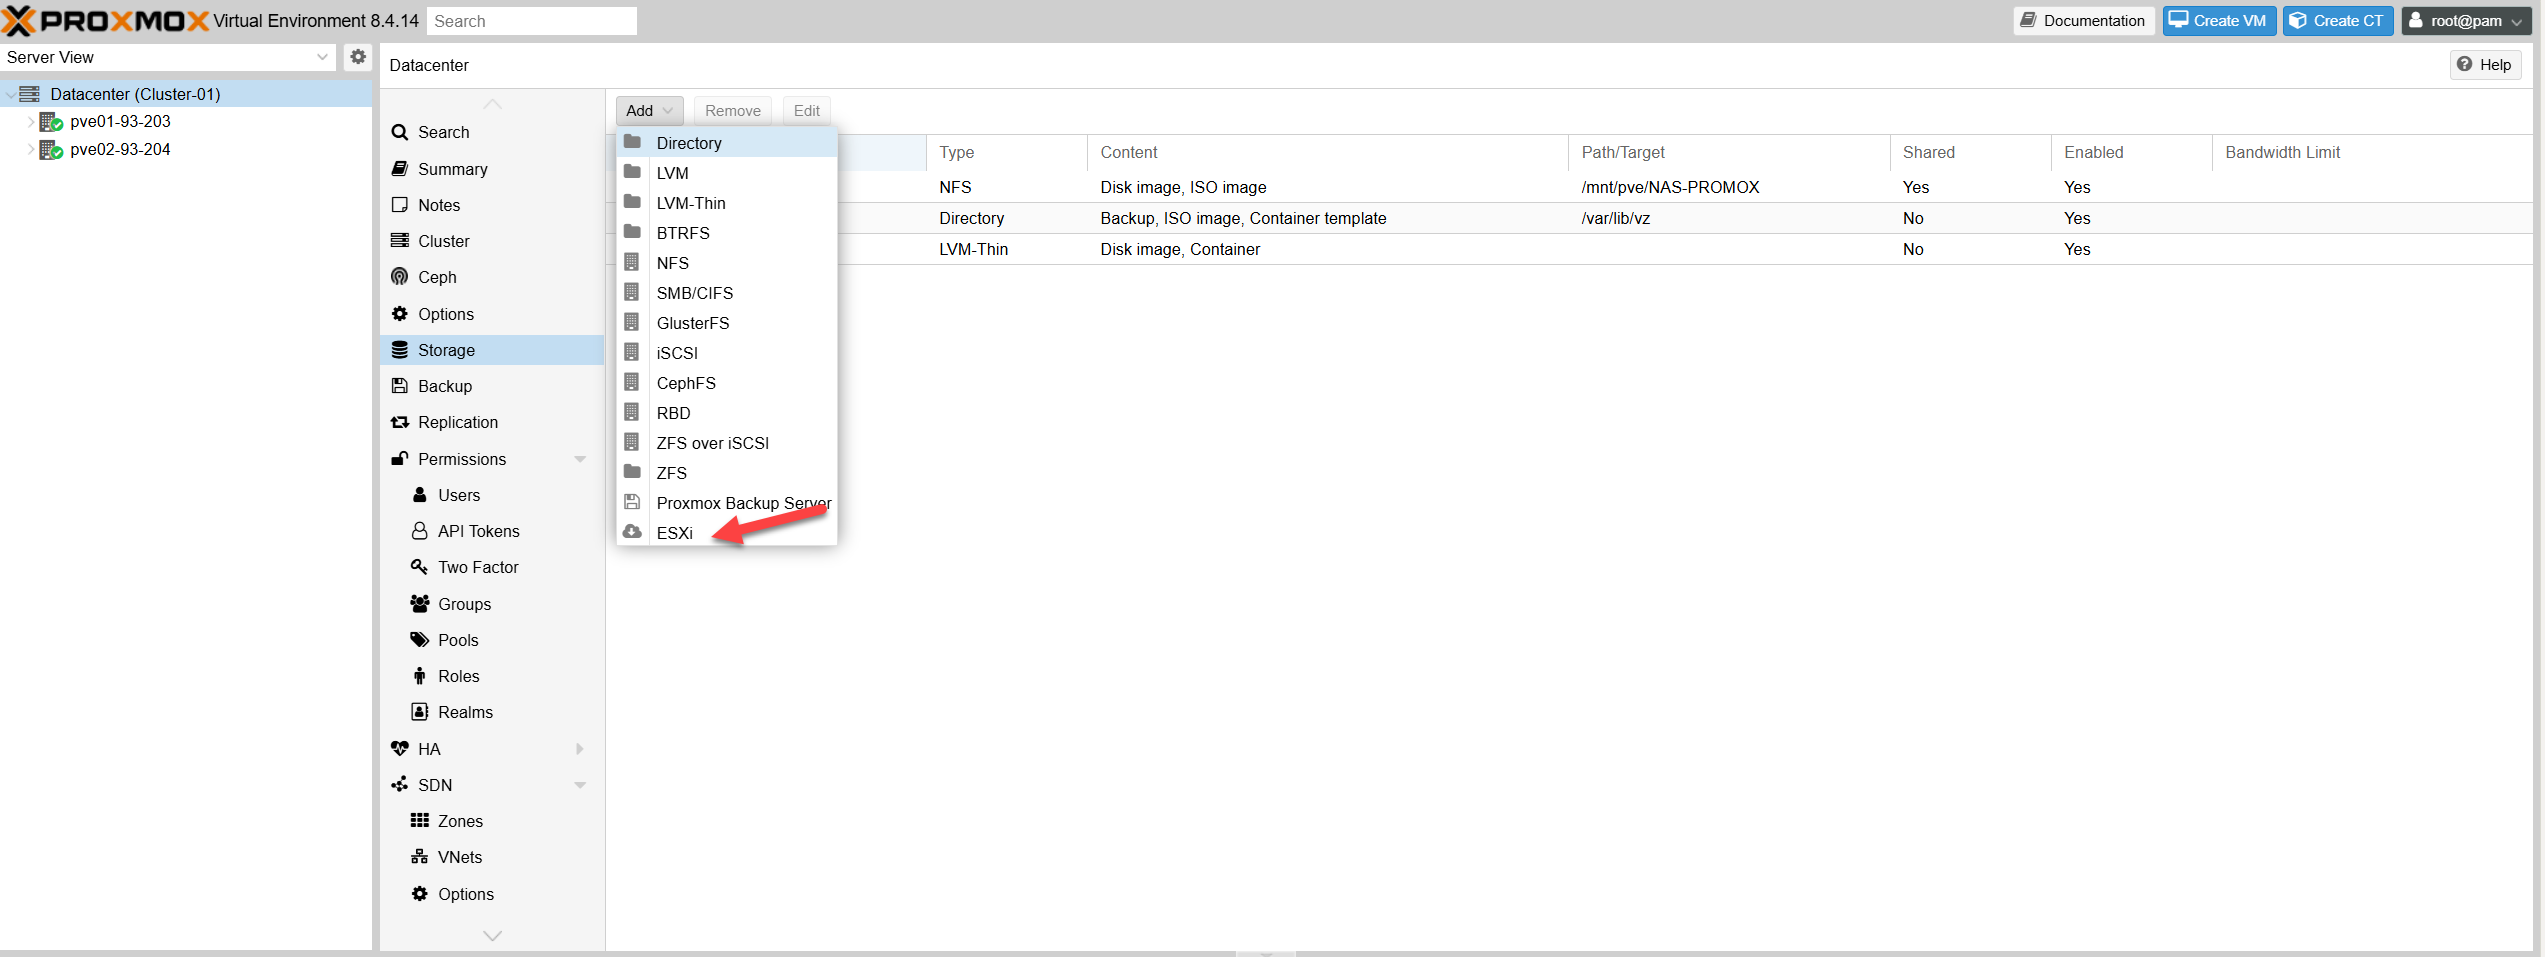
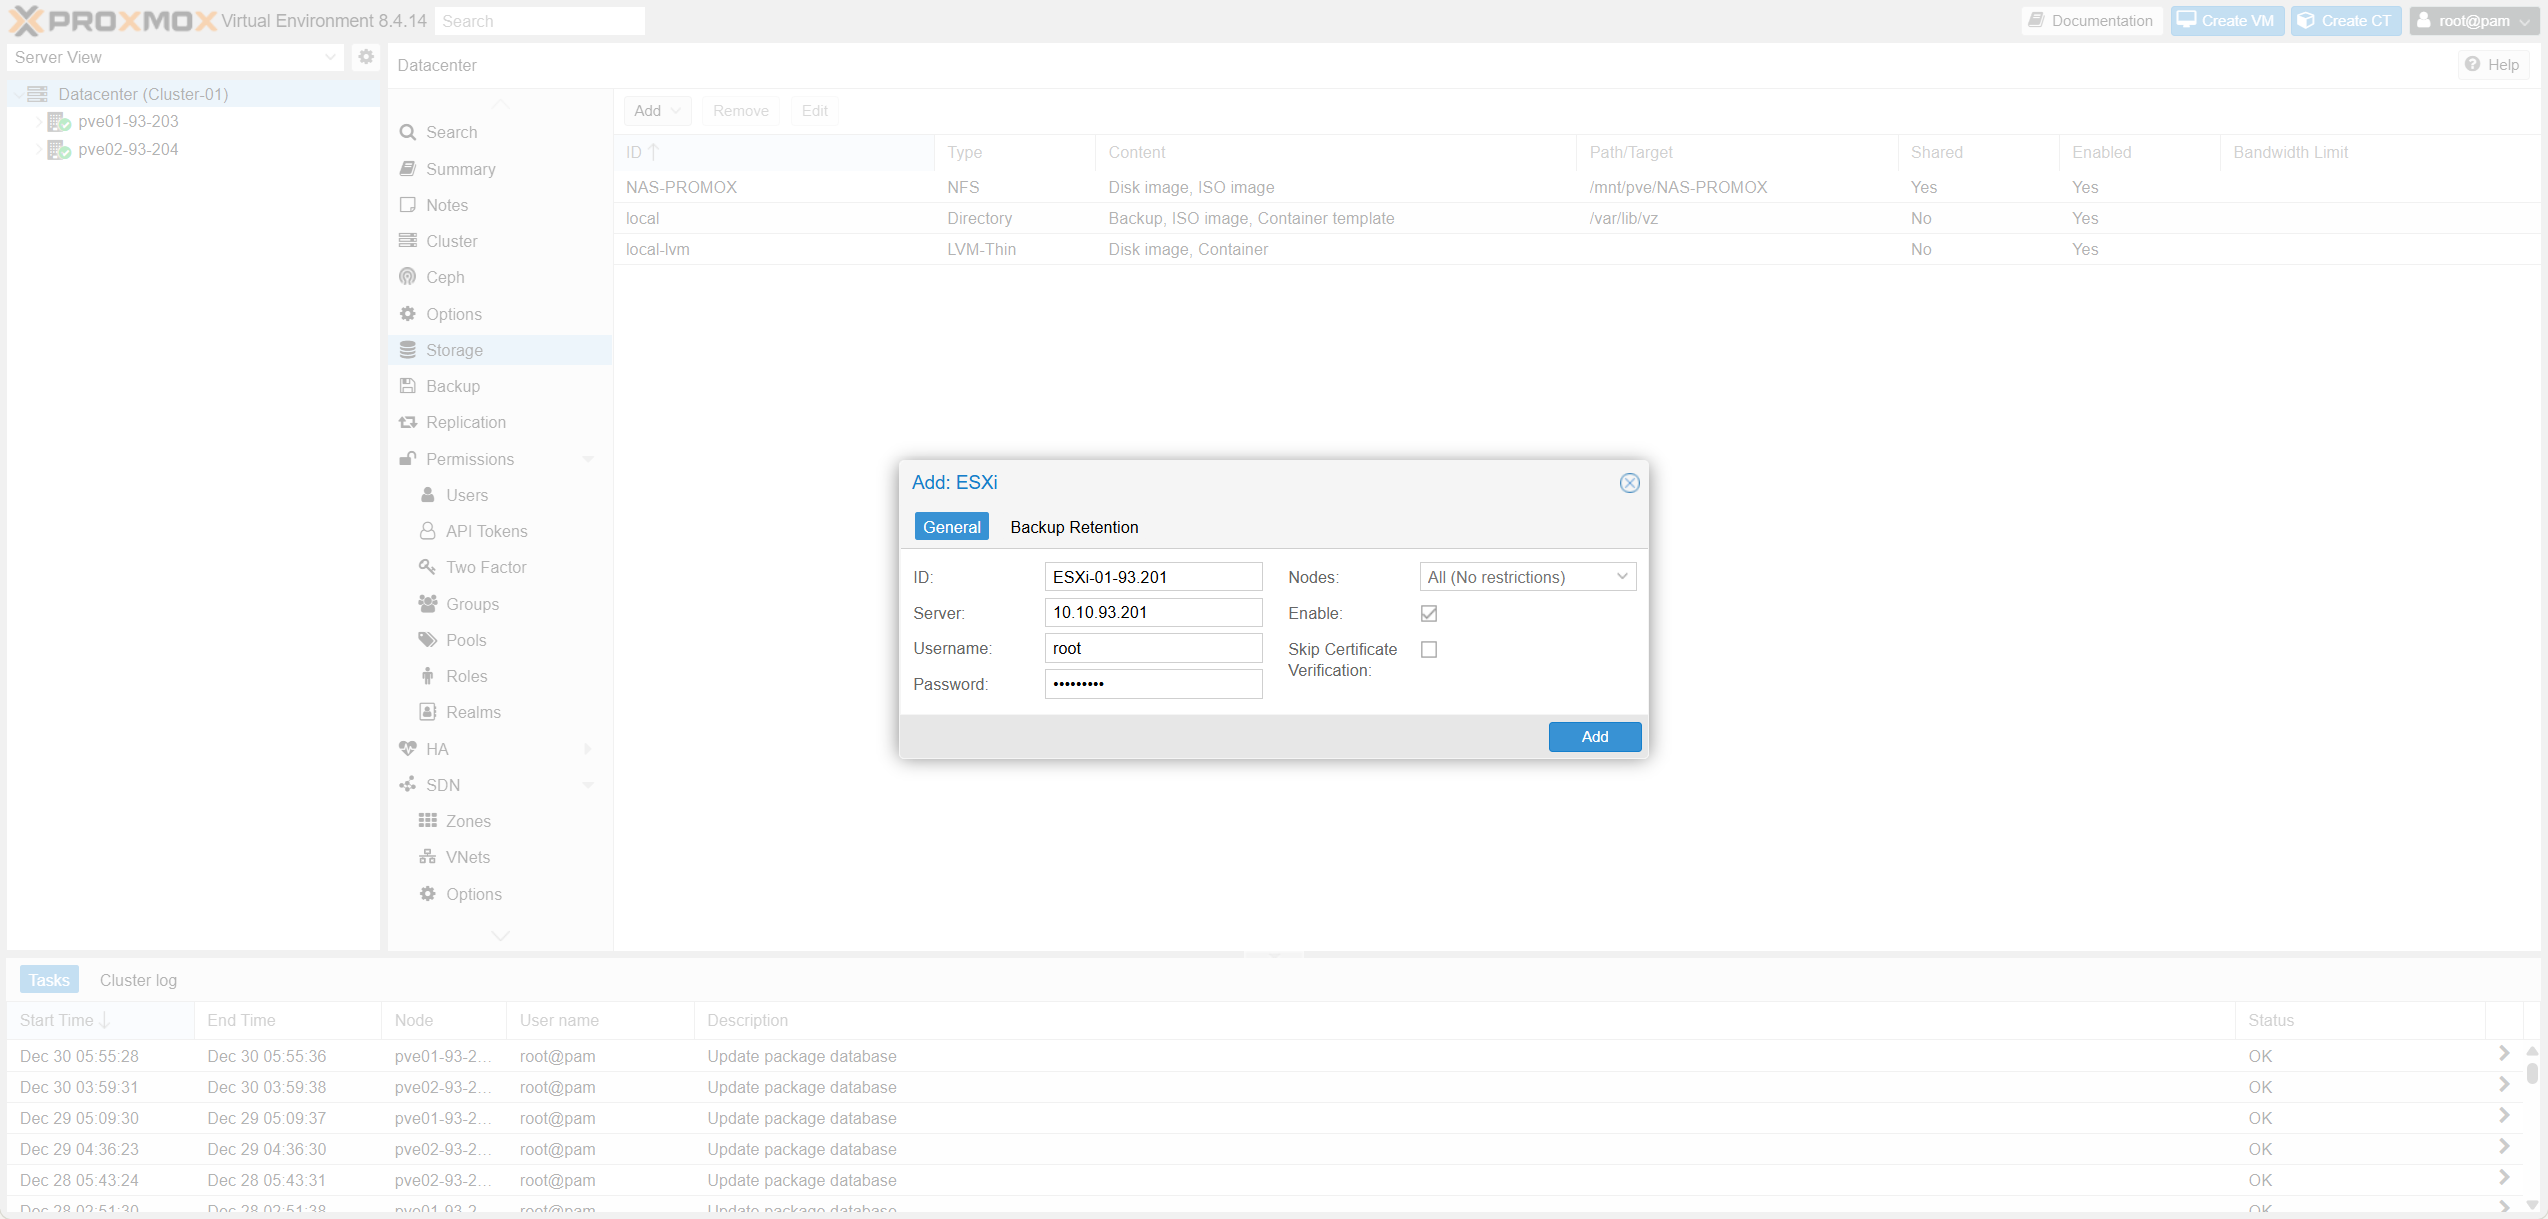
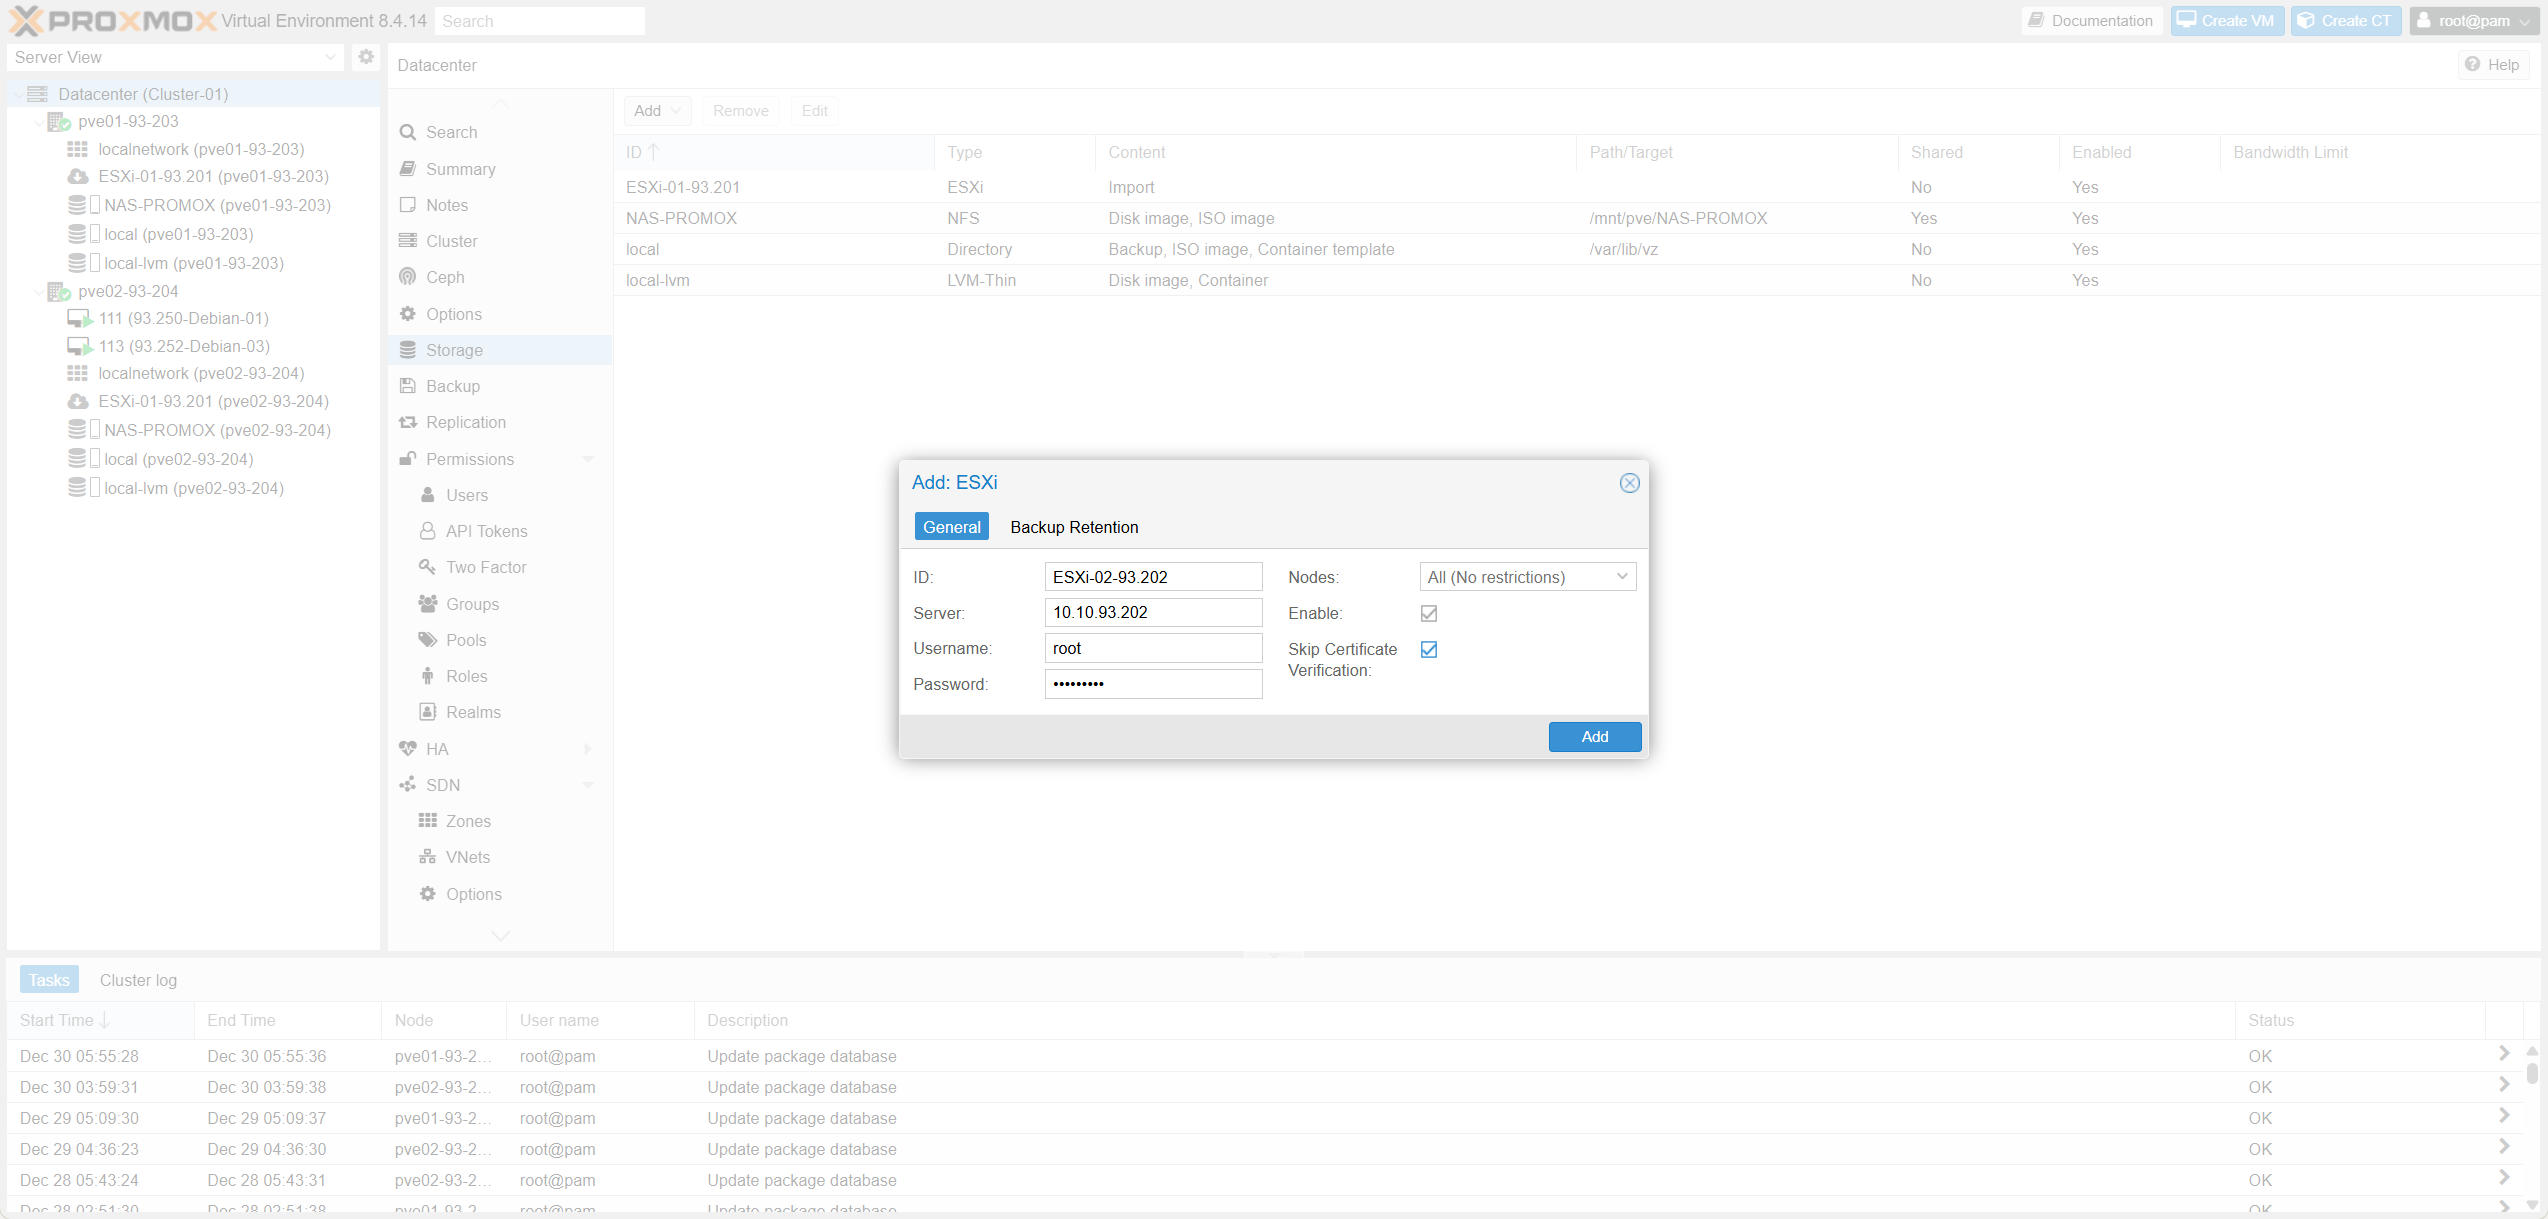
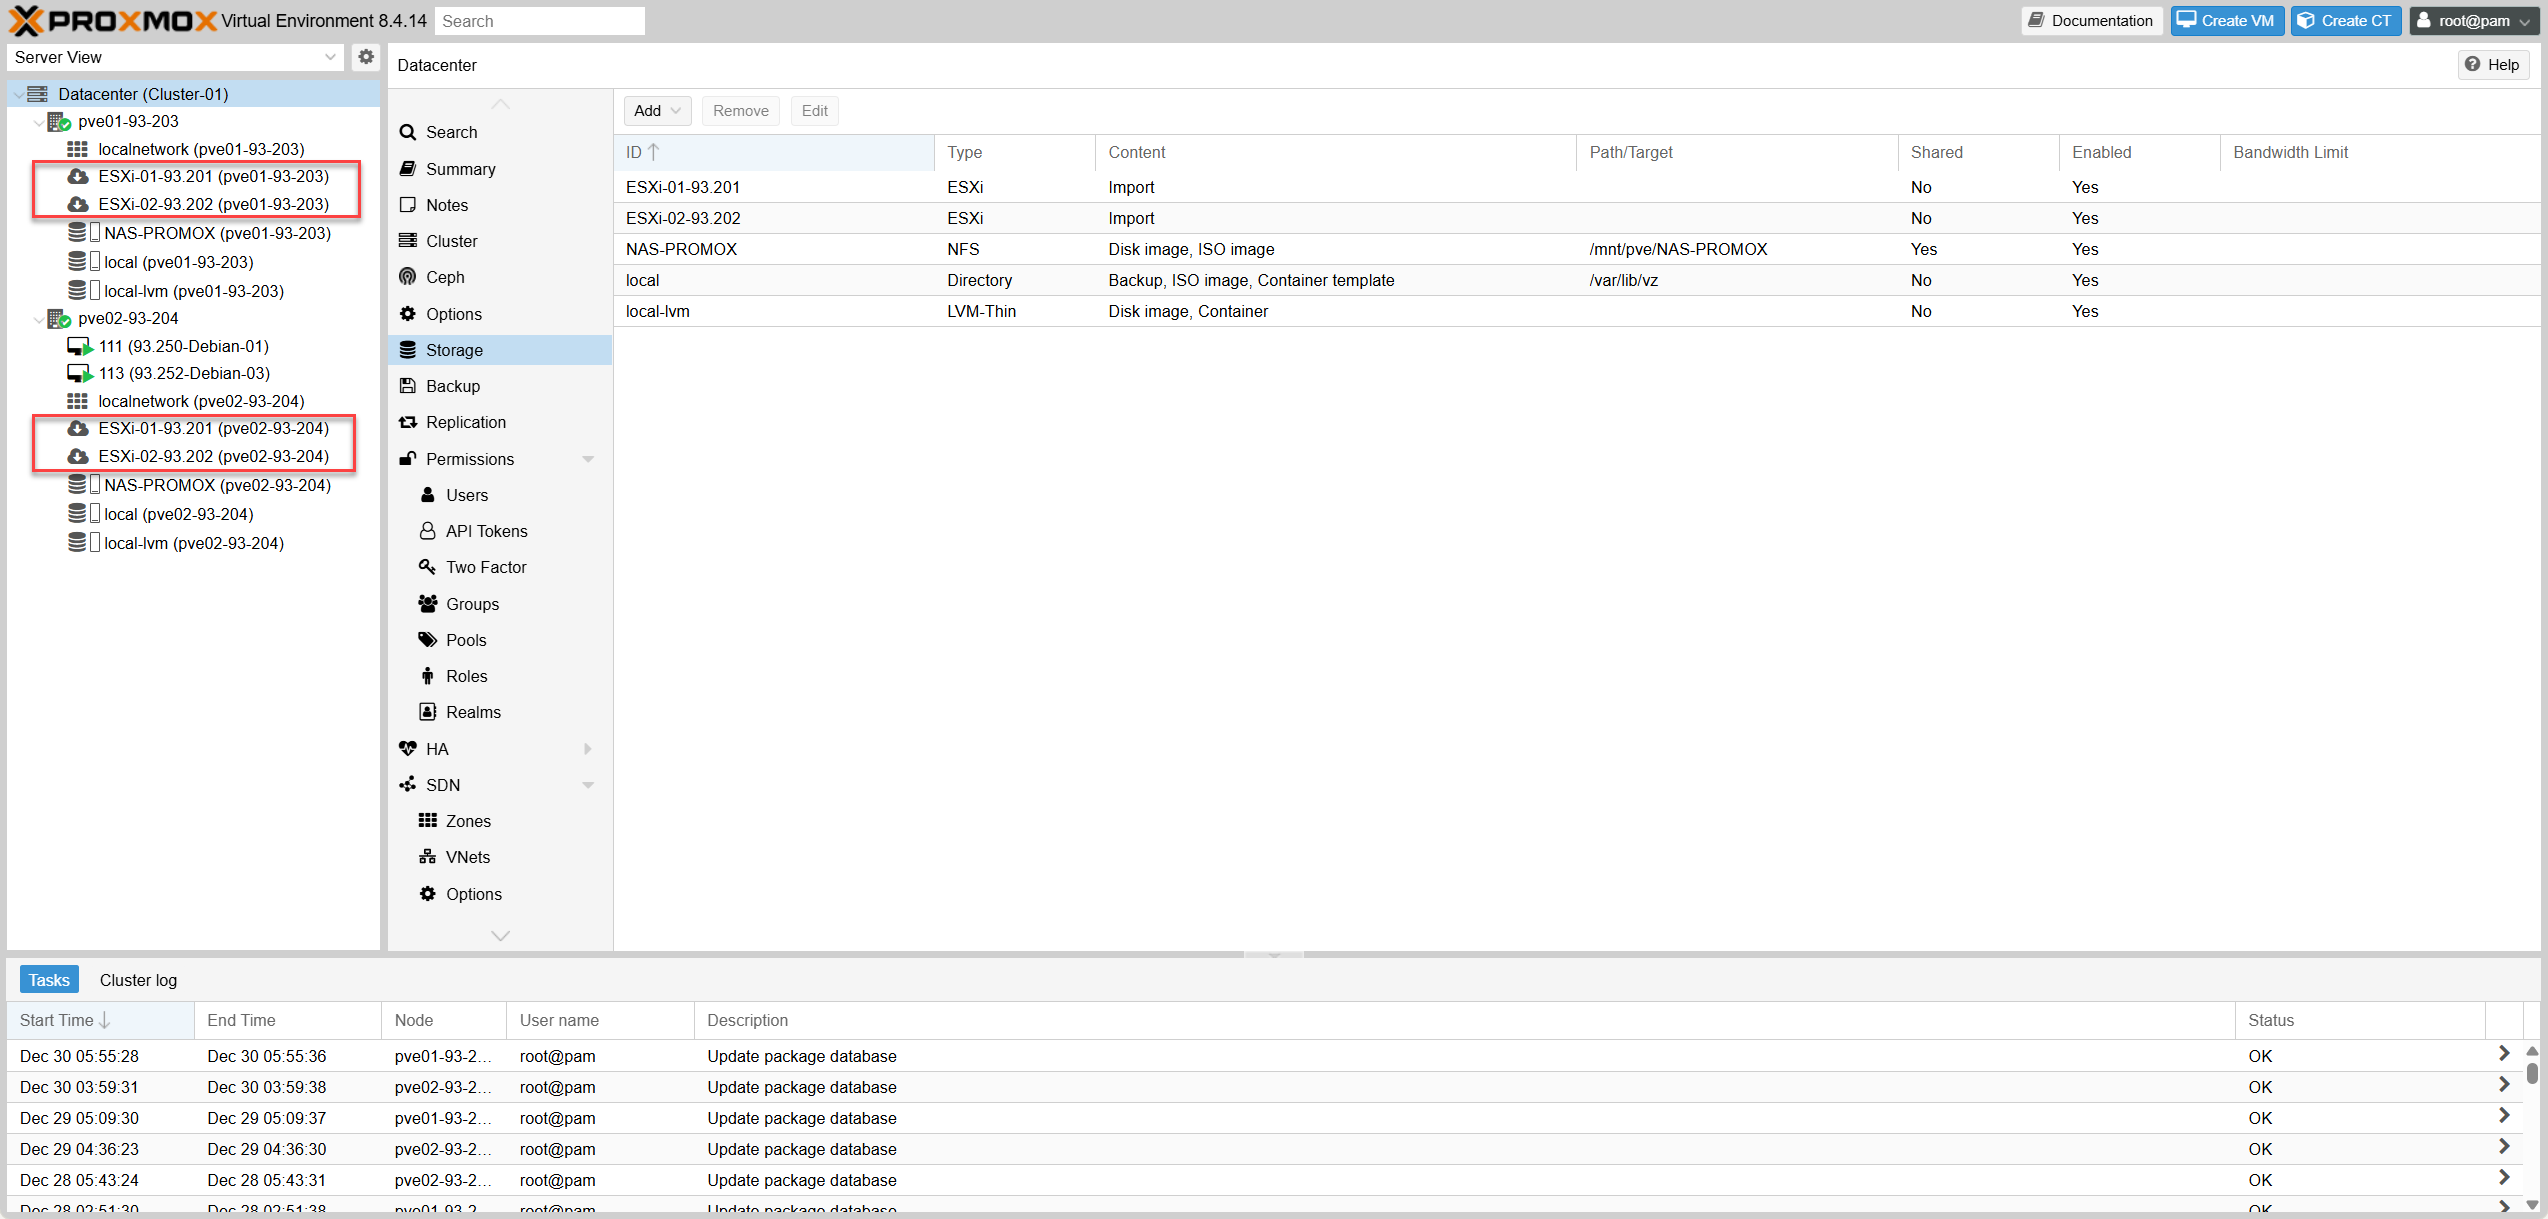
1. Add ESXi as Storage on Proxmox1. Thêm mới 2 ESXi vào mục Storage trên Proxmox
- On Proxmox Cluster, add Esxi-01 as storage.Trên Cluster Promox, add Esxi-01 vào storage.
- On Proxmox Cluster, add Esxi-02 as storage.Trên Cluster Promox, add Esxi-02 vào storage.
- Verify storage mount status in Datacenter view.Trên mục Datacenter, kiểm tra 2 storage Esxi đã được mount thành công hay chưa.
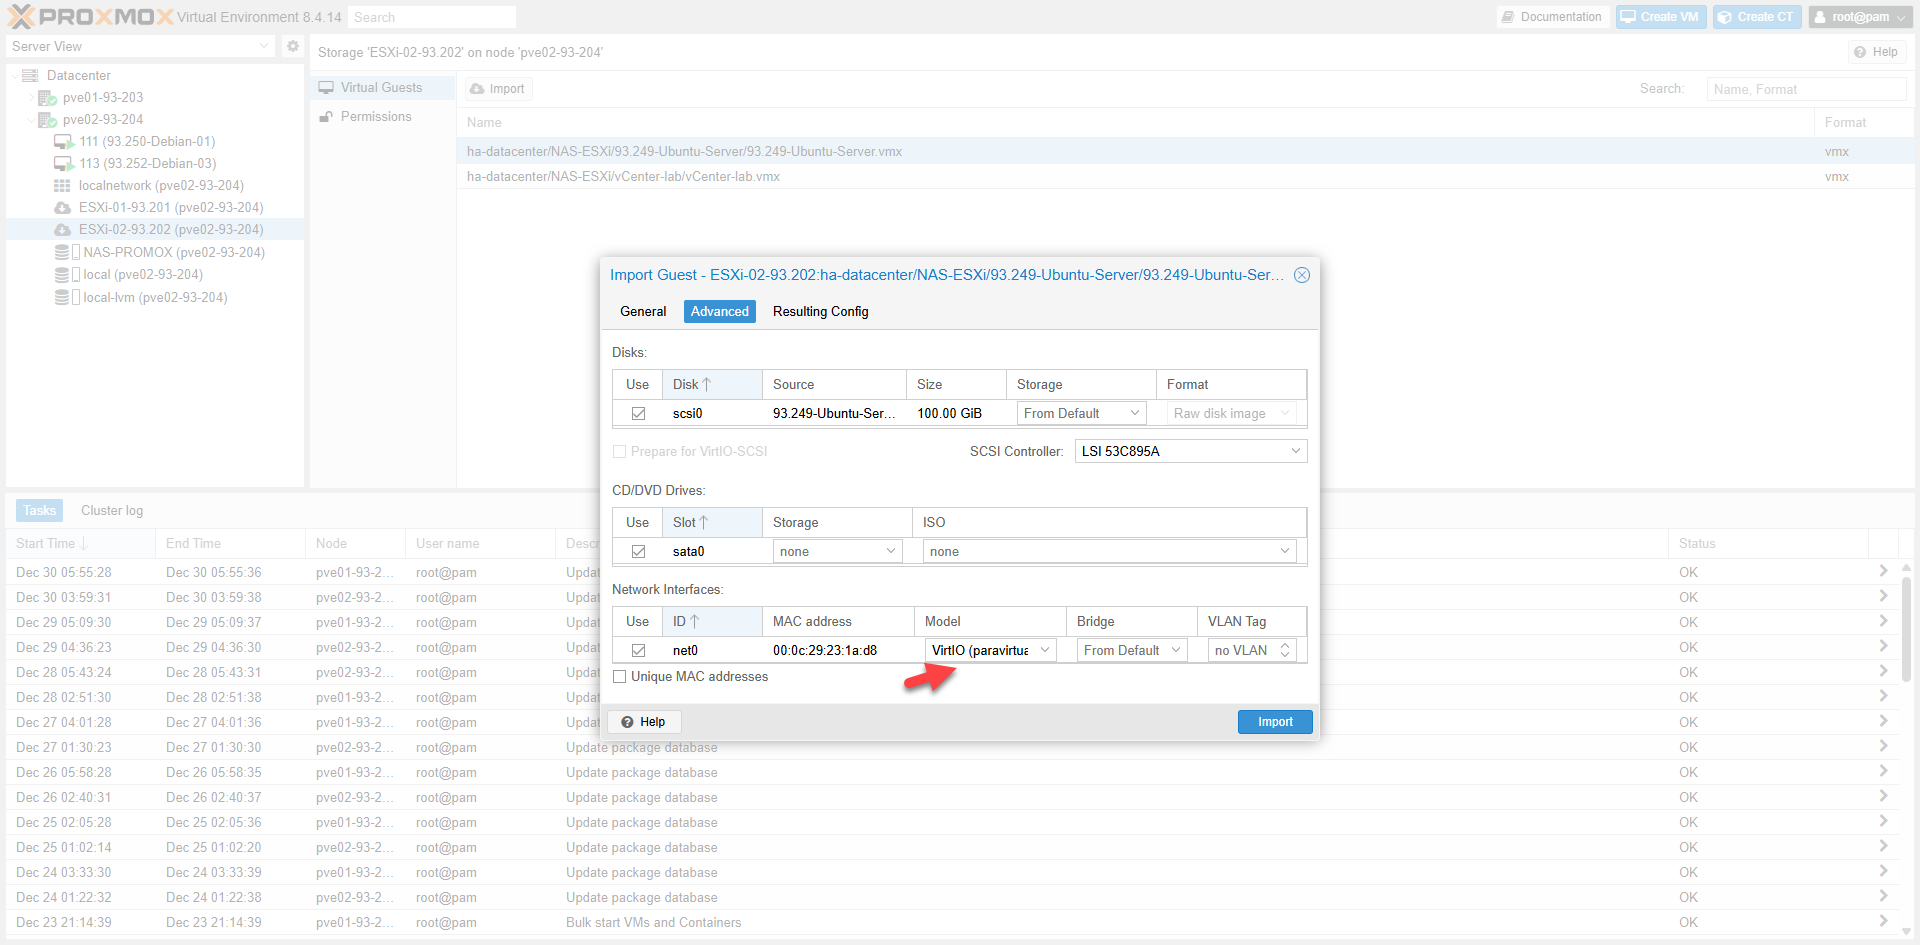
2. Select VMX & Start Import2. Chọn đúng nguồn ESXi & Start Import
Example:Ví dụ: Vm Ubuntu-93.249 tại ESXi-02-93.202
Step 1:Bước 1: Shutdown source VM.Tắt VMs cần migrate.
Step 2:Bước 2: Select .vmx file & Click Import.Chọn đúng nguồn cần Migrate (file .vmx) & Import.
Step 1:Bước 1: Shutdown source VM.Tắt VMs cần migrate.
Step 2:Bước 2: Select .vmx file & Click Import.Chọn đúng nguồn cần Migrate (file .vmx) & Import.
a. Tab General Configa. Khai báo thông tin: Tab General
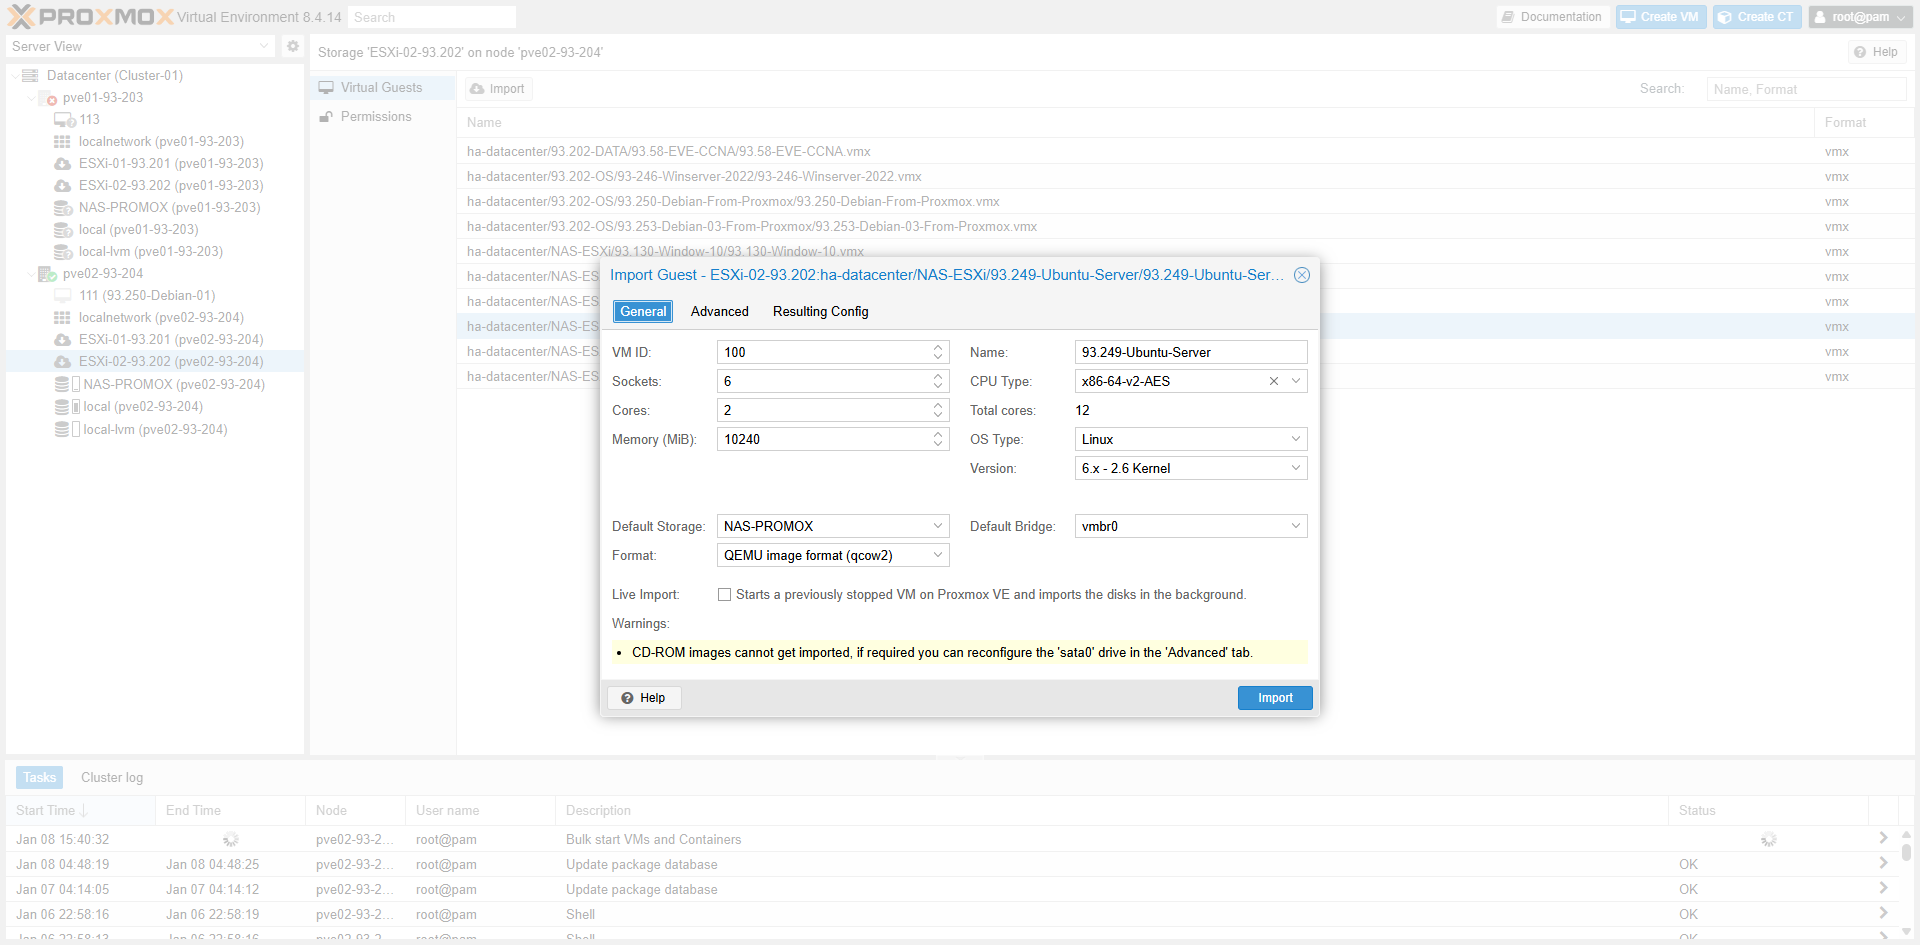
| FieldField | Technical MeaningÝ nghĩa kỹ thuật | Best PracticeBest practice production | NoteNote / Khi nào đổi |
|---|---|---|---|
| VM ID | Unique VM IDID nội bộ của VM | Use convention (e.g. 200-999)Dùng quy ước VMID theo chuẩn | Avoid duplicatesTránh trùng ID |
| Name | Display NameTên VM hiển thị | Naming: `ROLE-SITE-ENV-SEQ`Naming: `ROLE-SITE-ENV-SEQ` | Keep mapping for auditGiữ mapping để audit |
| CPU Type | CPU FlagsBaseline CPU flags | Common baseline (`x86-64-v2-AES`)Ổn định: chọn baseline chung | Avoid “illegal instruction”Tránh “illegal instruction” |
| Sockets/Cores/Memory | vCPU/RAM ConfigCấu hình vCPU/RAM | Match source VMGiữ tương đương VM gốc | Optimize after migrationTối ưu sau khi ổn định |
| OS Type/Version | Template ProfileTemplate profile | Select correct OSChọn đúng OS | Affects optimizationSai sẽ tối ưu kém |
| Default Storage | Target StorageStorage đích | HA: Shared. Perf: Local SSD/ZFS.Prod HA: shared. Prod perf: local SSD/ZFS | Wrong storage -> bottleneckChọn sai storage → bottleneck |
| Format | Disk FormatĐịnh dạng đĩa | Perf: `raw`. Flex: `qcow2`Perf: `raw`. Flex: `qcow2` | QCOW2 for snapshotsQCOW2 tiện snapshot |
| Default Bridge | Network BridgeBridge mạng | Standard bridge (`vmbr0`)Dùng bridge chuẩn hoá (`vmbr0`) | Set VLAN tag laterNhớ set VLAN tag đúng sau import |
| Live Import | Background ImportImport nền | Only if source is STOPPEDChỉ dùng khi VM nguồn đã STOP | Risk of data corruption if runningSource chạy → nguy cơ hỏng data |
b. Tab Advanced Configb. Khai báo thông tin: Tab Advanced Config
Disk SettingsCấu hình Disk
| ItemMục | Technical MeaningÝ nghĩa kỹ thuật | Best PracticeKhuyến nghị | NoteGhi chú |
|---|---|---|---|
| Use | Import this disk?Có import disk không | Always ON for OSLuôn bật cho OS disk | OFF for temp disksTắt nếu disk phụ không cần |
| Disk (scsi0) | Target Bus/SlotSlot/bus sau import | Prefer SCSIƯu tiên SCSI | Keep boot order cleanGiữ scsi0 là boot disk |
| Source | Source NameTên disk gốc | Reference onlyChỉ để tham chiếu | Do not changeKhông chỉnh |
| Size | Disk SizeDung lượng | Keep originalGiữ nguyên | Resize laterResize sau khi ổn định |
| Storage | Target DatastoreNơi chứa | Shared/Local based on TierShared/Local tuỳ tier | “From Default” is OK“From Default” là OK |
| Format | Image TypeKiểu disk image | Perf: Raw. Flex: Qcow2Perf: Raw. Flex: Qcow2 | Raw for DB/VoIPRaw cho hiệu năng cao |
| SCSI Controller | EmulationEmulation type | VirtIO-SCSI (Linux/Win+Driver)VirtIO-SCSI (Linux/Win+Driver) | LSI is slowerLSI mặc định chạy được nhưng chậm |
| Prepare for VirtIO | NormalizeChuẩn hoá | ON for LinuxBật cho Linux | Win needs driver firstWindows cần driver trước |
NIC SettingsCấu hình NIC
| ItemMục | Technical MeaningÝ nghĩa kỹ thuật | Best PracticeKhuyến nghị | NoteGhi chú |
|---|---|---|---|
| Use | Import NIC?Có import NIC không | ON for primaryBật NIC chính | Cleanup others laterDọn dẹp NIC thừa sau |
| MAC address | Keep Source MACGiữ MAC gốc | Keep if licensedGiữ nếu license bind MAC | Generate new if allowedTạo mới nếu được phép |
| Model | NIC DriverLoại Driver NIC | VirtIO (Linux). E1000 (Win)Linux: VirtIO. Windows: VirtIO/E1000 | Change to VirtIO for perfNên đổi sang VirtIO cho Ubuntu |
| Bridge | Network BridgeBridge mạng | Standard `vmbr0`Chuẩn hoá `vmbr0` | “From Default” OKLấy từ tab General |
| VLAN Tag | 802.1Q TagTag VLAN | Set correct ID (10/20…)Set đúng VLAN ID (10/20…) | Bridge must be VLAN-awareBridge phải là trunk VLAN-aware |
| Unique MAC | Generate New MACTạo MAC mới | ON for clonesBật khi clone nhiều | OFF for bound appsTắt nếu app bind MAC |
5. Post-import Checks5. Lưu ý sau Import
- Click Import and wait for completion.Nhấn Import và chờ quá trình hoàn tất.
- Update NIC settings after migration to restore network.Đổi lại card mạng VMs sau khi migrate để up network.
*** Important:*** Lưu ý quan trọng:
+ This is copy-based migration (full-clone).Đây là copy-based migration (full-clone).
+ Source VM on ESXi remains untouched.VM gốc trên ESXi vẫn còn nguyên, không tự xoá.
+ Only delete source after verification.Chỉ xoá trên ESXi sau khi đã test dịch vụ hoàn tất.
+ Backup immediately after successful migration.Nên backup 1 bản ngay sau khi migrate ổn định.
IV. Test Migration Proxmox → ESXi (Cold Migration) IV. Test Migration chiều Proxmox → ESXi
1. Shutdown & Backup VM1. Shutdown & Backup VM (Cold Migration)

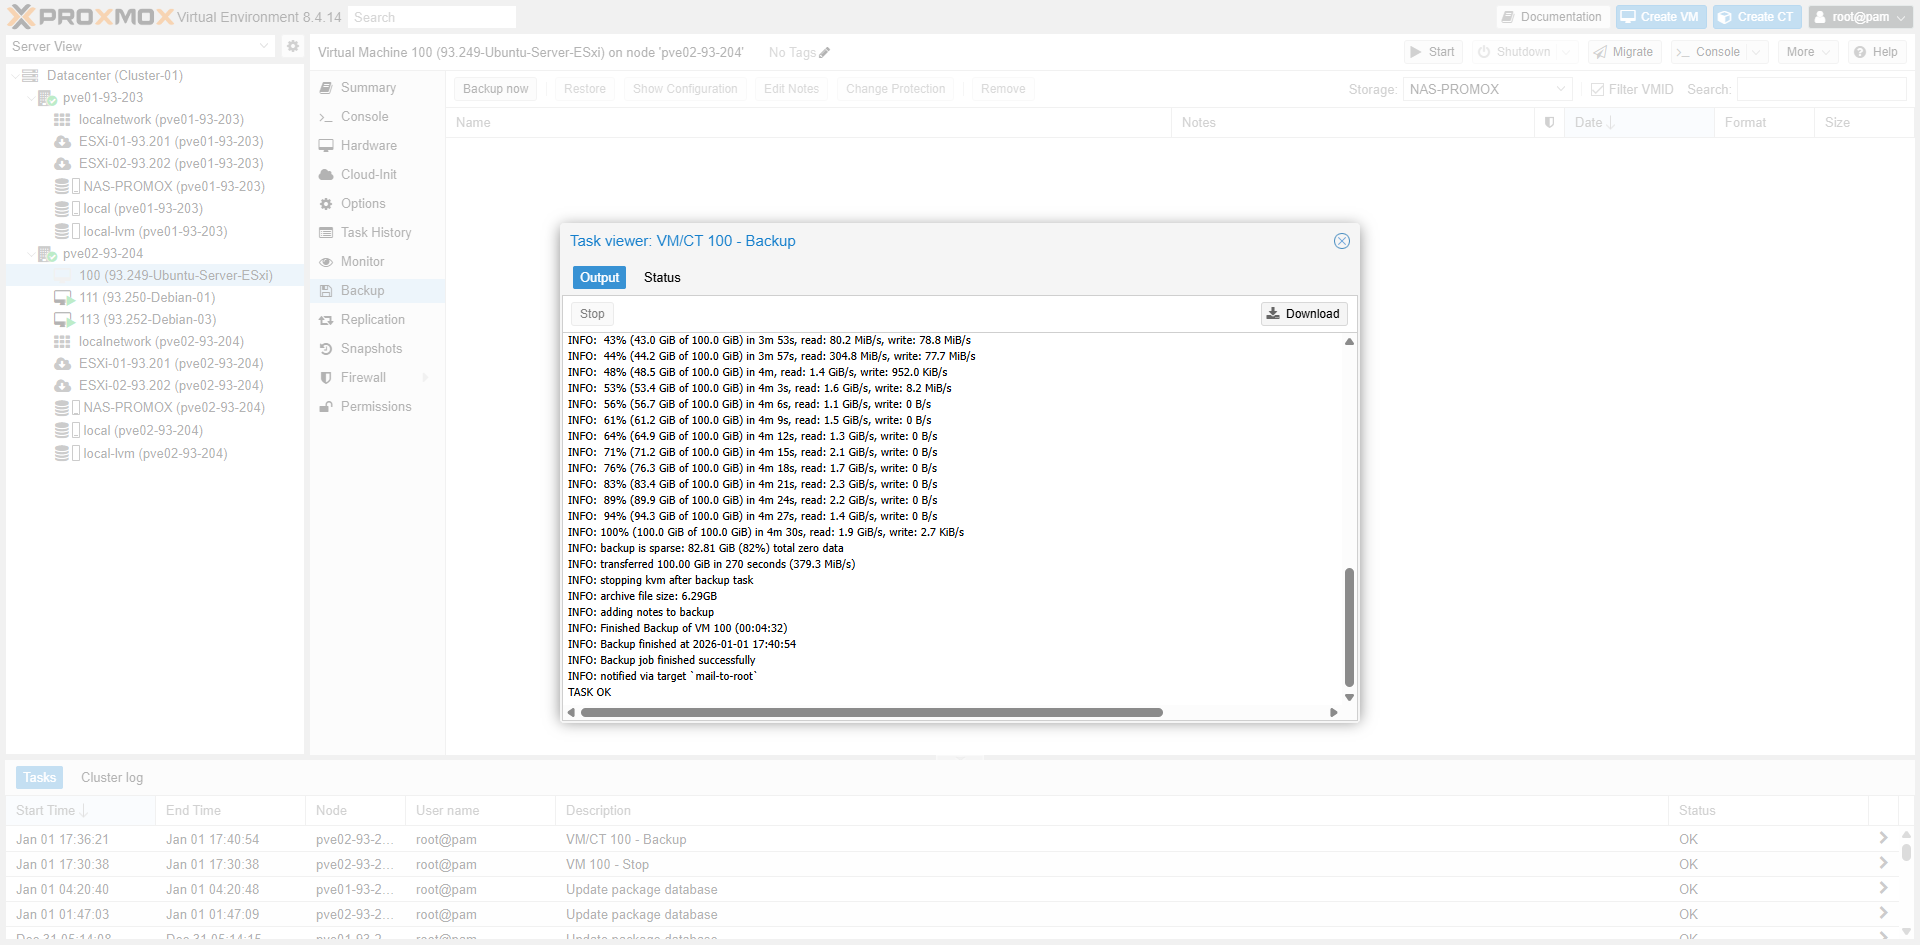
a. Backup Mode Tablea. Bảng mô tả Backup Mode
| Mode | Running?VM đang chạy? | Downtime | ConsistencyTính consistent | UsageKhi nào dùng |
|---|---|---|---|---|
| Snapshot | ✅ | ~0 | Medium -> GoodTB -> Tốt | Daily BackupBackup hàng ngày |
| Stop | ✅ | ✅ | ✅ BestTốt nhất | Cold MigrationCold migration |
| Suspend | ✅ | ShortNgắn | GoodTốt | Rarely usedÍt dùng |
b. Compression Tableb. Bảng mô tả Compression
| Compression | SpeedTốc độ | RatioTỷ lệ nén | RecommendationKhuyến nghị |
|---|---|---|---|
| ZSTD | ✅ FastNhanh | ✅ GoodTốt | ✅ Default RecommendedKhuyến nghị mặc định |
| LZO | ✅ Very FastRất nhanh | MediumTB | Speed priorityKhi cần cực nhanh |
| GZIP | SlowChậm | GoodTốt | Not preferredKhông ưu tiên |
2. Extract & Convert to VMDK2. Giải nén & extract & convert file backup ra VMDK
# a. Verify backup path / Kiểm tra file backup
root@pve02-93-204:~# ls -lh /mnt/pve/NAS-PROMOX/dump/ | grep vzdump-qemu-100
-rw-r--r-- 1 root root 5.3K Jan  1 17:40 vzdump-qemu-100-2026_01_01-17_36_22.log
-rwxrwxrwx 1 root root 6.3G Jan  1 17:40 vzdump-qemu-100-2026_01_01-17_36_22.vma.zst

# b. Create working dir / Tạo thư mục làm việc
root@pve02-93-204:~# mkdir -p /root/p2v/vm100
root@pve02-93-204:~# cd /root/p2v/vm100

# c. Decompress / Giải nén .vma.zst
root@pve02-93-204:~/p2v/vm100# zstd -d /mnt/pve/NAS-PROMOX/dump/vzdump-qemu-100...vma.zst -o vm100.vma
root@pve02-93-204:~/p2v/vm100# ls -lh vm100.vma
-rwxrwxrwx 1 root root 18G Jan  1 17:40 vm100.vma

# d. Extract RAW disk / Extract ra file disk RAW
root@pve02-93-204:~/p2v/vm100# rm -rf extract
root@pve02-93-204:~/p2v/vm100# vma extract vm100.vma -v extract
DEVINFO extract/tmp-disk-drive-scsi0.raw 107374182400
progress 100% (read 107374182400 bytes, duration 235 sec)

# e. Convert RAW -> streamOptimized VMDK
root@pve02-93-204:~/p2v/vm100# qemu-img convert -p -f raw -O vmdk -o subformat=streamOptimized \
  extract/disk-drive-scsi0.raw vm100-stream.vmdk
root@pve02-93-204:~/p2v/vm100# ls -lh vm100-stream.vmdk
-rw-r--r-- 1 root root 6.6G Jan  6 11:16 vm100-stream.vmdk
3. Upload to ESXi3. Import disk vào vCenter/ESXi
# Method 1: Download & Upload via vCenter Datastore Browser
# Method 2: SCP directly / SCP trực tiếp

# a. On ESXi / Trên ESXi
[root@localhost:~] mkdir -p /vmfs/volumes/NAS-ESXi/Proxmox-to-ESxi

# b. On Proxmox / Trên Proxmox
root@pve02-93-204:~# scp /root/p2v/vm100/vm100-stream.vmdk root@10.10.93.201:/vmfs/volumes/NAS-ESXi/Proxmox-to-ESxi/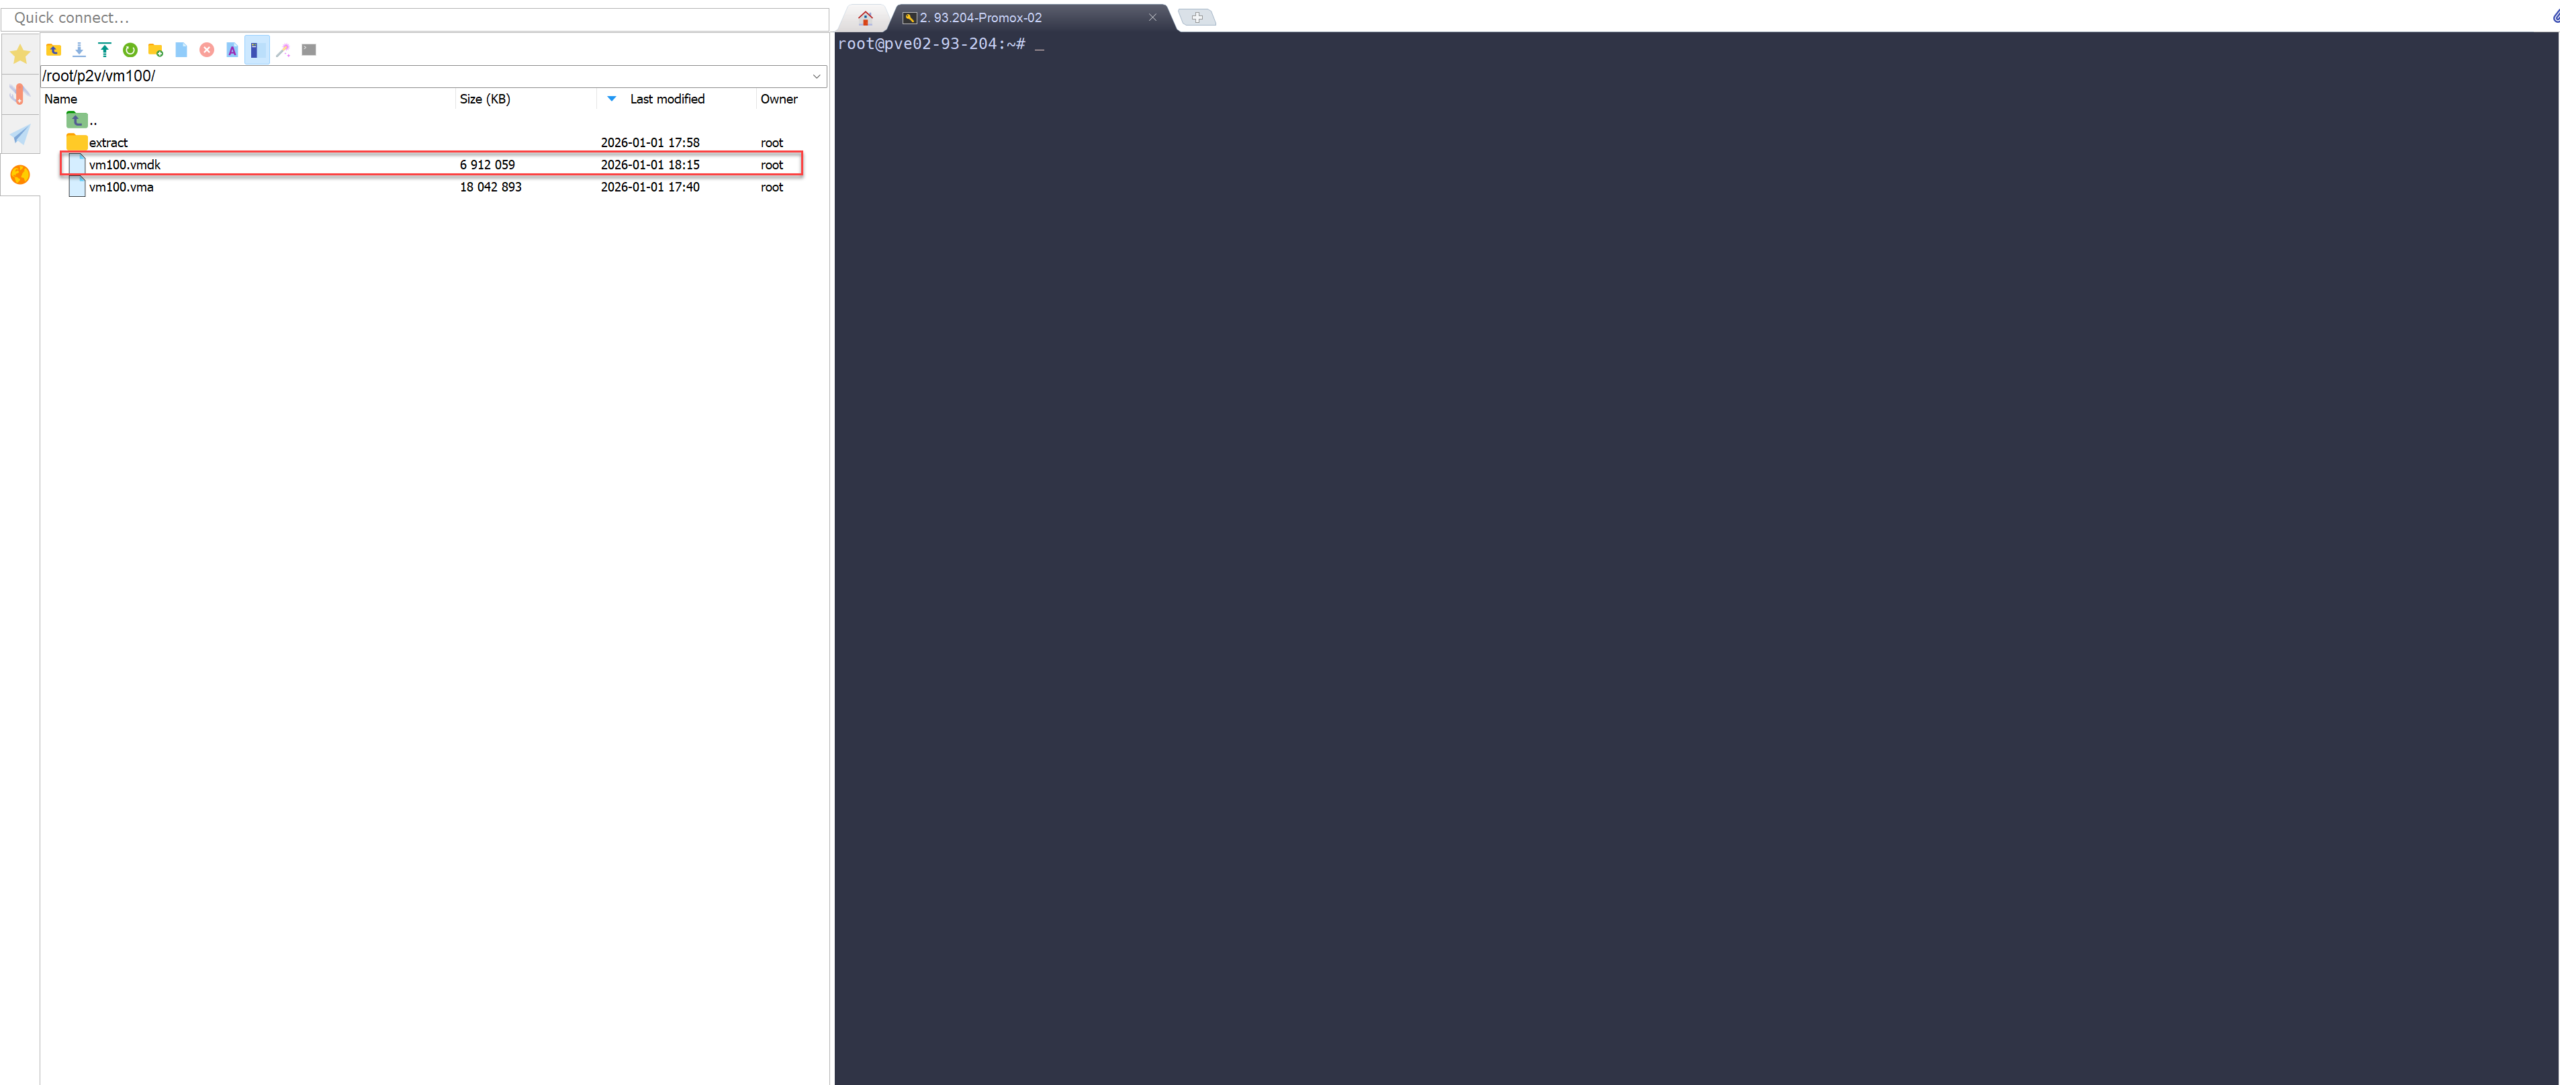
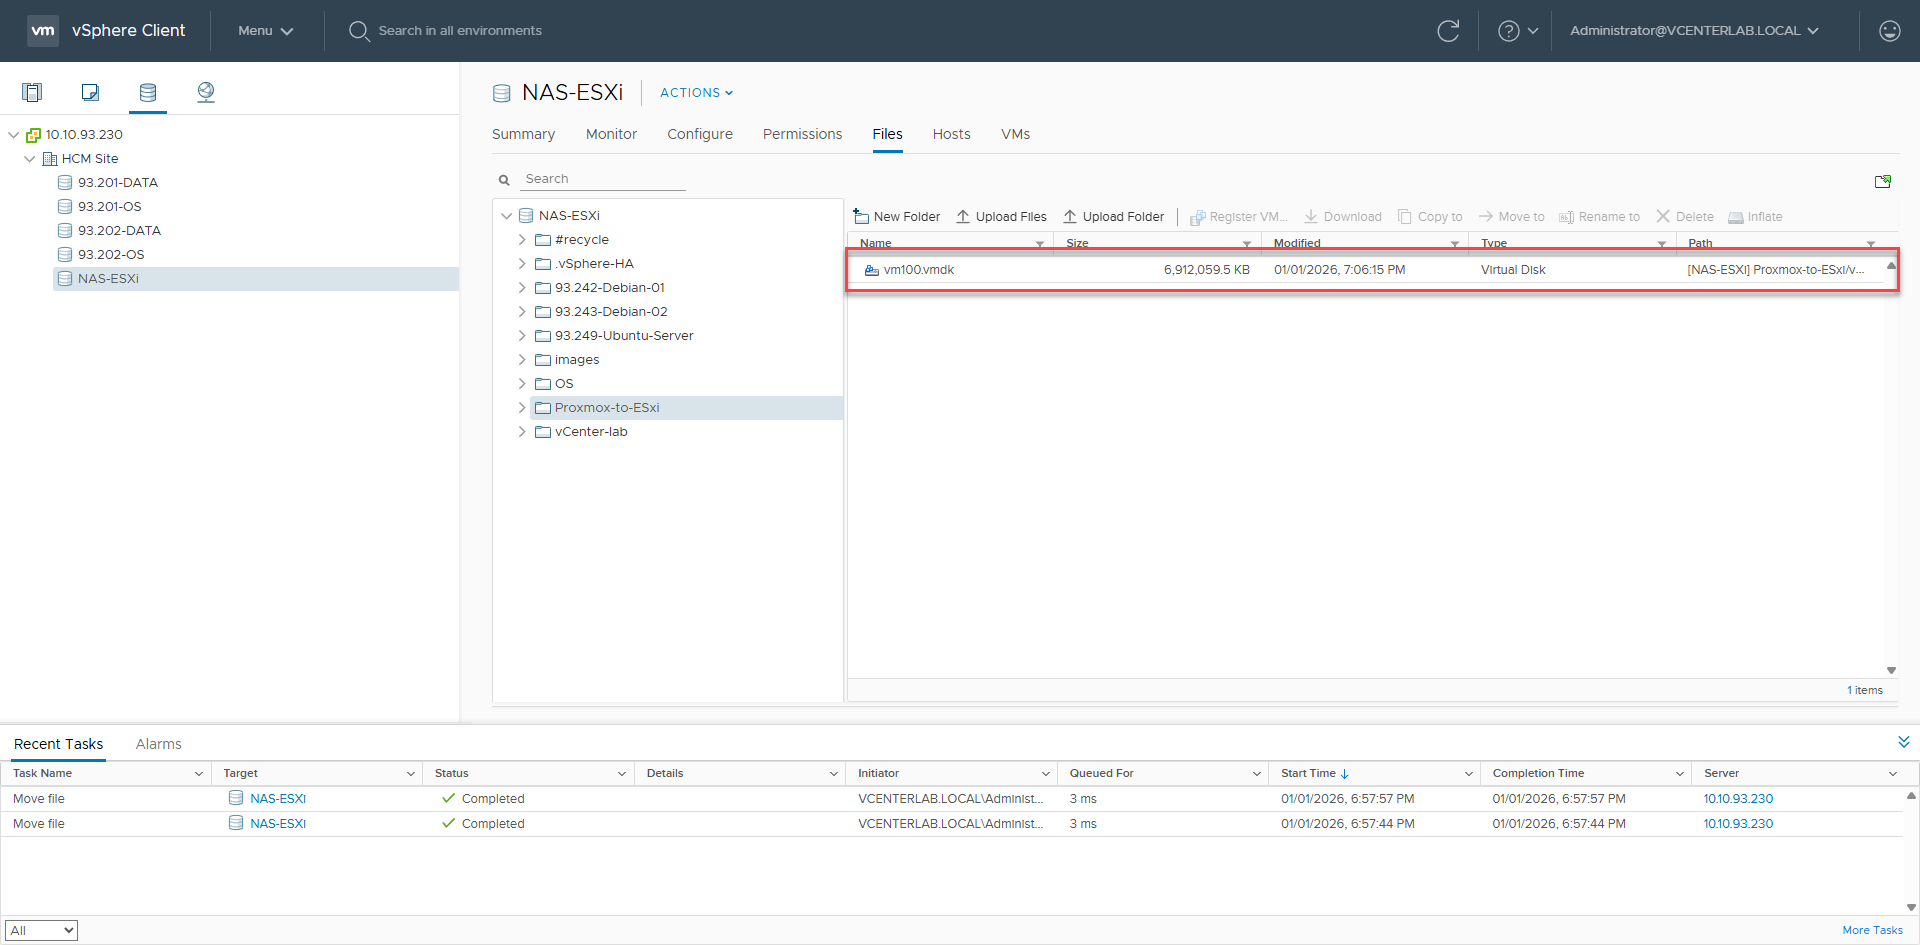
4. Convert to VMFS (On ESXi)4. Trên ESXi convert sang VMDK chuẩn VMFS
Critical:Quan trọng: streamOptimized files cannot boot. Must convert to VMFS.File streamOptimized không boot được. Bắt buộc convert sang VMFS.
[root@localhost:~] cd /vmfs/volumes/NAS-ESXi/Proxmox-to-ESxi/
[root@localhost:...] vmkfstools -i vm100-stream.vmdk vm100-esxi.vmdk -d thin
Destination disk format: VMFS thin-provisioned
Cloning disk 'vm100-stream.vmdk'...
Clone: 100% done.
# Verify / Kiểm tra
[root@localhost:...] ls -lh | egrep 'vm100-(stream|esxi)'
-rwxrwxrwx 1 root root 100.0G Jan 6 04:26 vm100-esxi-flat.vmdk
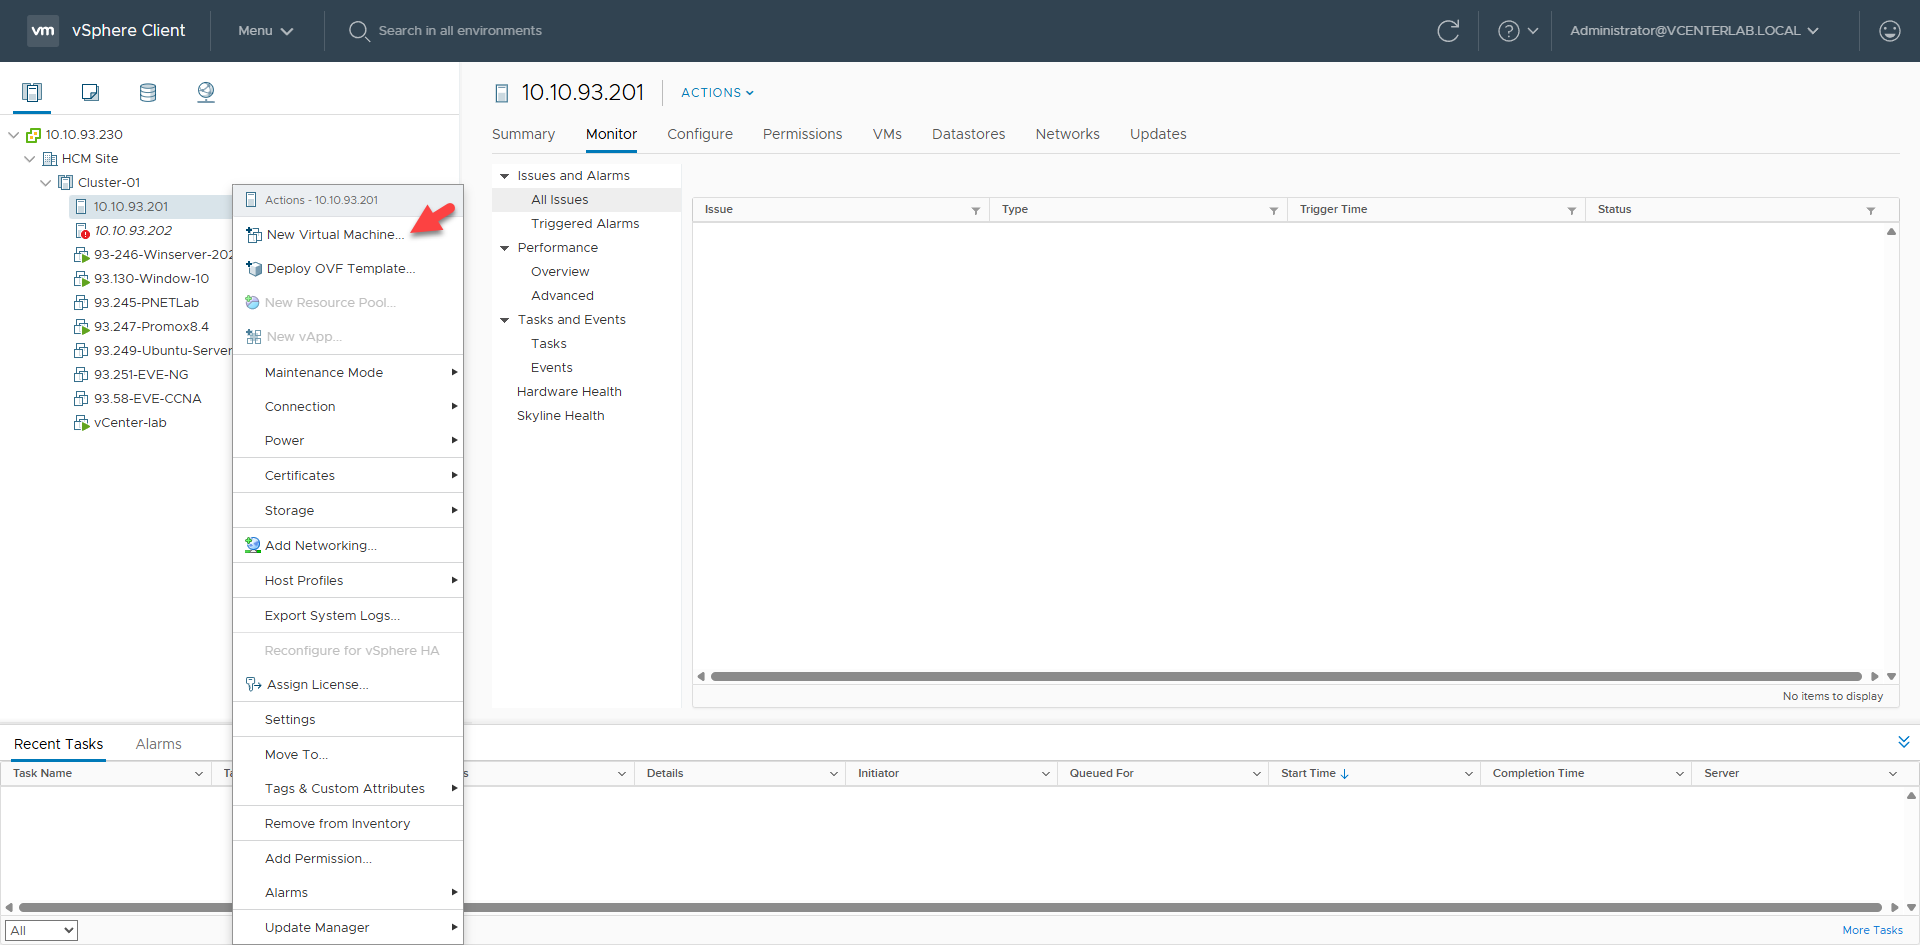
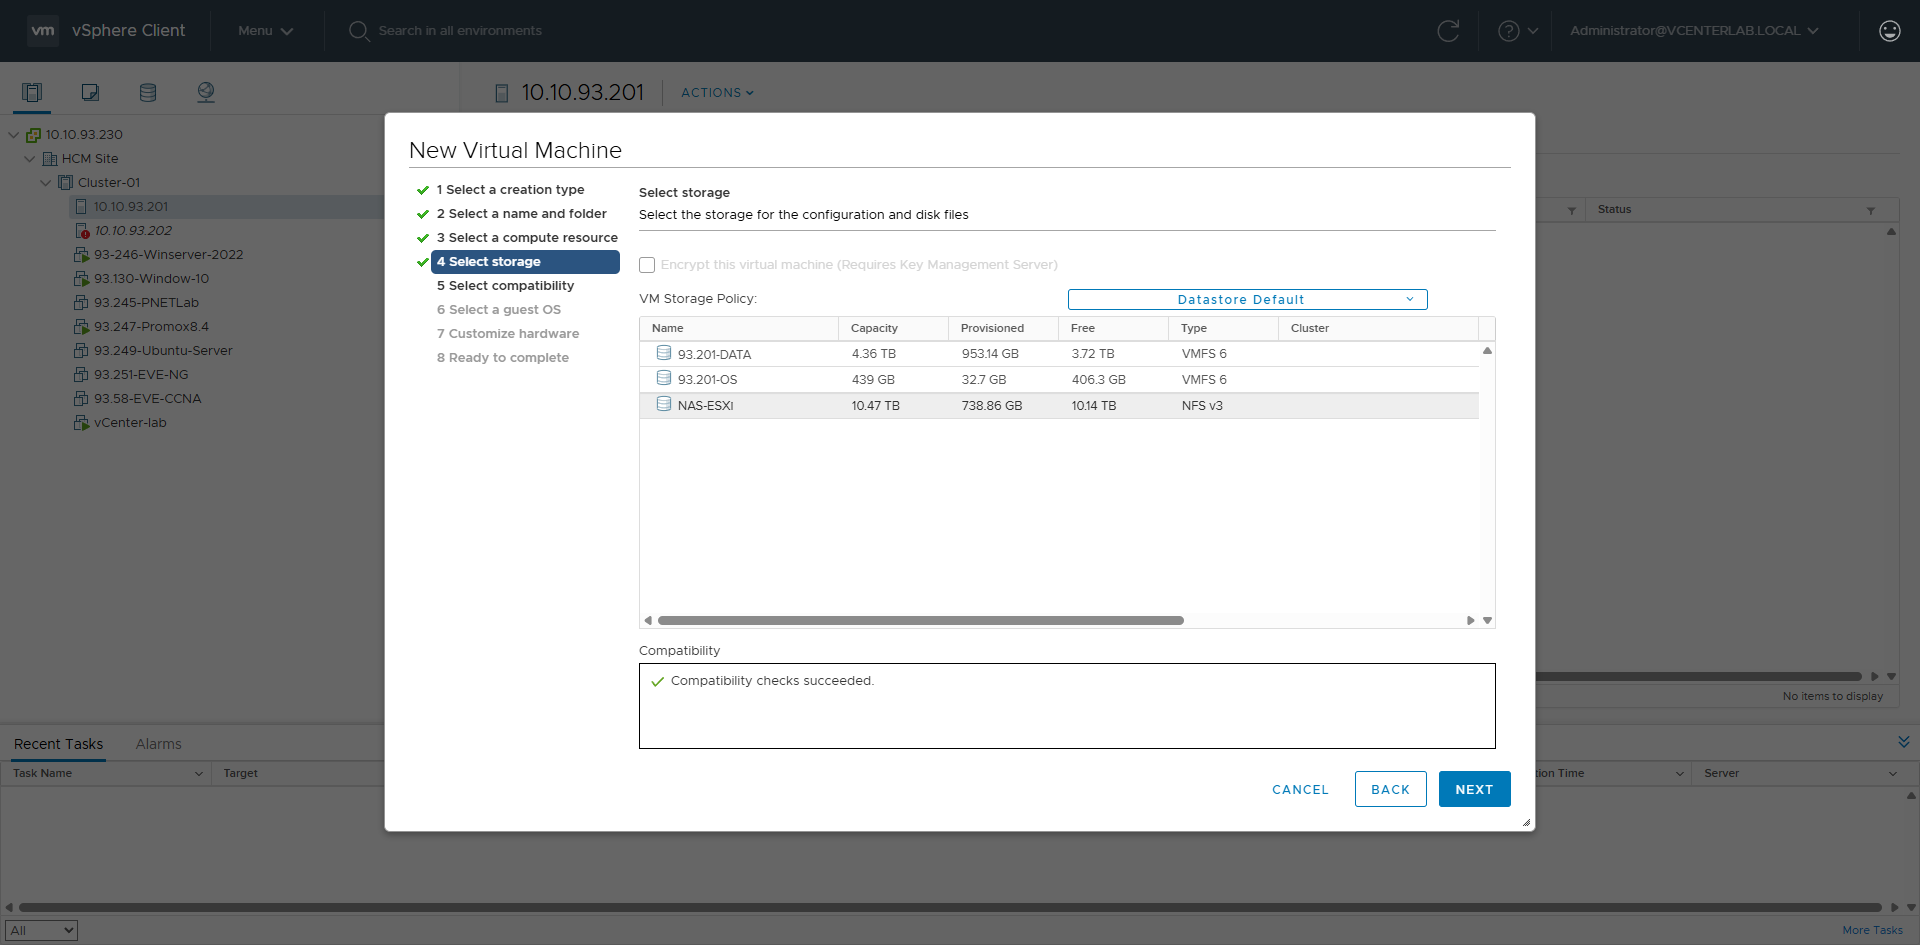
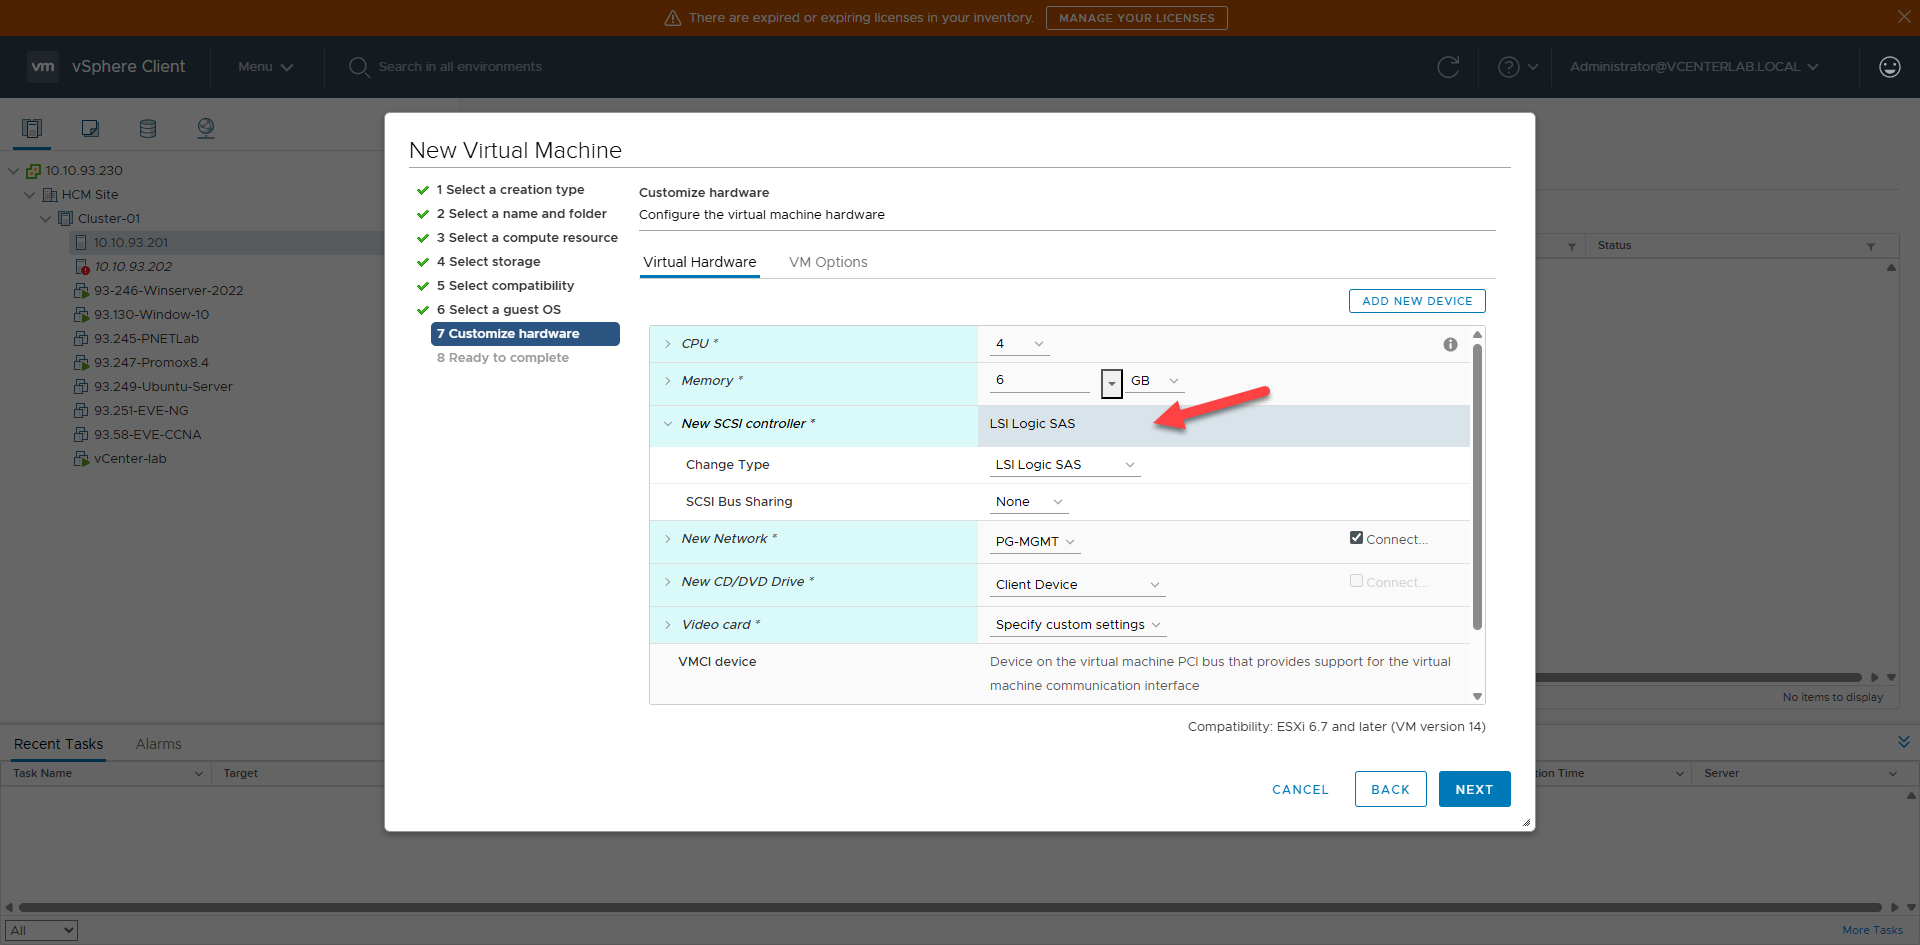
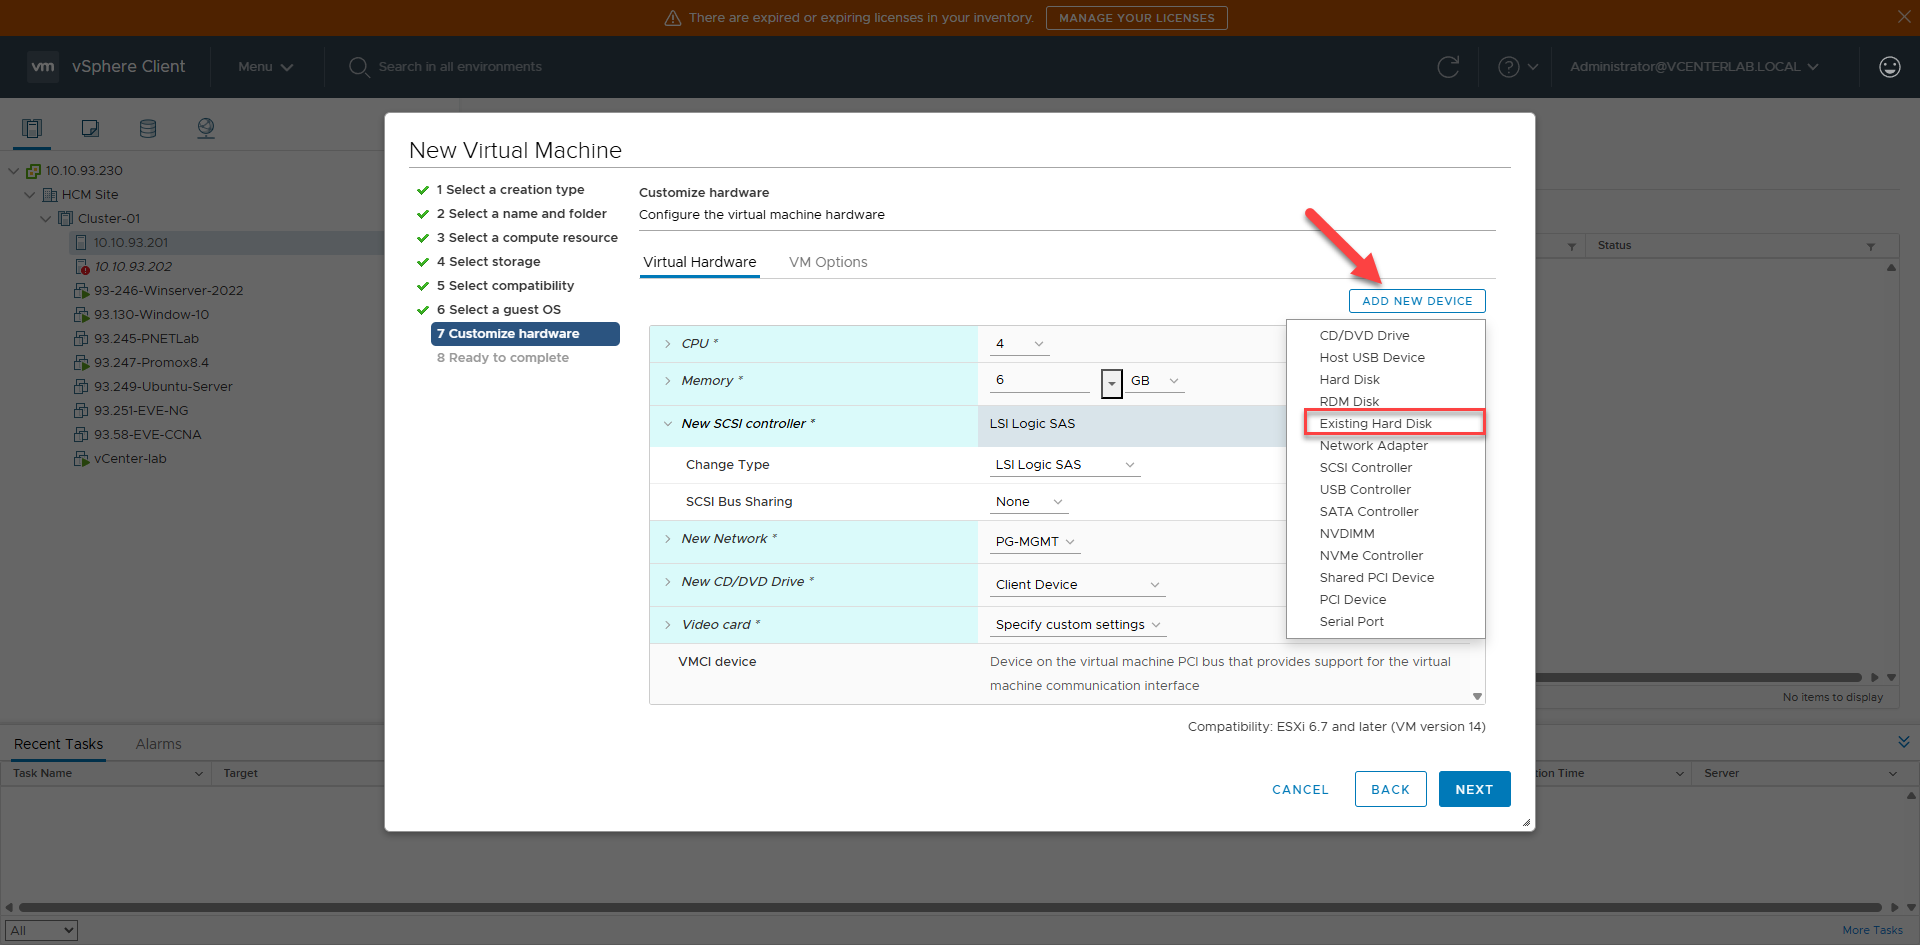
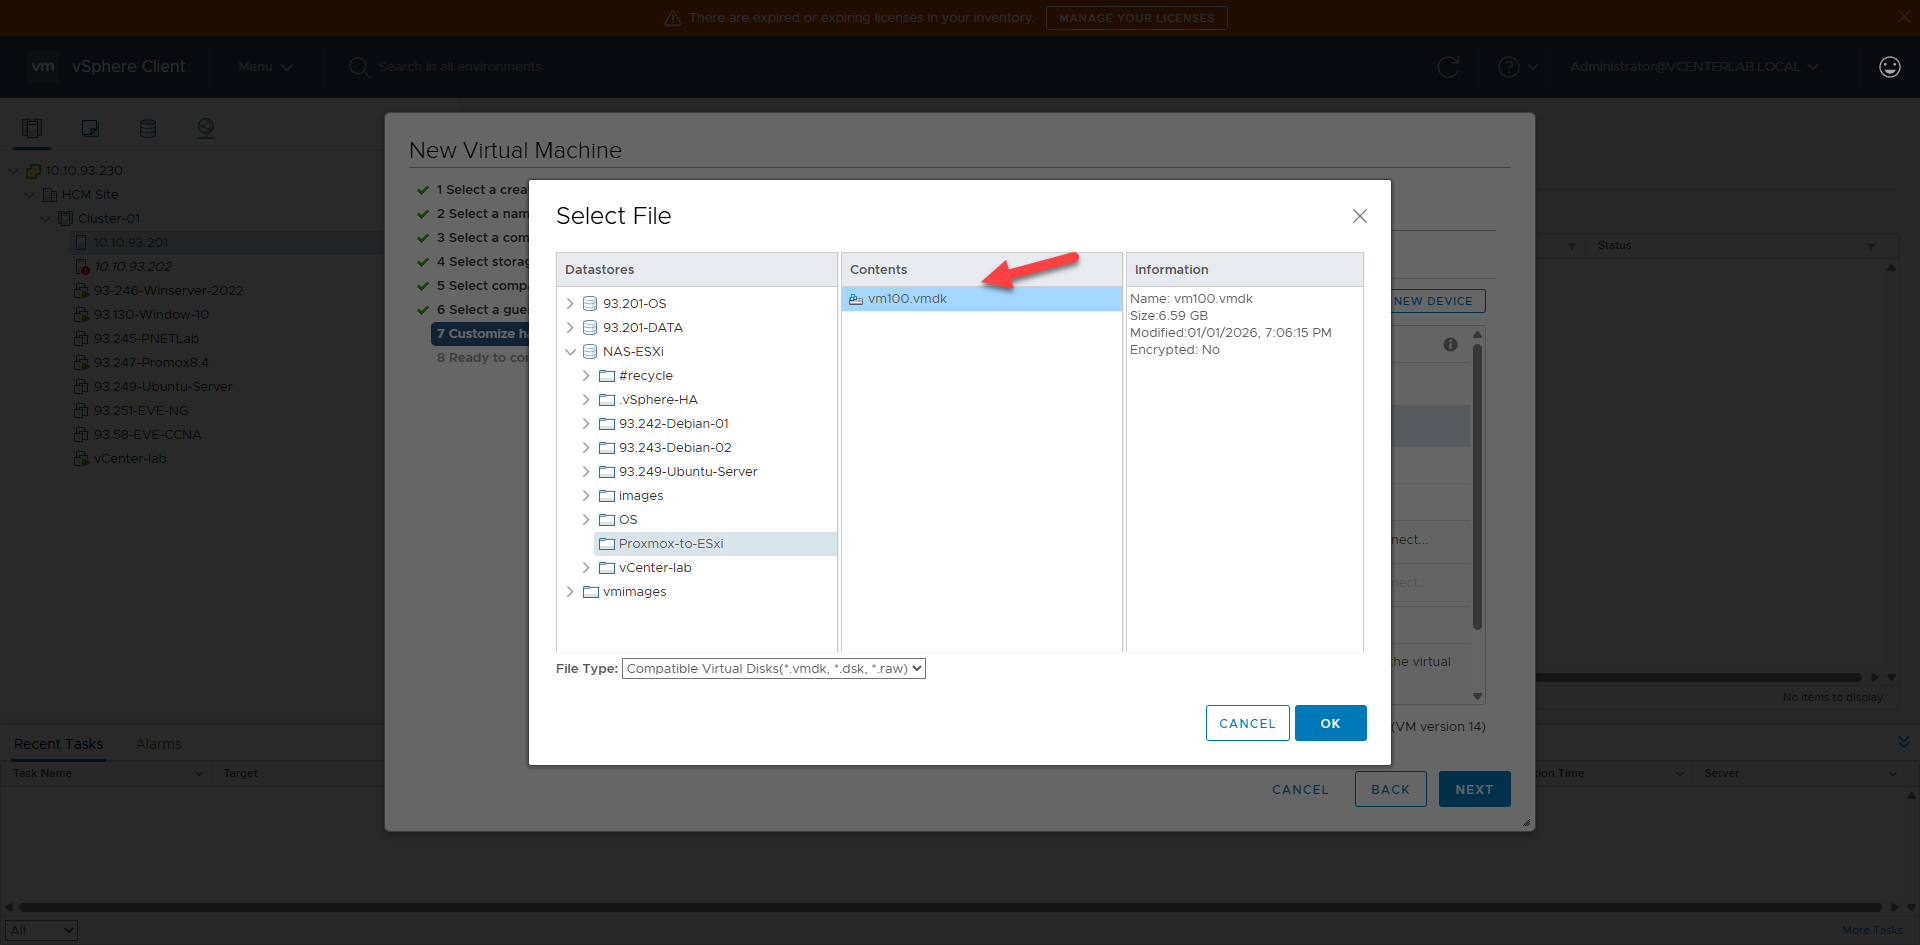
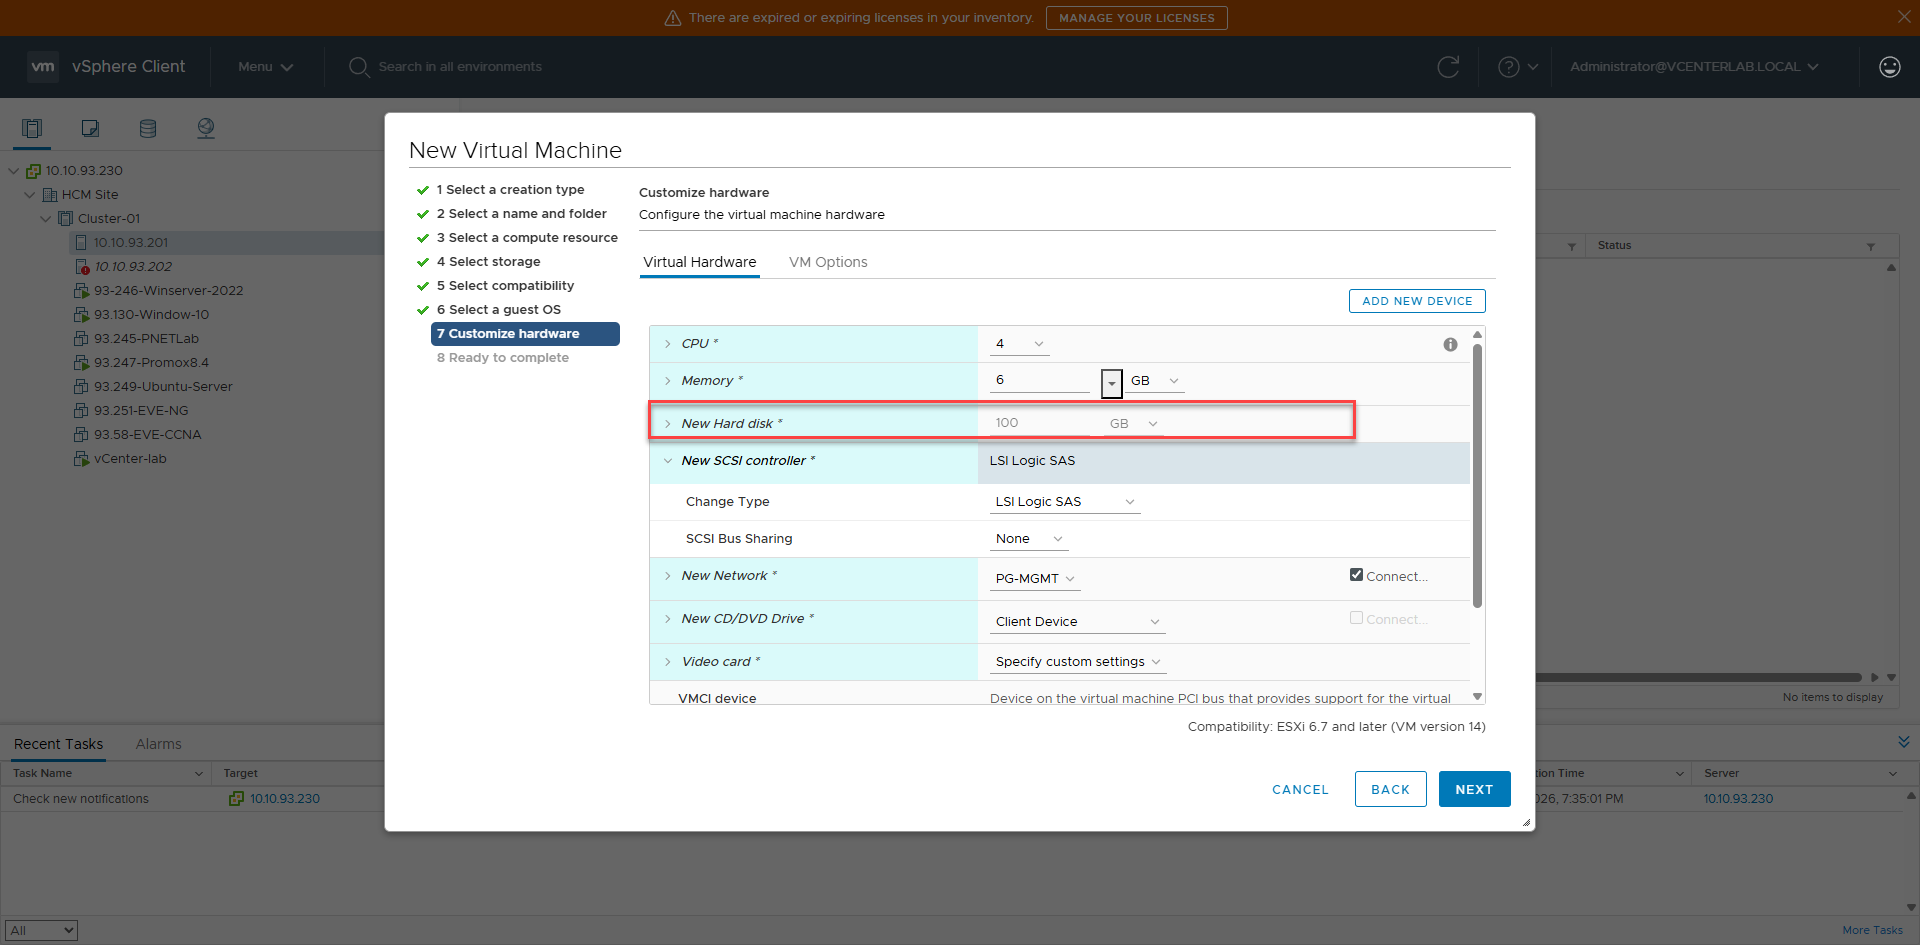
-rwxrwxrwx 1 root root 484 Jan 6 04:25 vm100-esxi.vmdkV. Create New VM on vCenter/ESXi & Attach Disk V. Tạo VM mới trên vCenter/ESXi & Gắn disk đã convert
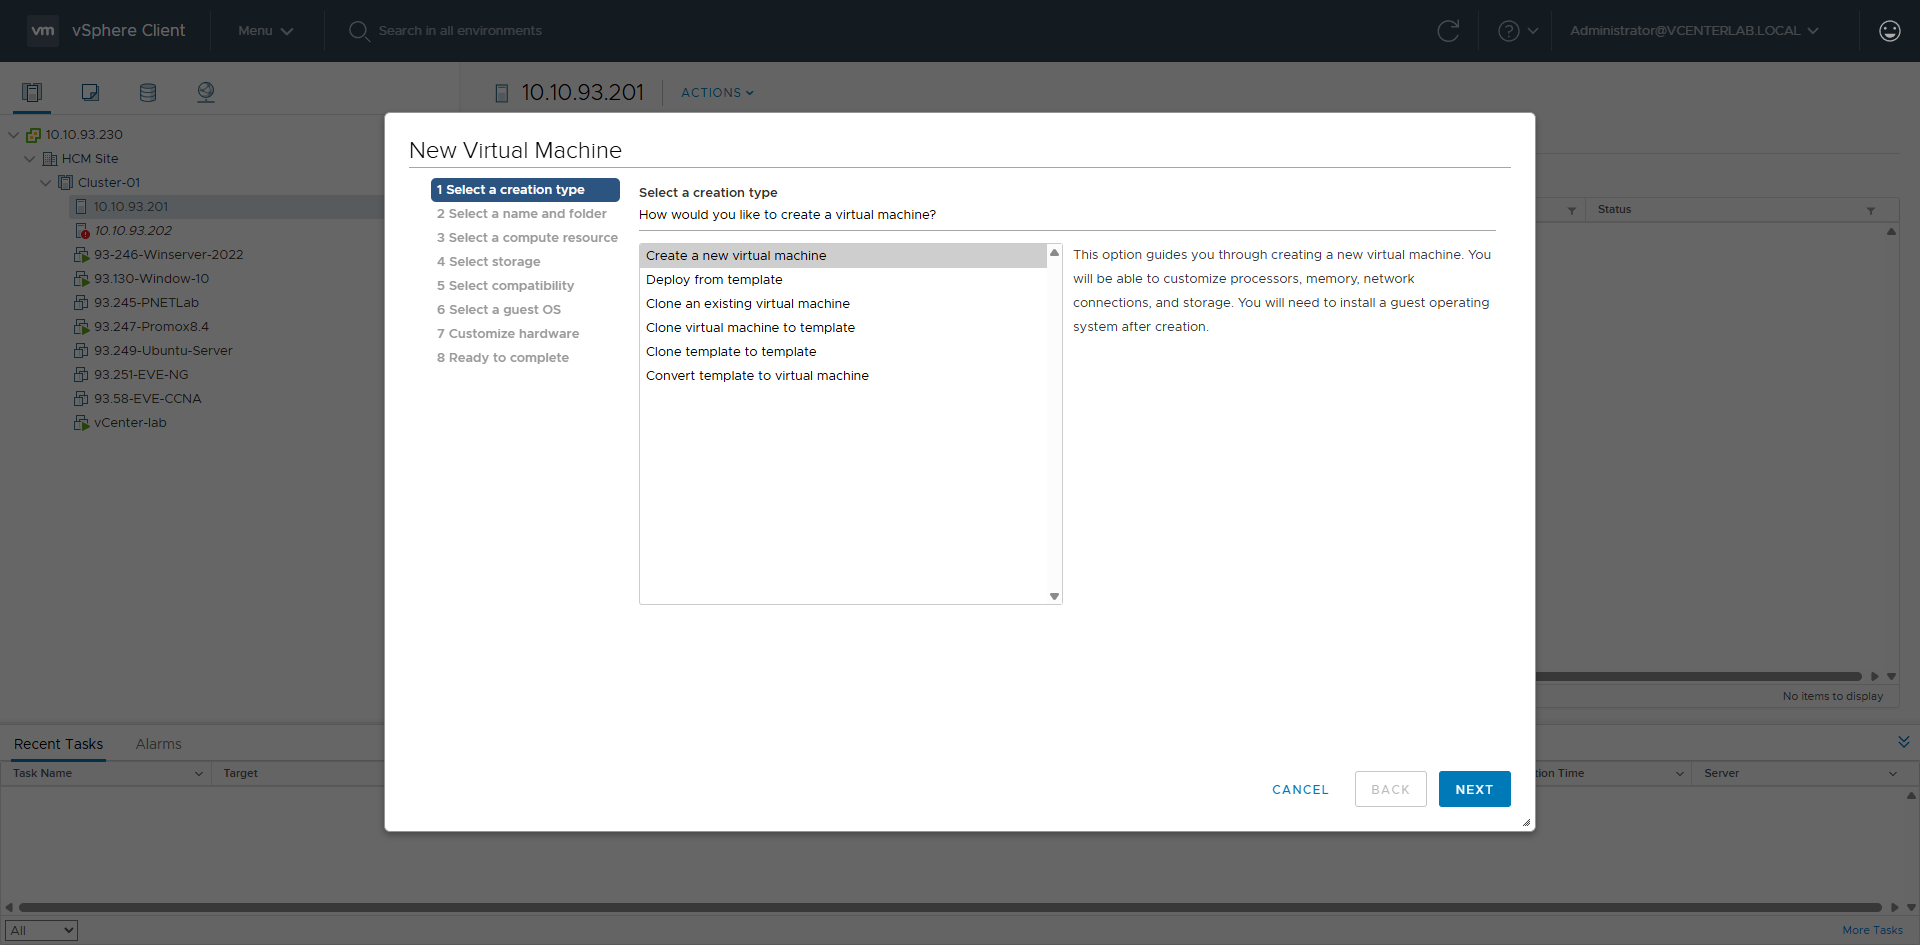
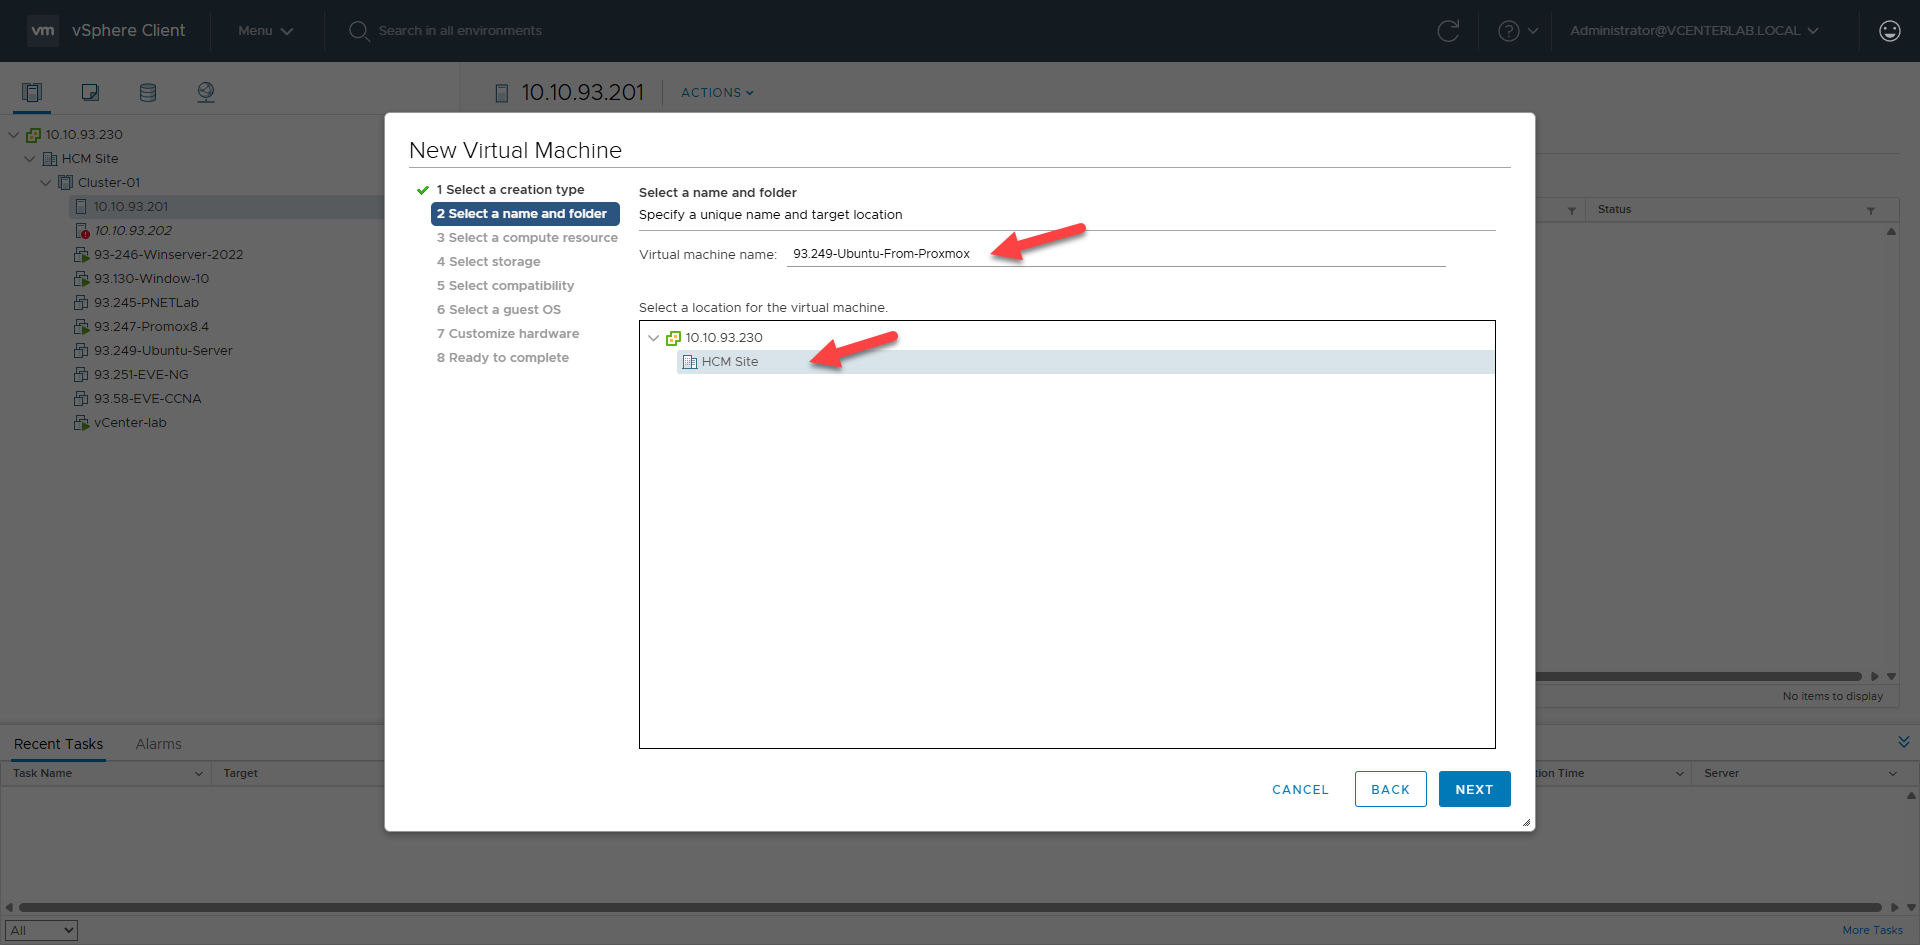
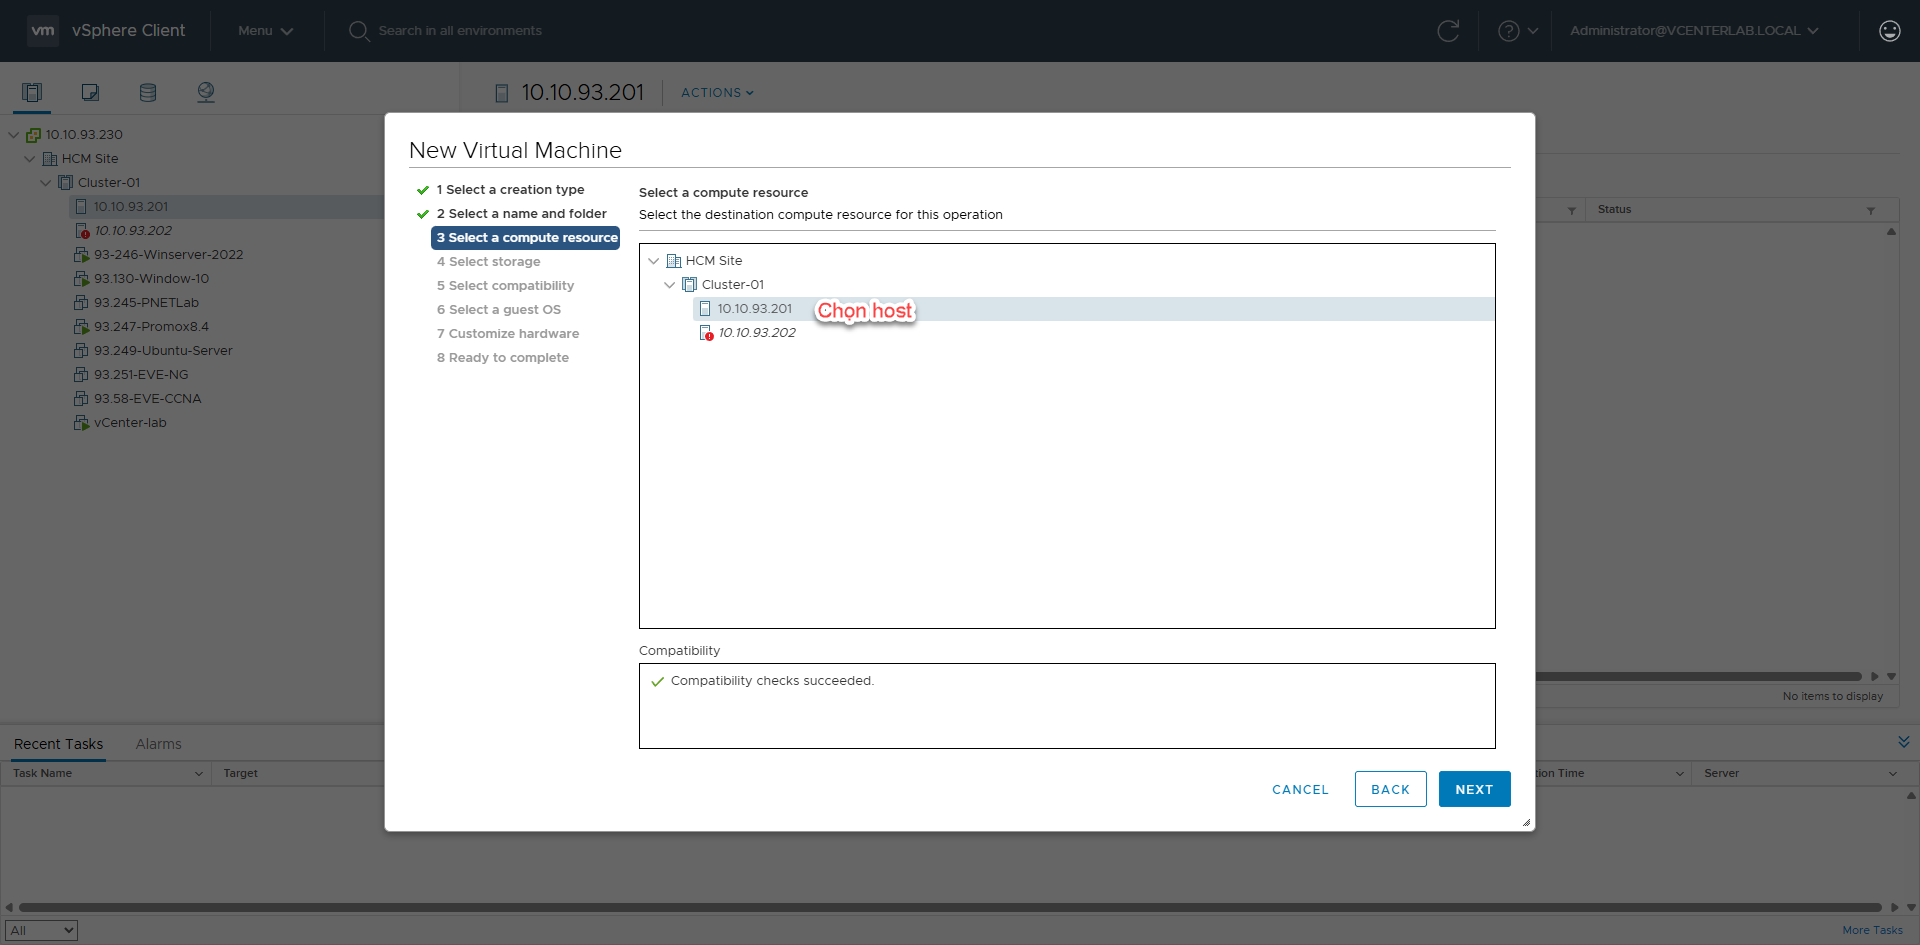
1. Create VM Wizard Steps1. Các bước tạo VM Wizard