Part 3: Advanced Configurations in vCenter Server 6.7
Phần 3: Cấu hình Nâng cao vCenter Server 6.7
Updated: 15/12/2025 • Version 5.1I. Enhanced vMotion Compatibility (EVC) Mode
I. Chế độ Tương thích vMotion Nâng cao (EVC)
1. What is EVC Mode?
1. EVC Mode là gì?
Enhanced vMotion Compatibility (EVC) is a feature in VMware vSphere Cluster that ensures vMotion compatibility between ESXi hosts with different CPU generations.
Enhanced vMotion Compatibility (EVC) là một tính năng trong VMware vSphere Cluster giúp đảm bảo khả năng tương thích vMotion giữa các máy chủ ESXi có các thế hệ CPU khác nhau.
In a virtualized environment, performing Live Migration (vMotion) of a virtual machine from Host A to Host B requires the CPU Instruction Set of both hosts to be identical. If Host A uses a newer generation CPU than Host B, Host A will have instruction sets that Host B does not understand. In this case, vMotion will fail to prevent the guest operating system from crashing.
Trong môi trường ảo hóa, việc thực hiện Live Migration (vMotion) máy ảo từ Host A sang Host B yêu cầu Tập lệnh CPU của cả hai host phải giống nhau. Nếu Host A sử dụng CPU thế hệ mới hơn Host B, Host A sẽ có các tập lệnh mà Host B không hiểu. Trong trường hợp này, vMotion sẽ thất bại để ngăn hệ điều hành máy khách (guest OS) bị crash.
EVC works by “masking” the advanced CPU features of newer chip generations, forcing them to operate at the feature level of the oldest chip family in the Cluster. As a result, all hosts in the Cluster will share a common baseline instruction set, allowing vMotion to proceed smoothly.
EVC hoạt động bằng cách “che giấu” (masking) các tính năng CPU nâng cao của các thế hệ chip mới hơn, buộc chúng hoạt động ở mức tính năng của dòng chip cũ nhất trong Cluster. Kết quả là tất cả các host trong Cluster sẽ chia sẻ một tập lệnh cơ sở chung, cho phép vMotion diễn ra suôn sẻ.
Current Lab CPU Configuration Table:
Bảng Cấu hình CPU Lab Hiện tại:
| Host | Server Model | CPU Model | Architecture | CPU Count |
|---|---|---|---|---|
| ESXi-01 | Dell PowerEdge R630 | Xeon E5-2680 v3 @ 2.50GHz | Haswell (Newer) | 24 CPUs |
| ESXi-02 | IBM System x3650 M4 | Xeon E5-2690 v2 @ 3.00GHz | Ivy Bridge (Older) | 10 CPUs |
2. Features and Use Cases
2. Tính năng và Trường hợp sử dụng
Enabling EVC provides the following essential benefits for virtual infrastructure:
Việc bật EVC mang lại những lợi ích thiết yếu sau cho hạ tầng ảo hóa:
- Multi-generation CPU Compatibility: Allows combining multiple generations of physical servers (e.g., servers purchased in 2013 and 2015) in the same Cluster.
- Flexible vMotion: Ensures VMs can migrate freely between any hosts in the Cluster without CPU compatibility errors.
- Gradual Upgrades: Allows replacing old servers with new ones gradually without system-wide downtime.
- High Availability (HA): Ensures that if one host fails, VMs can restart on any other surviving host.
- Tương thích đa thế hệ CPU: Cho phép kết hợp nhiều thế hệ máy chủ vật lý (ví dụ: server mua năm 2013 và 2015) trong cùng một Cluster.
- vMotion linh hoạt: Đảm bảo VM có thể di chuyển tự do giữa bất kỳ host nào trong Cluster mà không gặp lỗi tương thích CPU.
- Nâng cấp dần dần: Cho phép thay thế server cũ bằng server mới một cách từ từ mà không gây downtime toàn hệ thống.
- Cân bằng tải: Là điều kiện tiên quyết để DRS hoạt động hiệu quả.
- High Availability (HA): Đảm bảo nếu một host bị lỗi, các VM có thể khởi động lại trên bất kỳ host nào còn sống.
⚠️ IMPORTANT NOTES ABOUT EVC:
- EVC must be enabled BEFORE any virtual machines are running in the Cluster.
- All hosts in the Cluster must be from the same CPU vendor (Intel or AMD).
- The EVC Baseline must be set to the lowest (oldest) CPU generation present in the Cluster.
- Virtualization features (VT-x/AMD-V) and Execute Disable Bit (XD/NX) must be enabled in the physical server BIOS.
⚠️ LƯU Ý QUAN TRỌNG VỀ EVC:
- EVC phải được bật TRƯỚC KHI có bất kỳ máy ảo nào đang chạy trong Cluster.
- Tất cả các host trong Cluster phải cùng nhà sản xuất CPU (Intel hoặc AMD).
- EVC Baseline phải được thiết lập ở mức thế hệ CPU thấp nhất (cũ nhất) có trong Cluster.
- Các tính năng ảo hóa (VT-x/AMD-V) và Execute Disable Bit (XD/NX) phải được bật trong BIOS của máy chủ vật lý.
3. EVC Mode Configuration Process
3. Quy trình Cấu hình EVC Mode
Prerequisites: vCenter Server installed and ESXi Hosts added to Inventory but not yet in a Cluster.
Điều kiện tiên quyết: vCenter Server đã được cài đặt và các ESXi Host đã được thêm vào Inventory nhưng chưa vào Cluster.
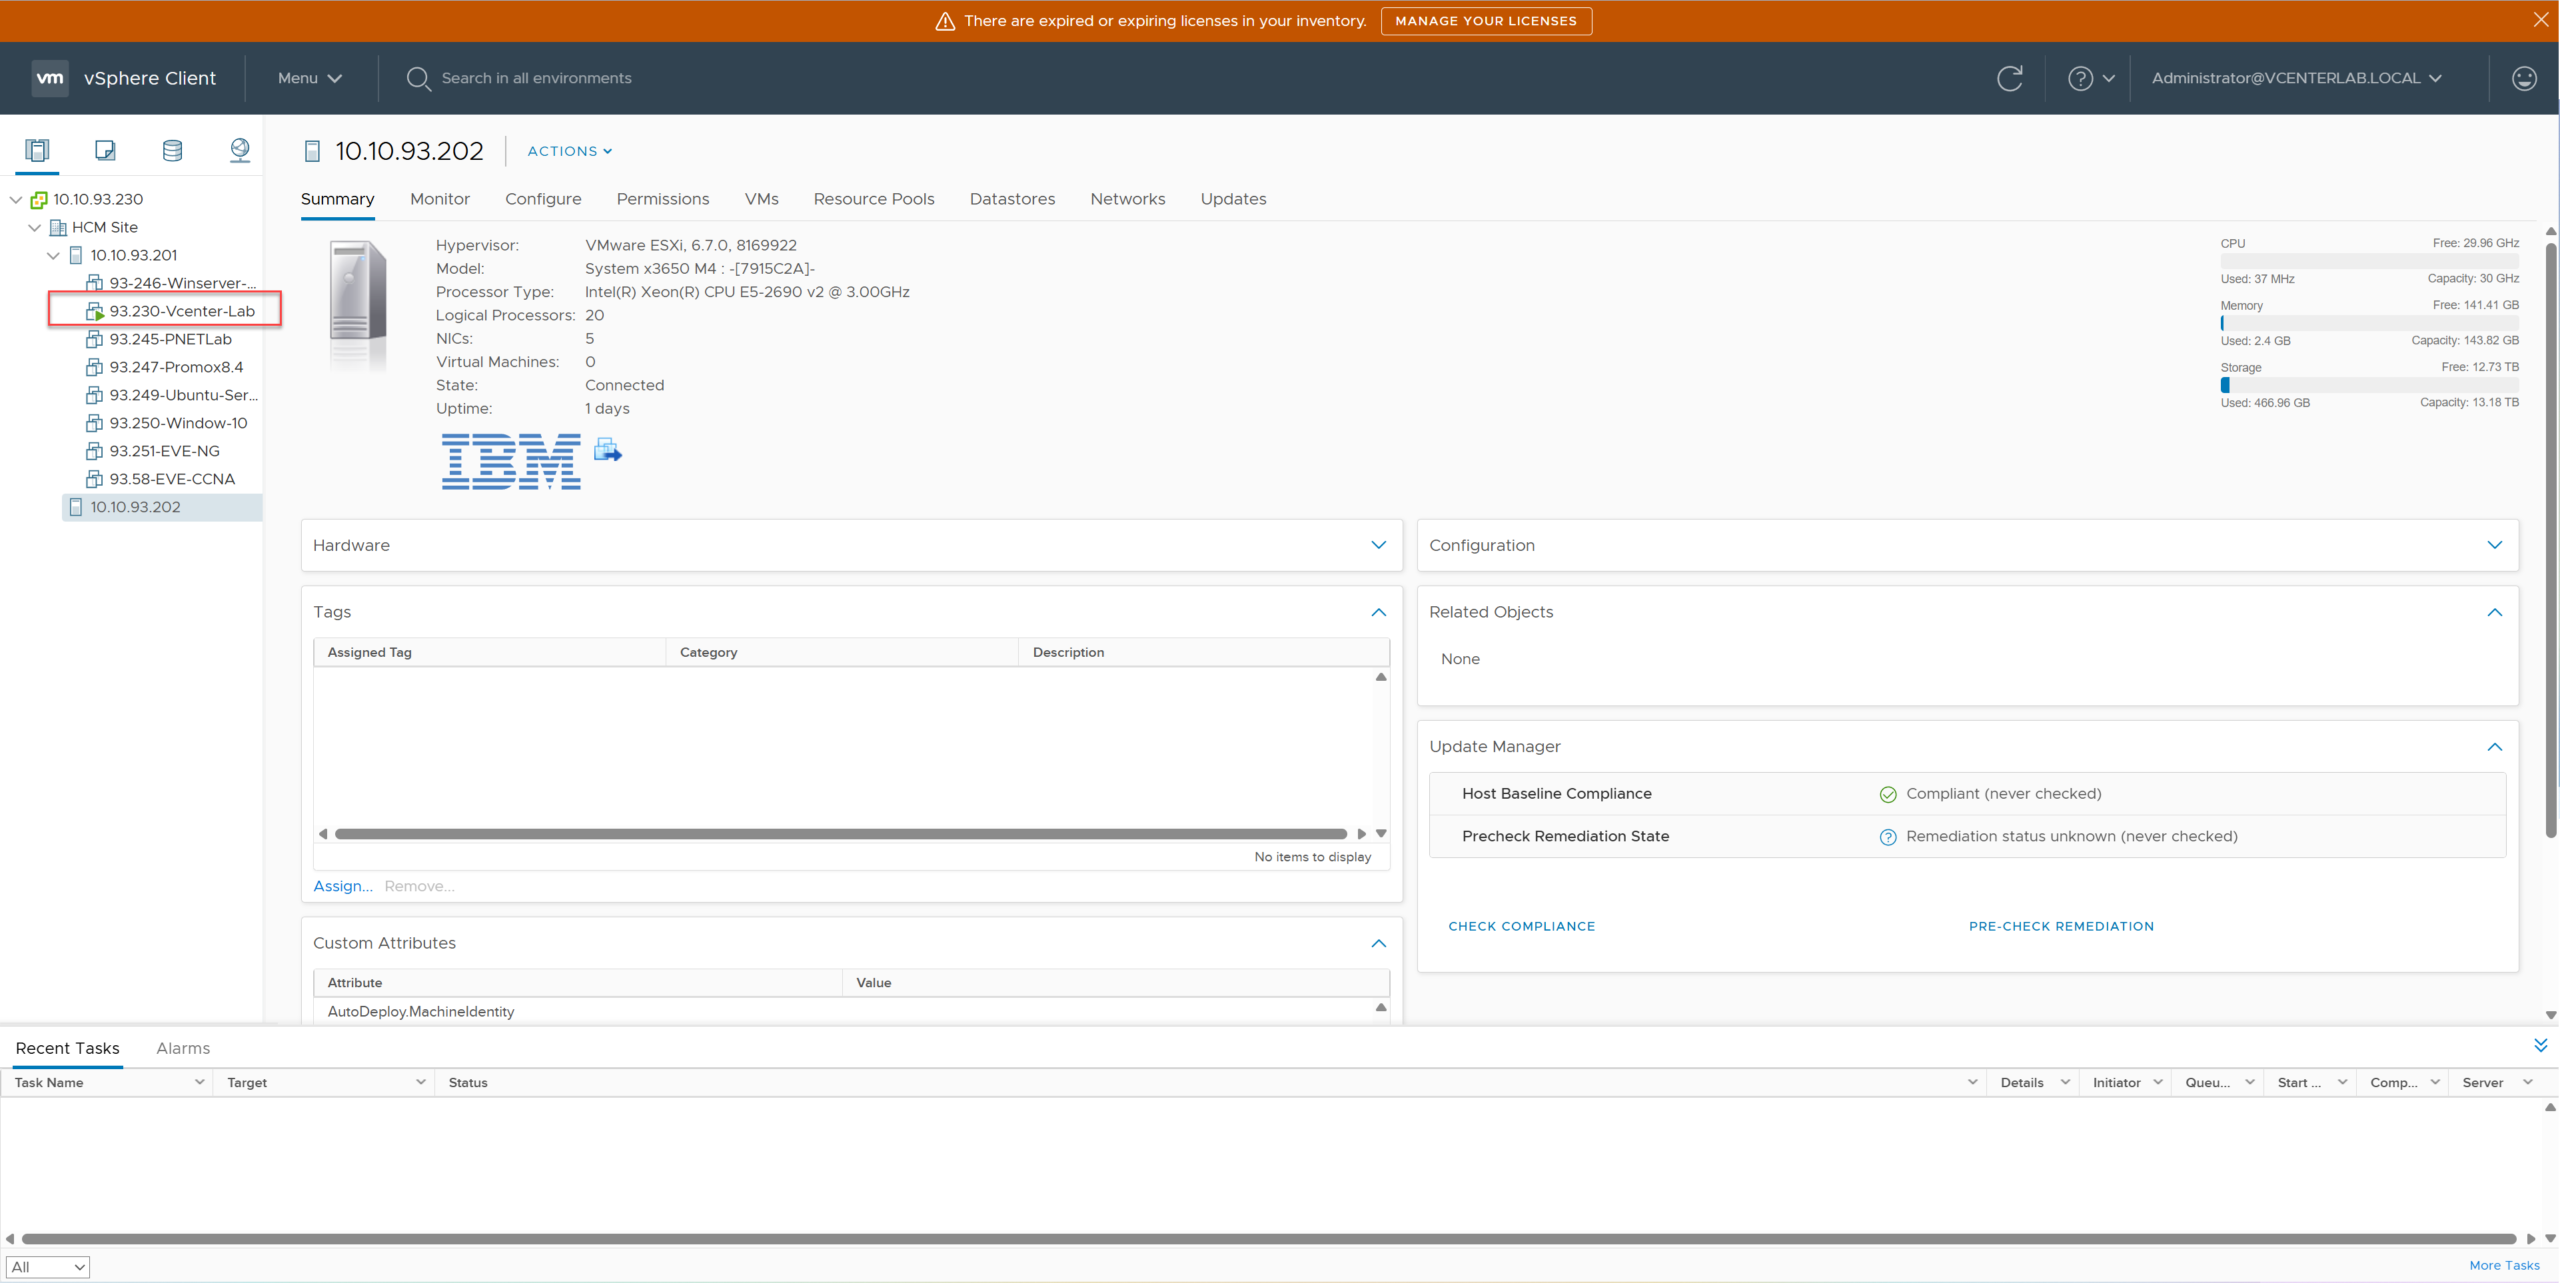
3.1. Migrate all VMs from the low CPU Host to the high CPU Host
3.1. Di chuyển tất cả VM từ Host CPU thấp sang Host CPU cao
Before configuring, we need to empty the host with the lower CPU generation (ESXi-02 – Ivy Bridge) to put it into Maintenance Mode. vMotion all running VMs from ESXi-02 to ESXi-01.
Trước khi cấu hình, chúng ta cần làm trống host có thế hệ CPU thấp hơn (ESXi-02 – Ivy Bridge) để đưa nó vào chế độ bảo trì (Maintenance Mode). Thực hiện vMotion tất cả VM đang chạy từ ESXi-02 sang ESXi-01.
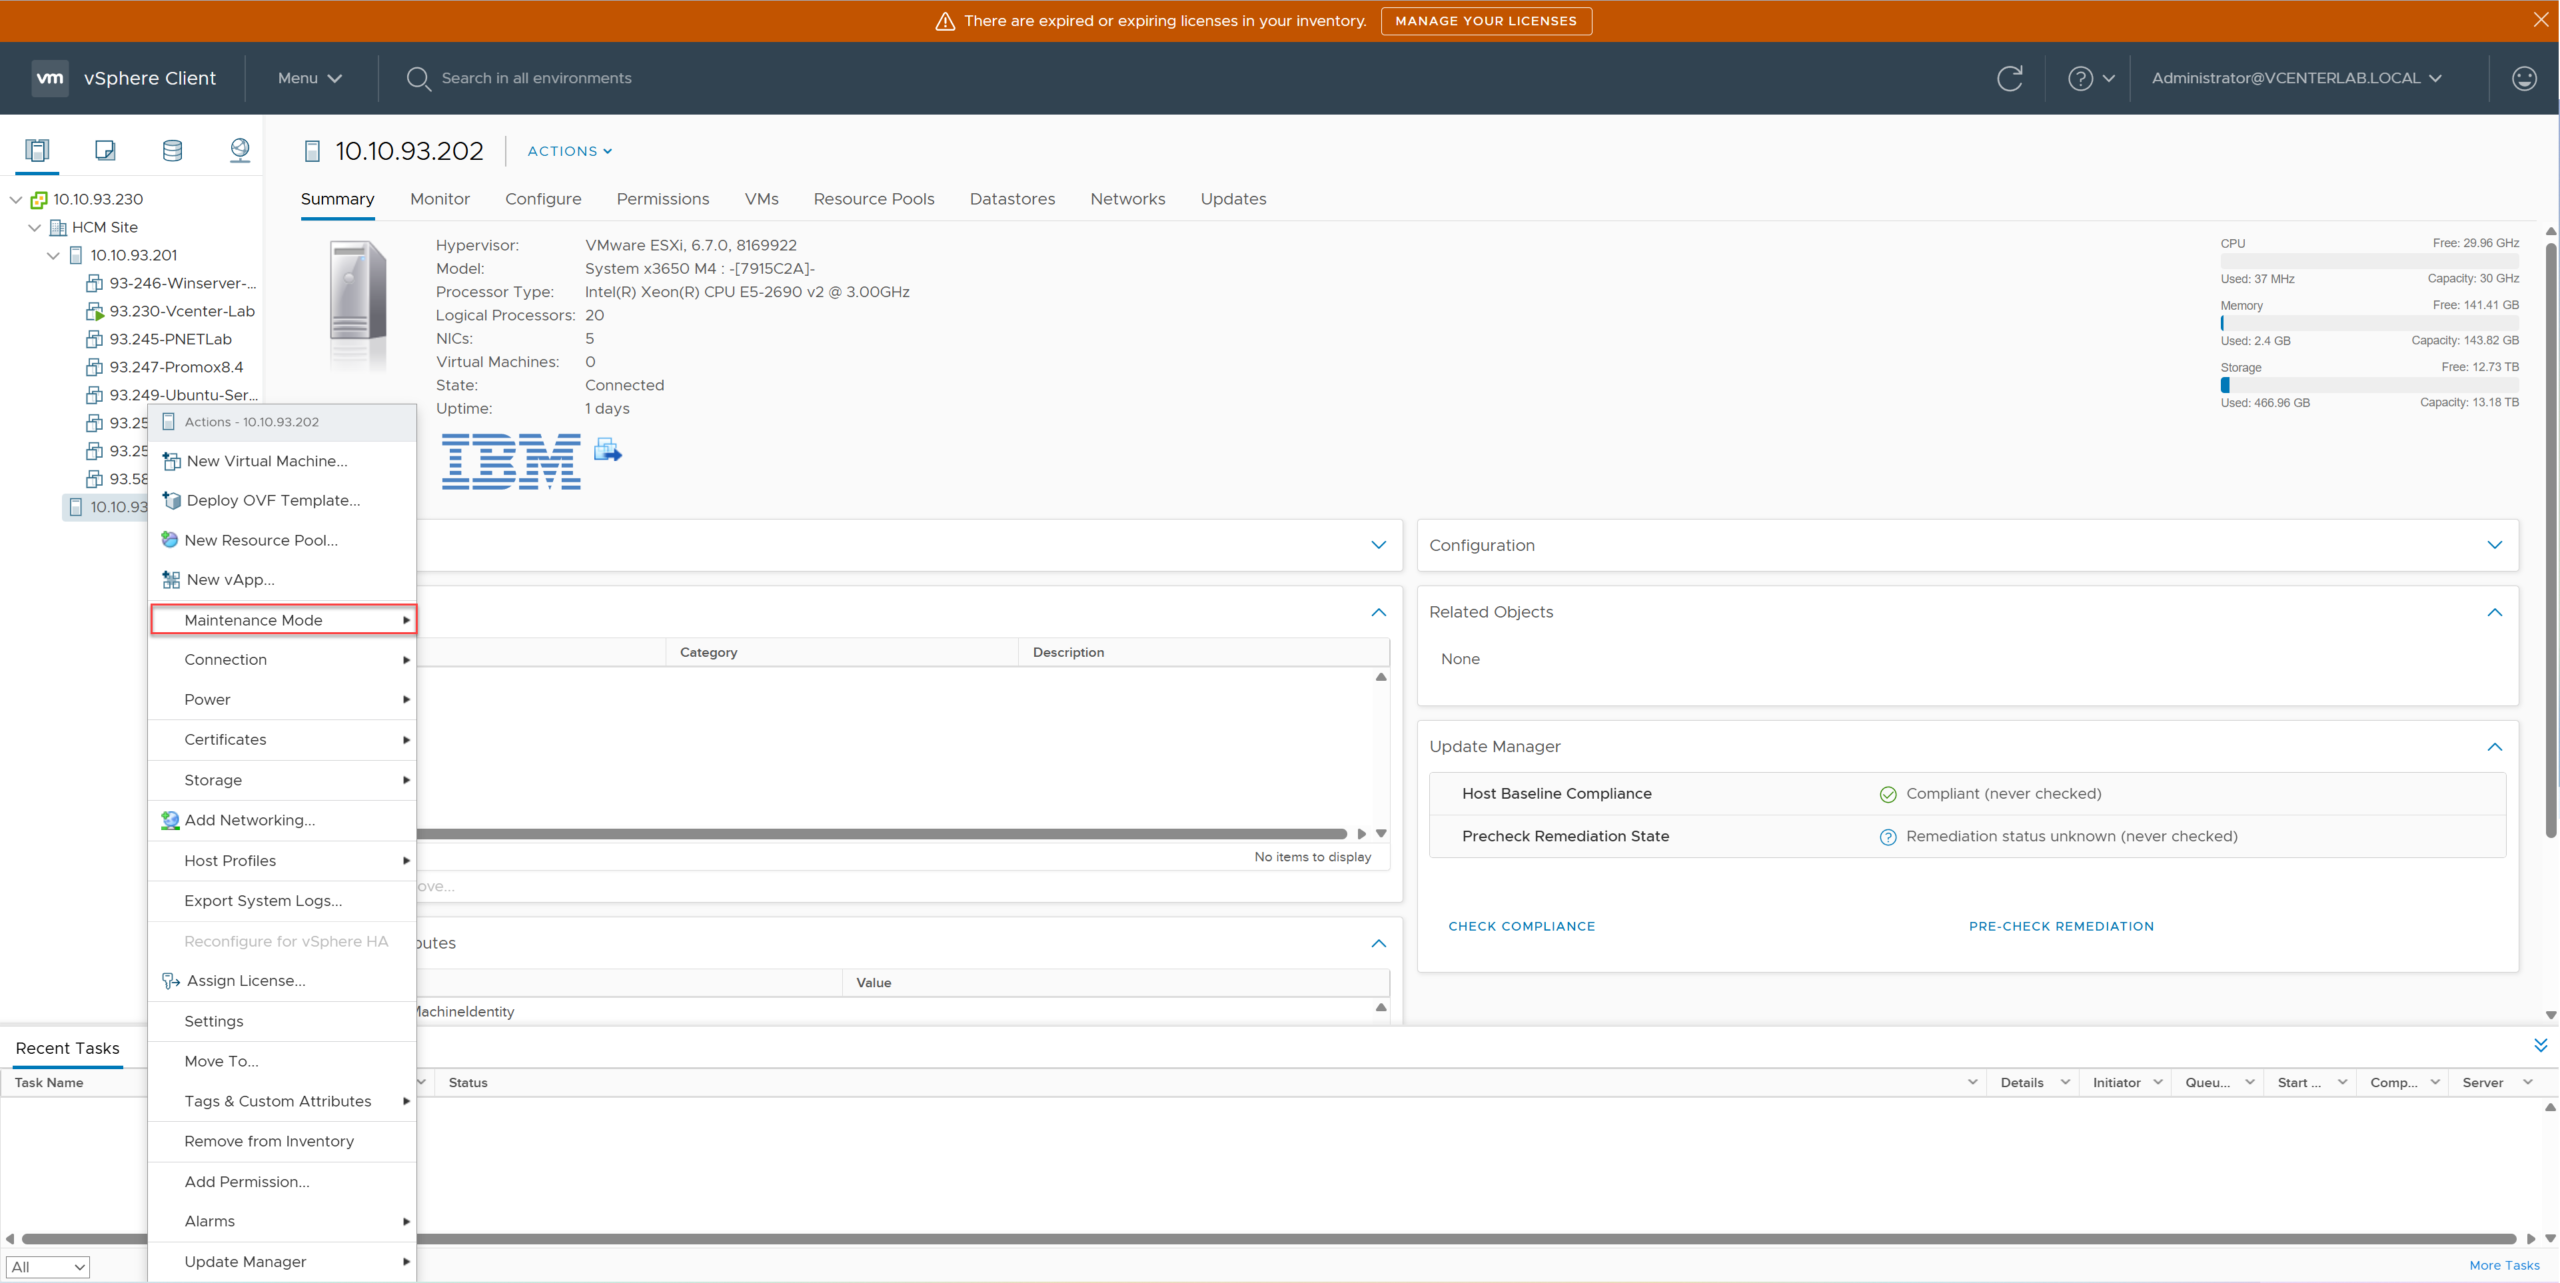
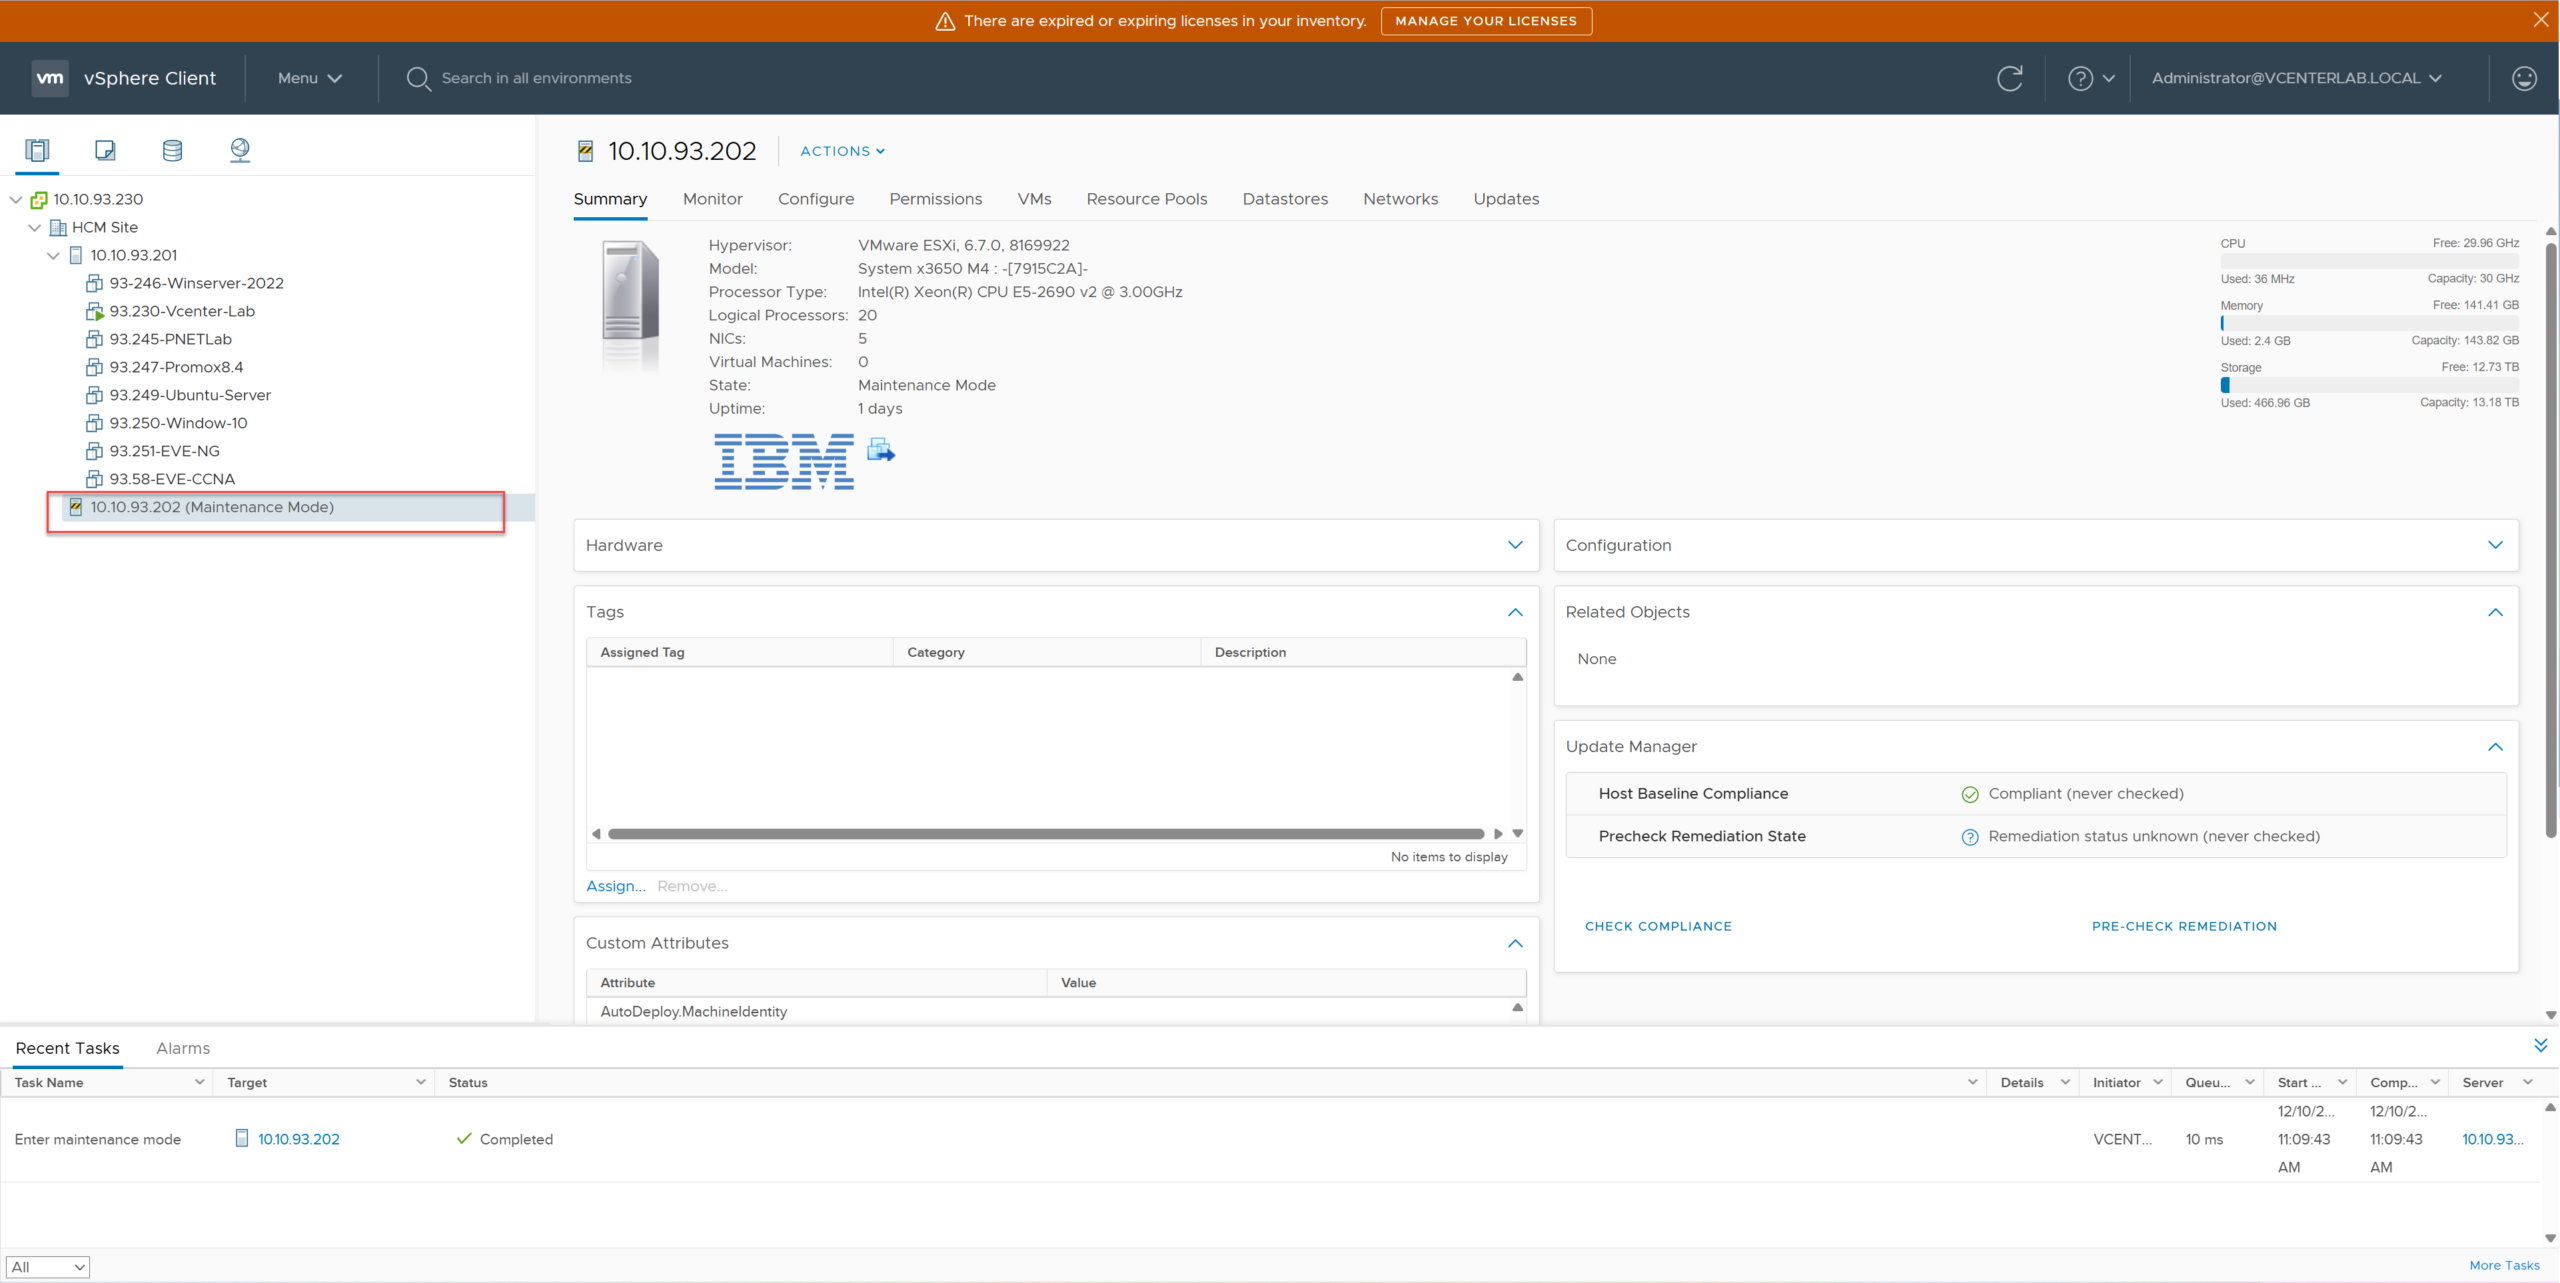
3.2. Switch ESXi-02 to “Maintenance Mode”
3.2. Chuyển ESXi-02 sang “Maintenance Mode”
Right-click Host ESXi-02 > Maintenance Mode > Enter Maintenance Mode.
Chuột phải vào Host ESXi-02 > Maintenance Mode > Enter Maintenance Mode.

3.3. Create New Cluster
3.3. Tạo Cluster mới
Right-click Datacenter > New Cluster. Name the Cluster (e.g., EVC-Cluster). Do not enable DRS and HA yet.
Chuột phải vào Datacenter > New Cluster. Đặt tên Cluster (ví dụ: EVC-Cluster). Chưa bật DRS và HA vội.

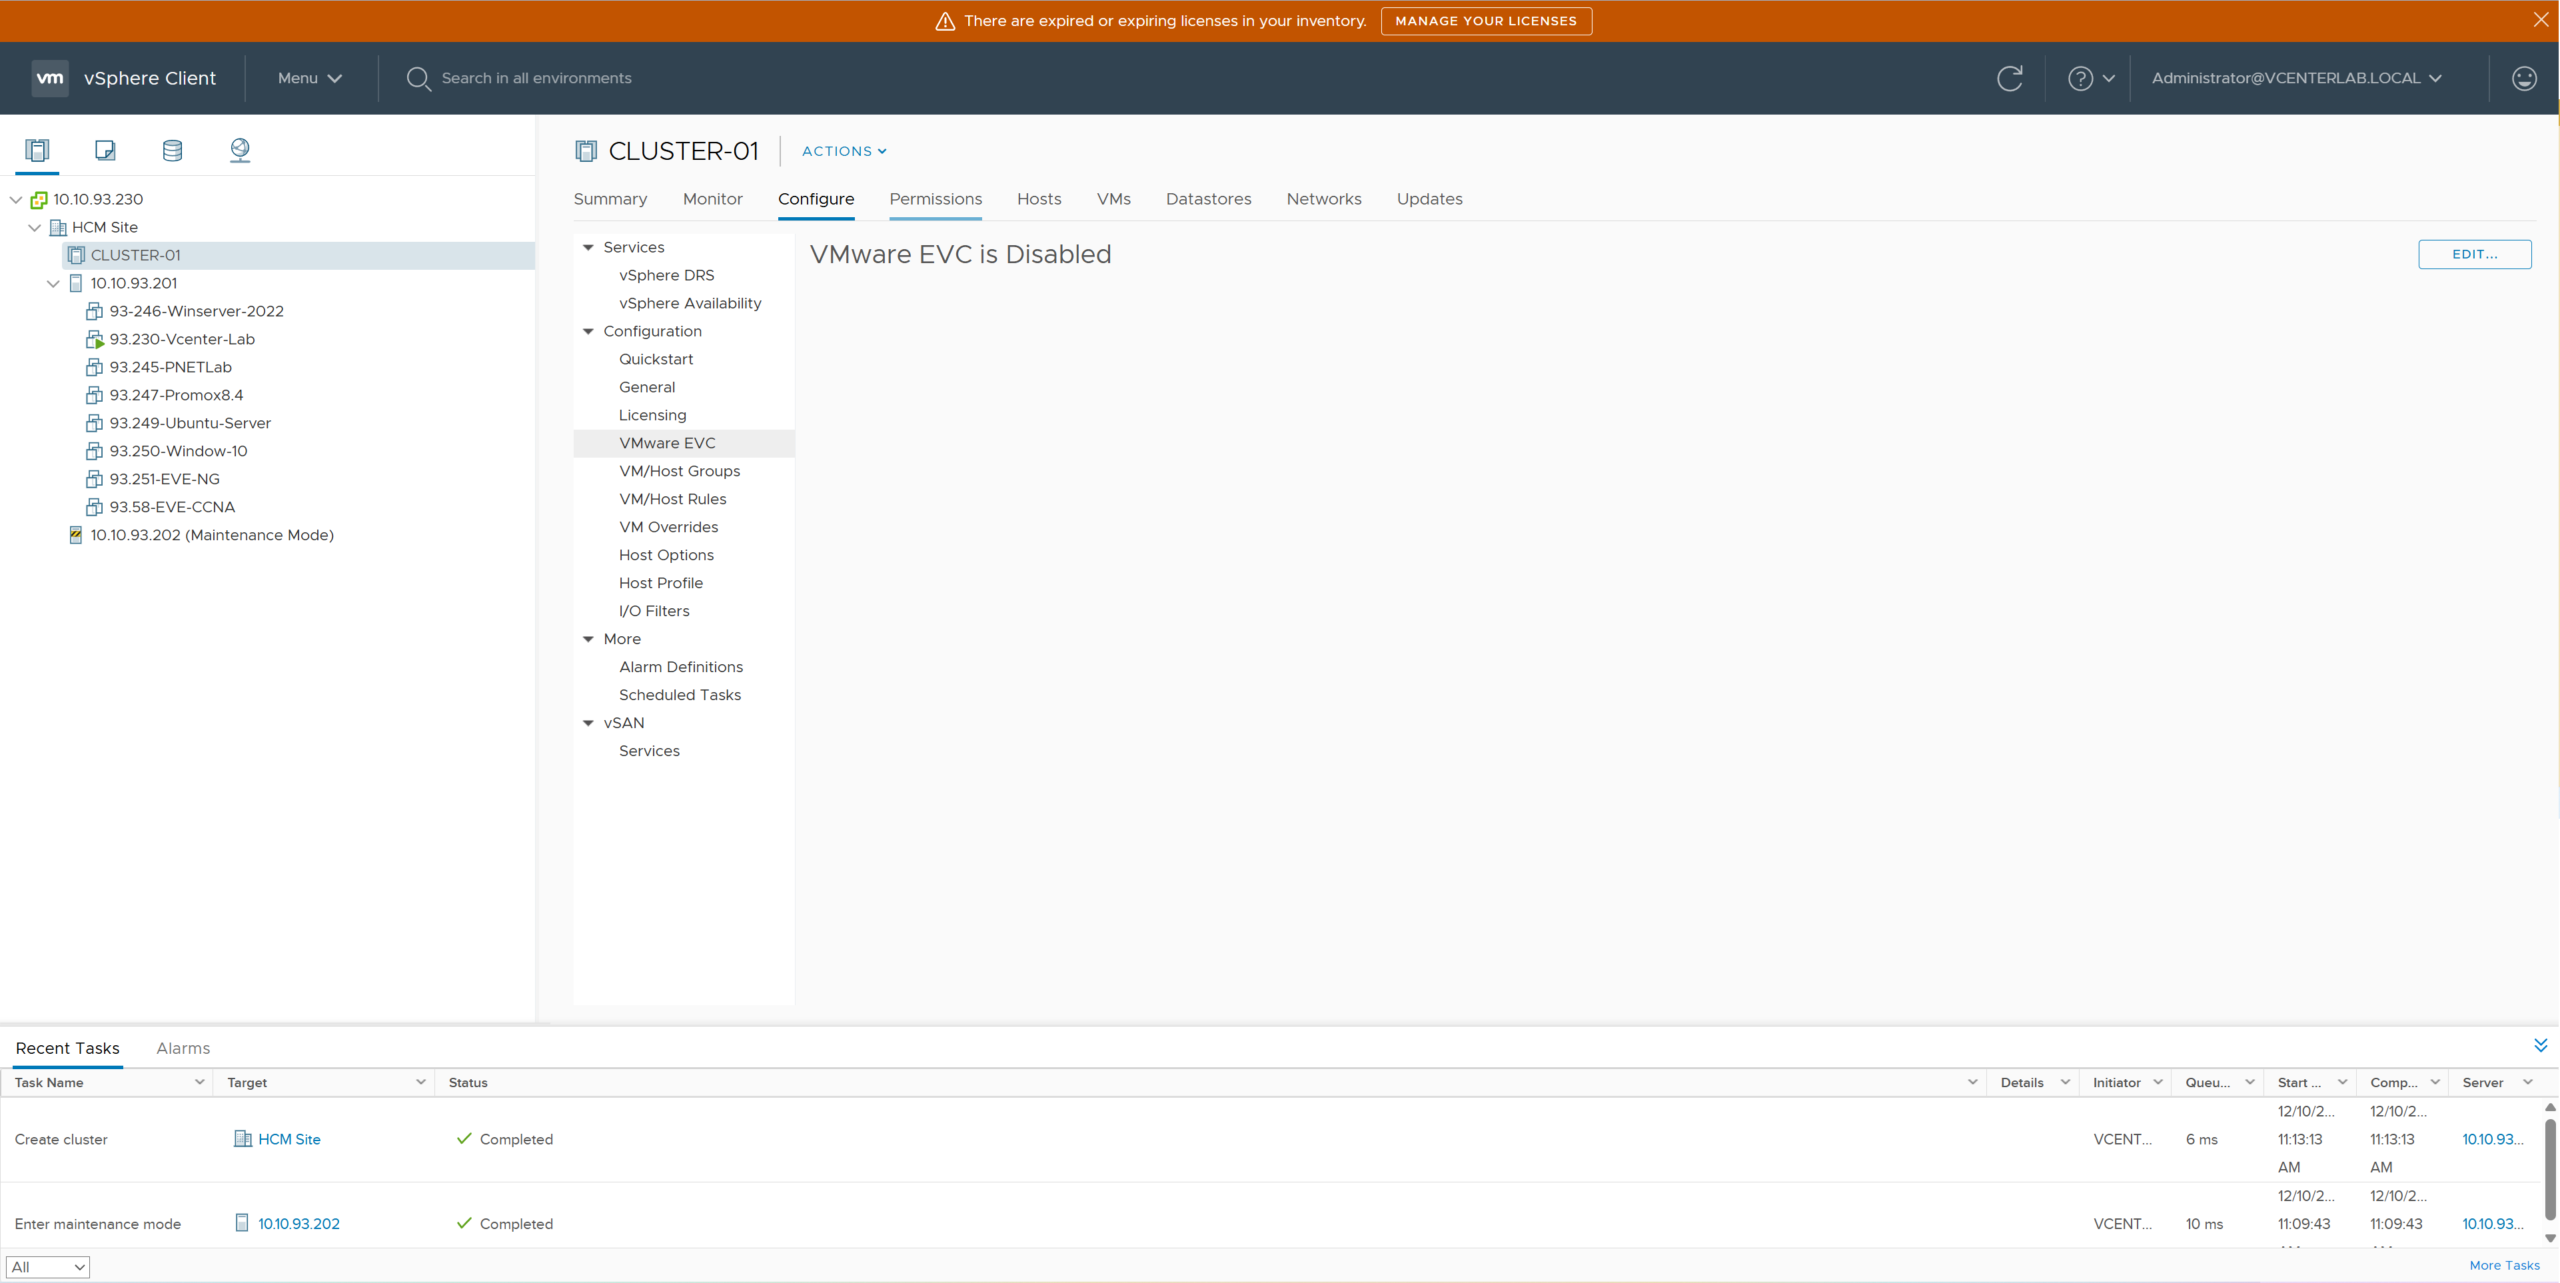
3.4. Enable EVC mode matching the lower CPU
3.4. Bật chế độ EVC tương ứng với CPU thấp hơn
Select the created Cluster > Configure Tab > VMware EVC > Edit. Select Intel “Ivy Bridge” Generation.
Chọn Cluster vừa tạo > Tab Configure > VMware EVC > Edit. Chọn Intel “Ivy Bridge” Generation.
Why choose Ivy Bridge?
Because the Lab has 2 CPU types: Haswell (New) and Ivy Bridge (Old). Following the “Lowest Common Denominator” principle, we must select the lowest level, Ivy Bridge, so both hosts are compatible.
Tại sao chọn Ivy Bridge?
Vì Lab có 2 loại CPU: Haswell (Mới) và Ivy Bridge (Cũ). Theo nguyên tắc “Mẫu số chung thấp nhất”, ta phải chọn mức thấp nhất là Ivy Bridge để cả hai host đều tương thích.


3.5. Exit “Maintenance Mode” for ESXi-02
3.5. Thoát “Maintenance Mode” cho ESXi-02

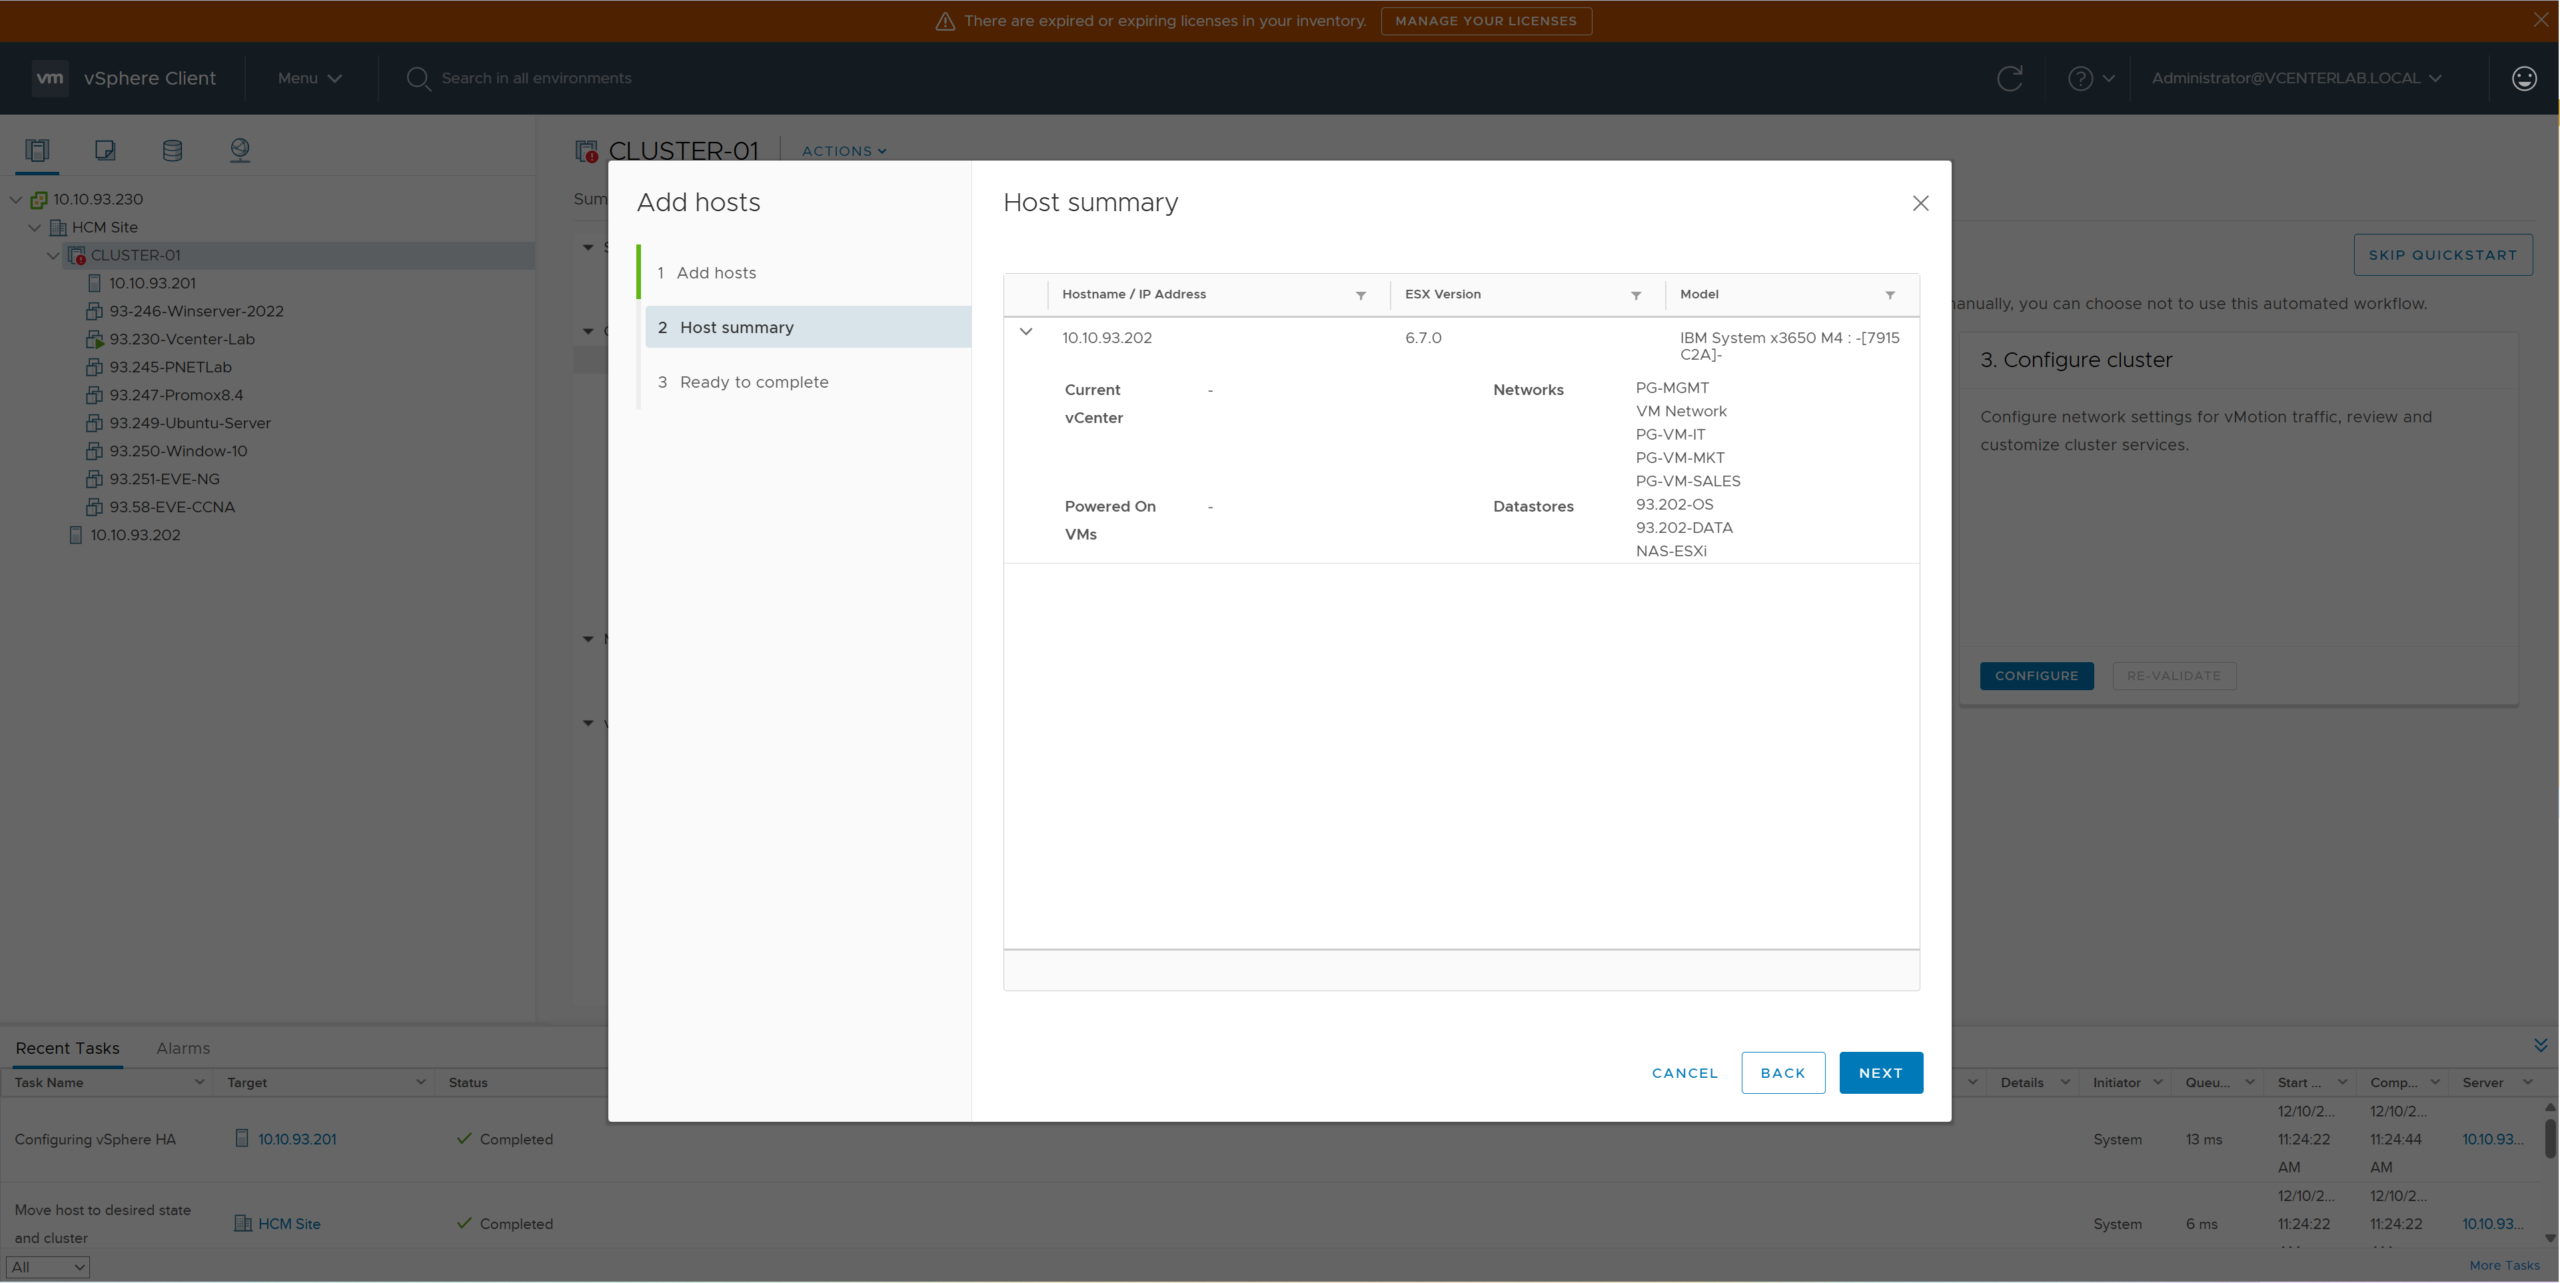
3.6. Add ESXi-01 to Cluster
3.6. Thêm ESXi-01 vào Cluster
Drag and drop (Move) Host ESXi-01 (containing VMs) into the Cluster. Since this Host has a Haswell CPU (higher than Ivy Bridge), EVC will automatically “mask” the advanced features for compatibility.
Kéo và thả (Move) Host ESXi-01 (đang chứa các VM) vào trong Cluster. Vì host này có CPU Haswell (cao hơn Ivy Bridge), EVC sẽ tự động “mask” các tính năng cao cấp để tương thích.
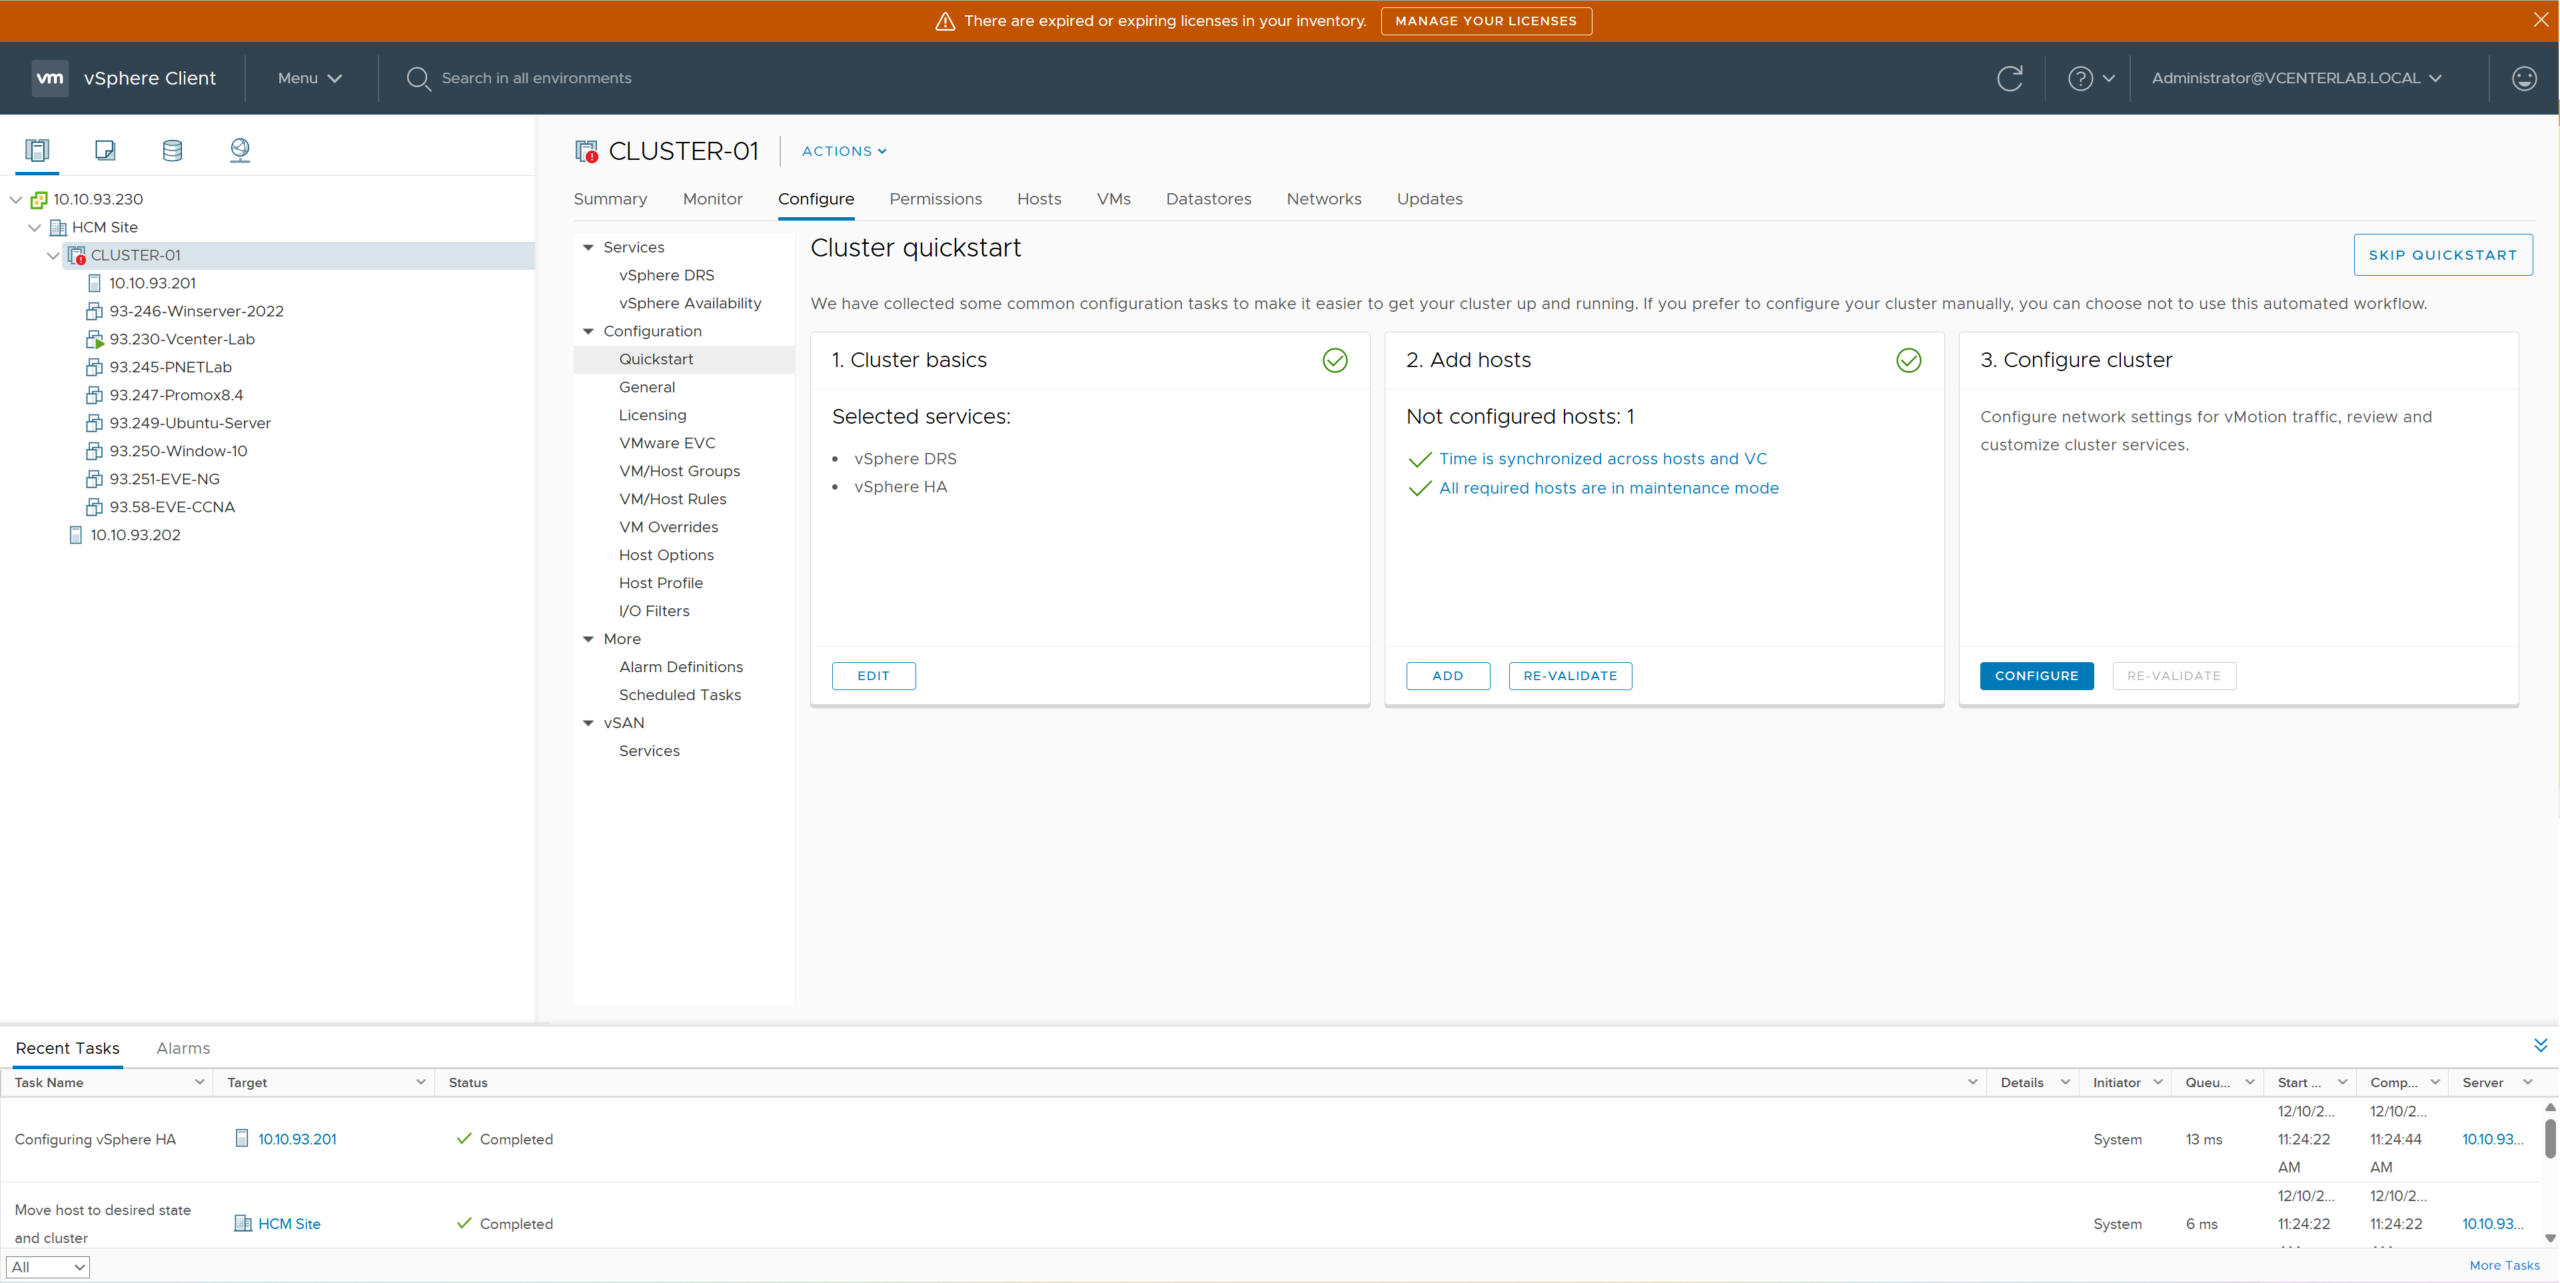
3.7. Add ESXi-02 to Cluster
3.7. Thêm ESXi-02 vào Cluster

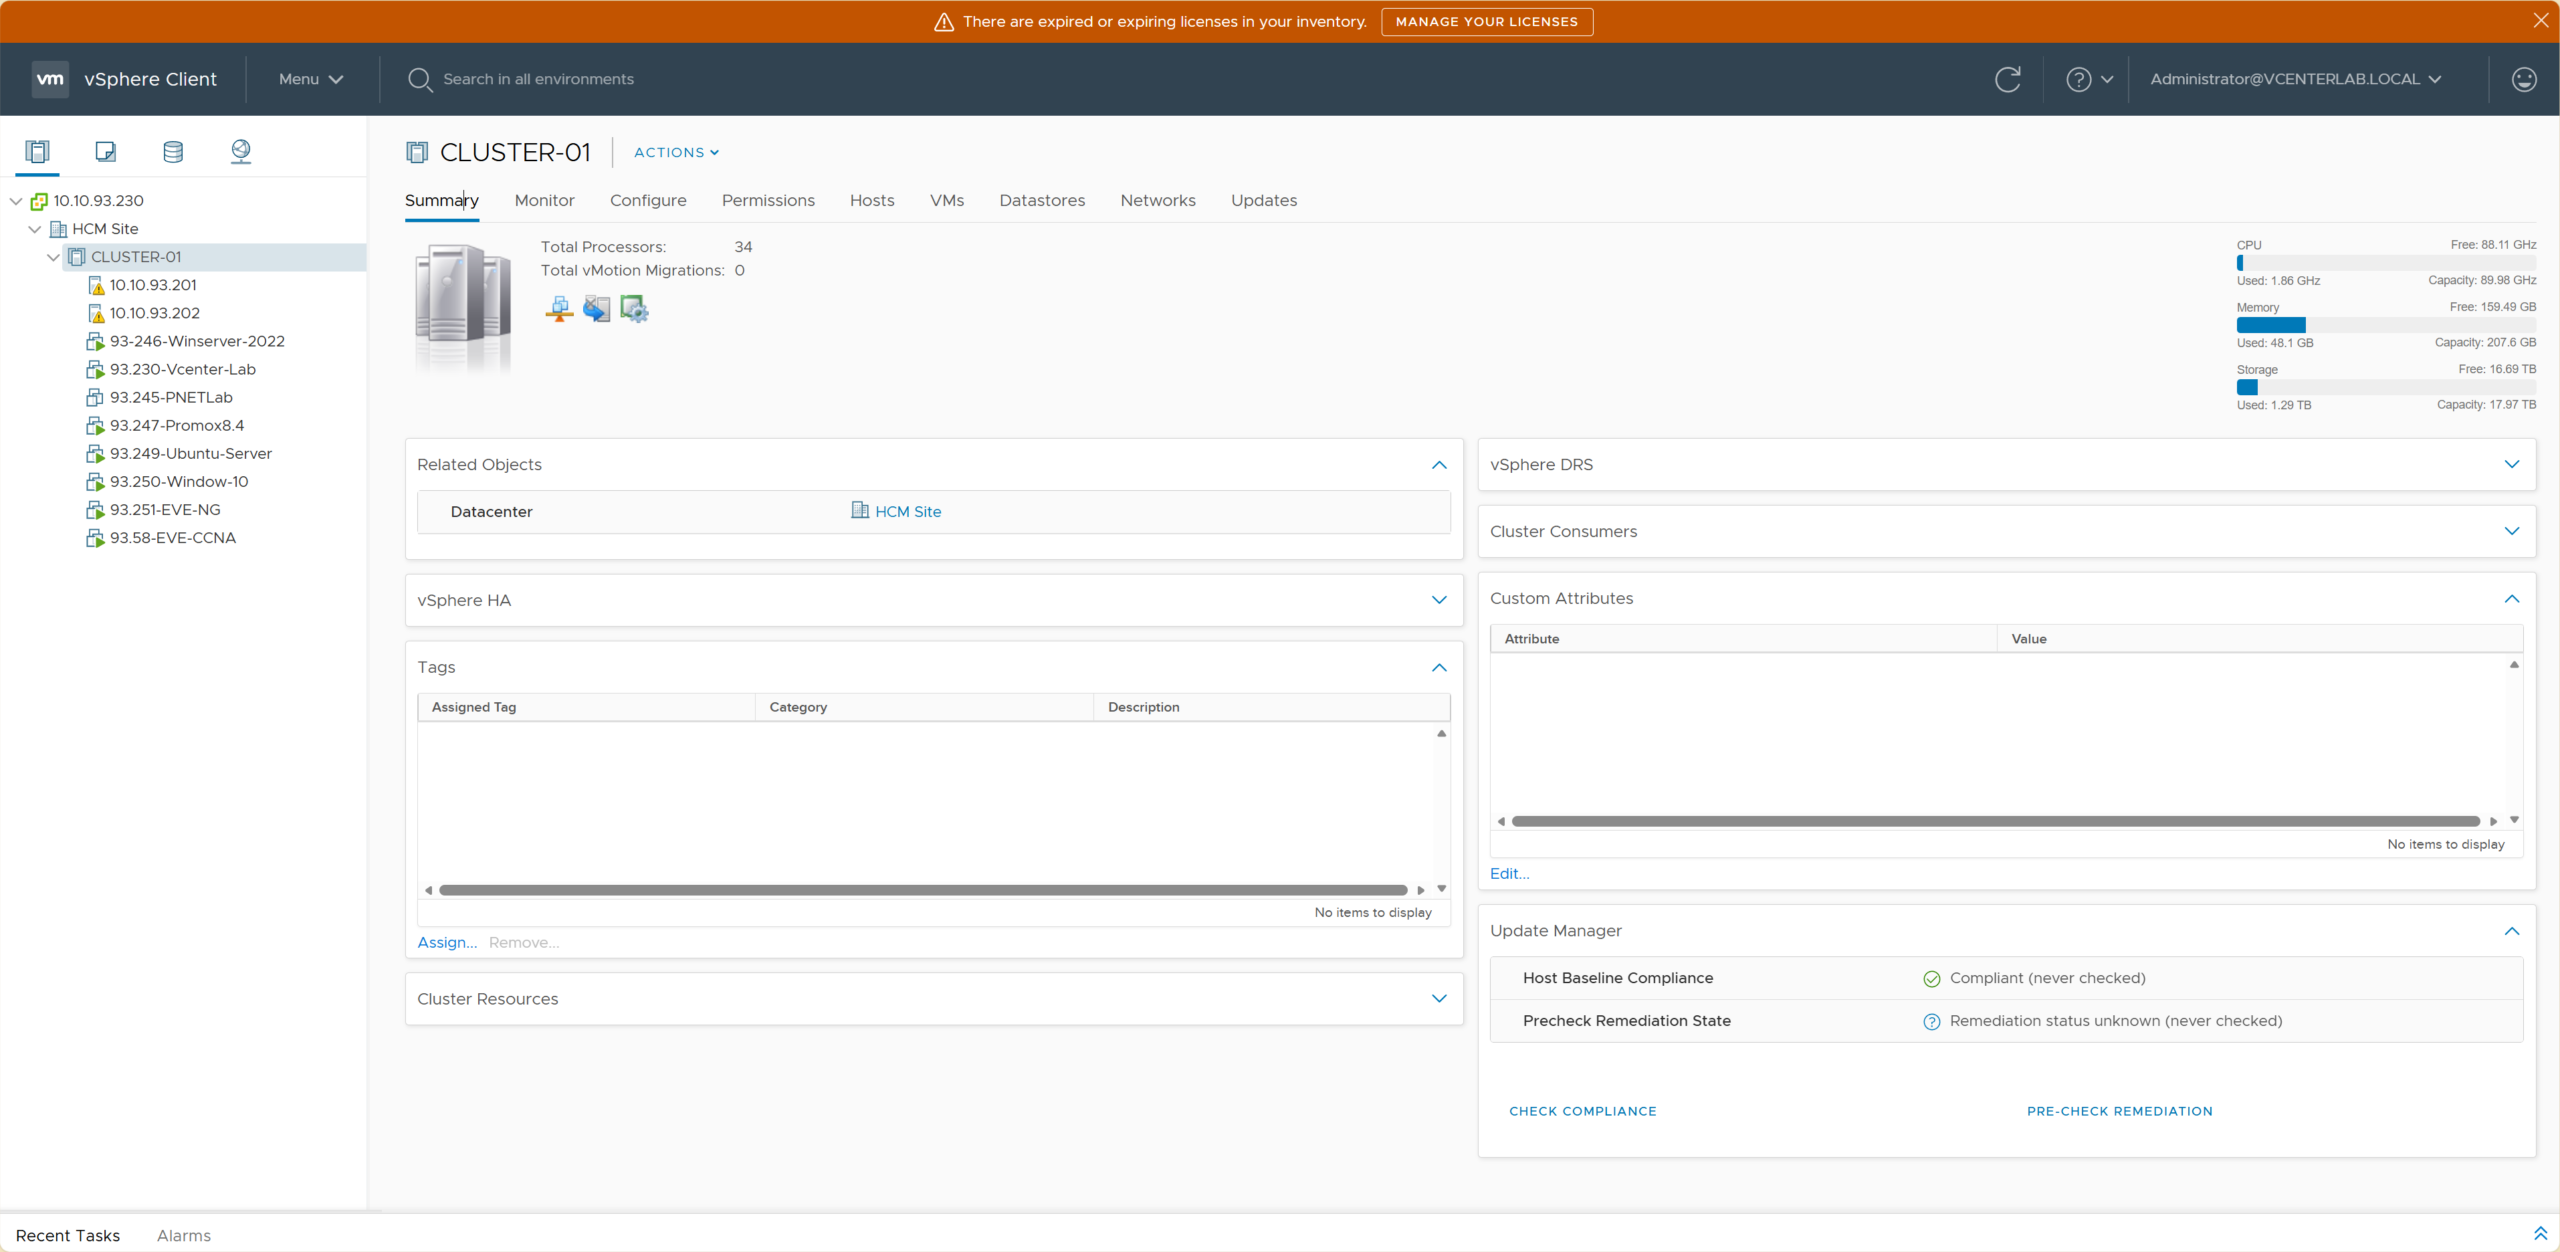
3.8. Verification
3.8. Kiểm tra lại (Verification)
- Go to Cluster > Monitor > vMotion. Ensure both hosts show compatible status.
- Try a live vMotion (Live Migration) of a VM from ESXi-01 to ESXi-02 to confirm no CPU errors.
- Vào Cluster > Monitor > vMotion. Đảm bảo cả hai host đều hiển thị trạng thái tương thích (compatible).
- Thử vMotion (Live Migration) một VM từ ESXi-01 sang ESXi-02 để xác nhận không có lỗi CPU.
4. EVC Modes Reference Table for Intel CPUs
4. Bảng Tham khảo các Chế độ EVC cho Intel CPU
| EVC Mode | Microarchitecture | CPU Series Example | Year Released |
|---|---|---|---|
| Merom | Core | Xeon 5100/5300/3000 | 2006 |
| Penryn | Core (45nm) | Xeon 5400/3300 | 2007 |
| Nehalem | Nehalem | Xeon 5500/3500 (Core i7 1st Gen) | 2008 |
| Westmere | Westmere | Xeon 5600/3600 | 2010 |
| Sandy Bridge | Sandy Bridge | Xeon E5-2600 (Core i 2nd Gen) | 2011 |
| Ivy Bridge | Ivy Bridge | Xeon E5-2600 v2 (Core i 3rd Gen) | 2013 |
| Haswell | Haswell | Xeon E5-2600 v3 (Core i 4th Gen) | 2014 |
| Broadwell | Broadwell | Xeon E5-2600 v4 (Core i 5th Gen) | 2016 |
| Skylake | Skylake | Xeon Scalable (Gold/Platinum) | 2017 |
| Cascade Lake | Cascade Lake | Xeon Scalable Gen 2 | 2019 |
| Chế độ EVC | Vi kiến trúc | Dòng CPU Ví dụ | Năm Phát hành |
|---|---|---|---|
| Merom | Core | Xeon 5100/5300/3000 | 2006 |
| Penryn | Core (45nm) | Xeon 5400/3300 | 2007 |
| Nehalem | Nehalem | Xeon 5500/3500 (Core i7 1st Gen) | 2008 |
| Westmere | Westmere | Xeon 5600/3600 | 2010 |
| Sandy Bridge | Sandy Bridge | Xeon E5-2600 (Core i 2nd Gen) | 2011 |
| Ivy Bridge | Ivy Bridge | Xeon E5-2600 v2 (Core i 3rd Gen) | 2013 |
| Haswell | Haswell | Xeon E5-2600 v3 (Core i 4th Gen) | 2014 |
| Broadwell | Broadwell | Xeon E5-2600 v4 (Core i 5th Gen) | 2016 |
| Skylake | Skylake | Xeon Scalable (Gold/Platinum) | 2017 |
| Cascade Lake | Cascade Lake | Xeon Scalable Gen 2 | 2019 |
II. vSphere High Availability (HA) Configuration
II. Cấu hình vSphere High Availability (HA)
1. Enabling vSphere HA
1. Bật tính năng vSphere HA
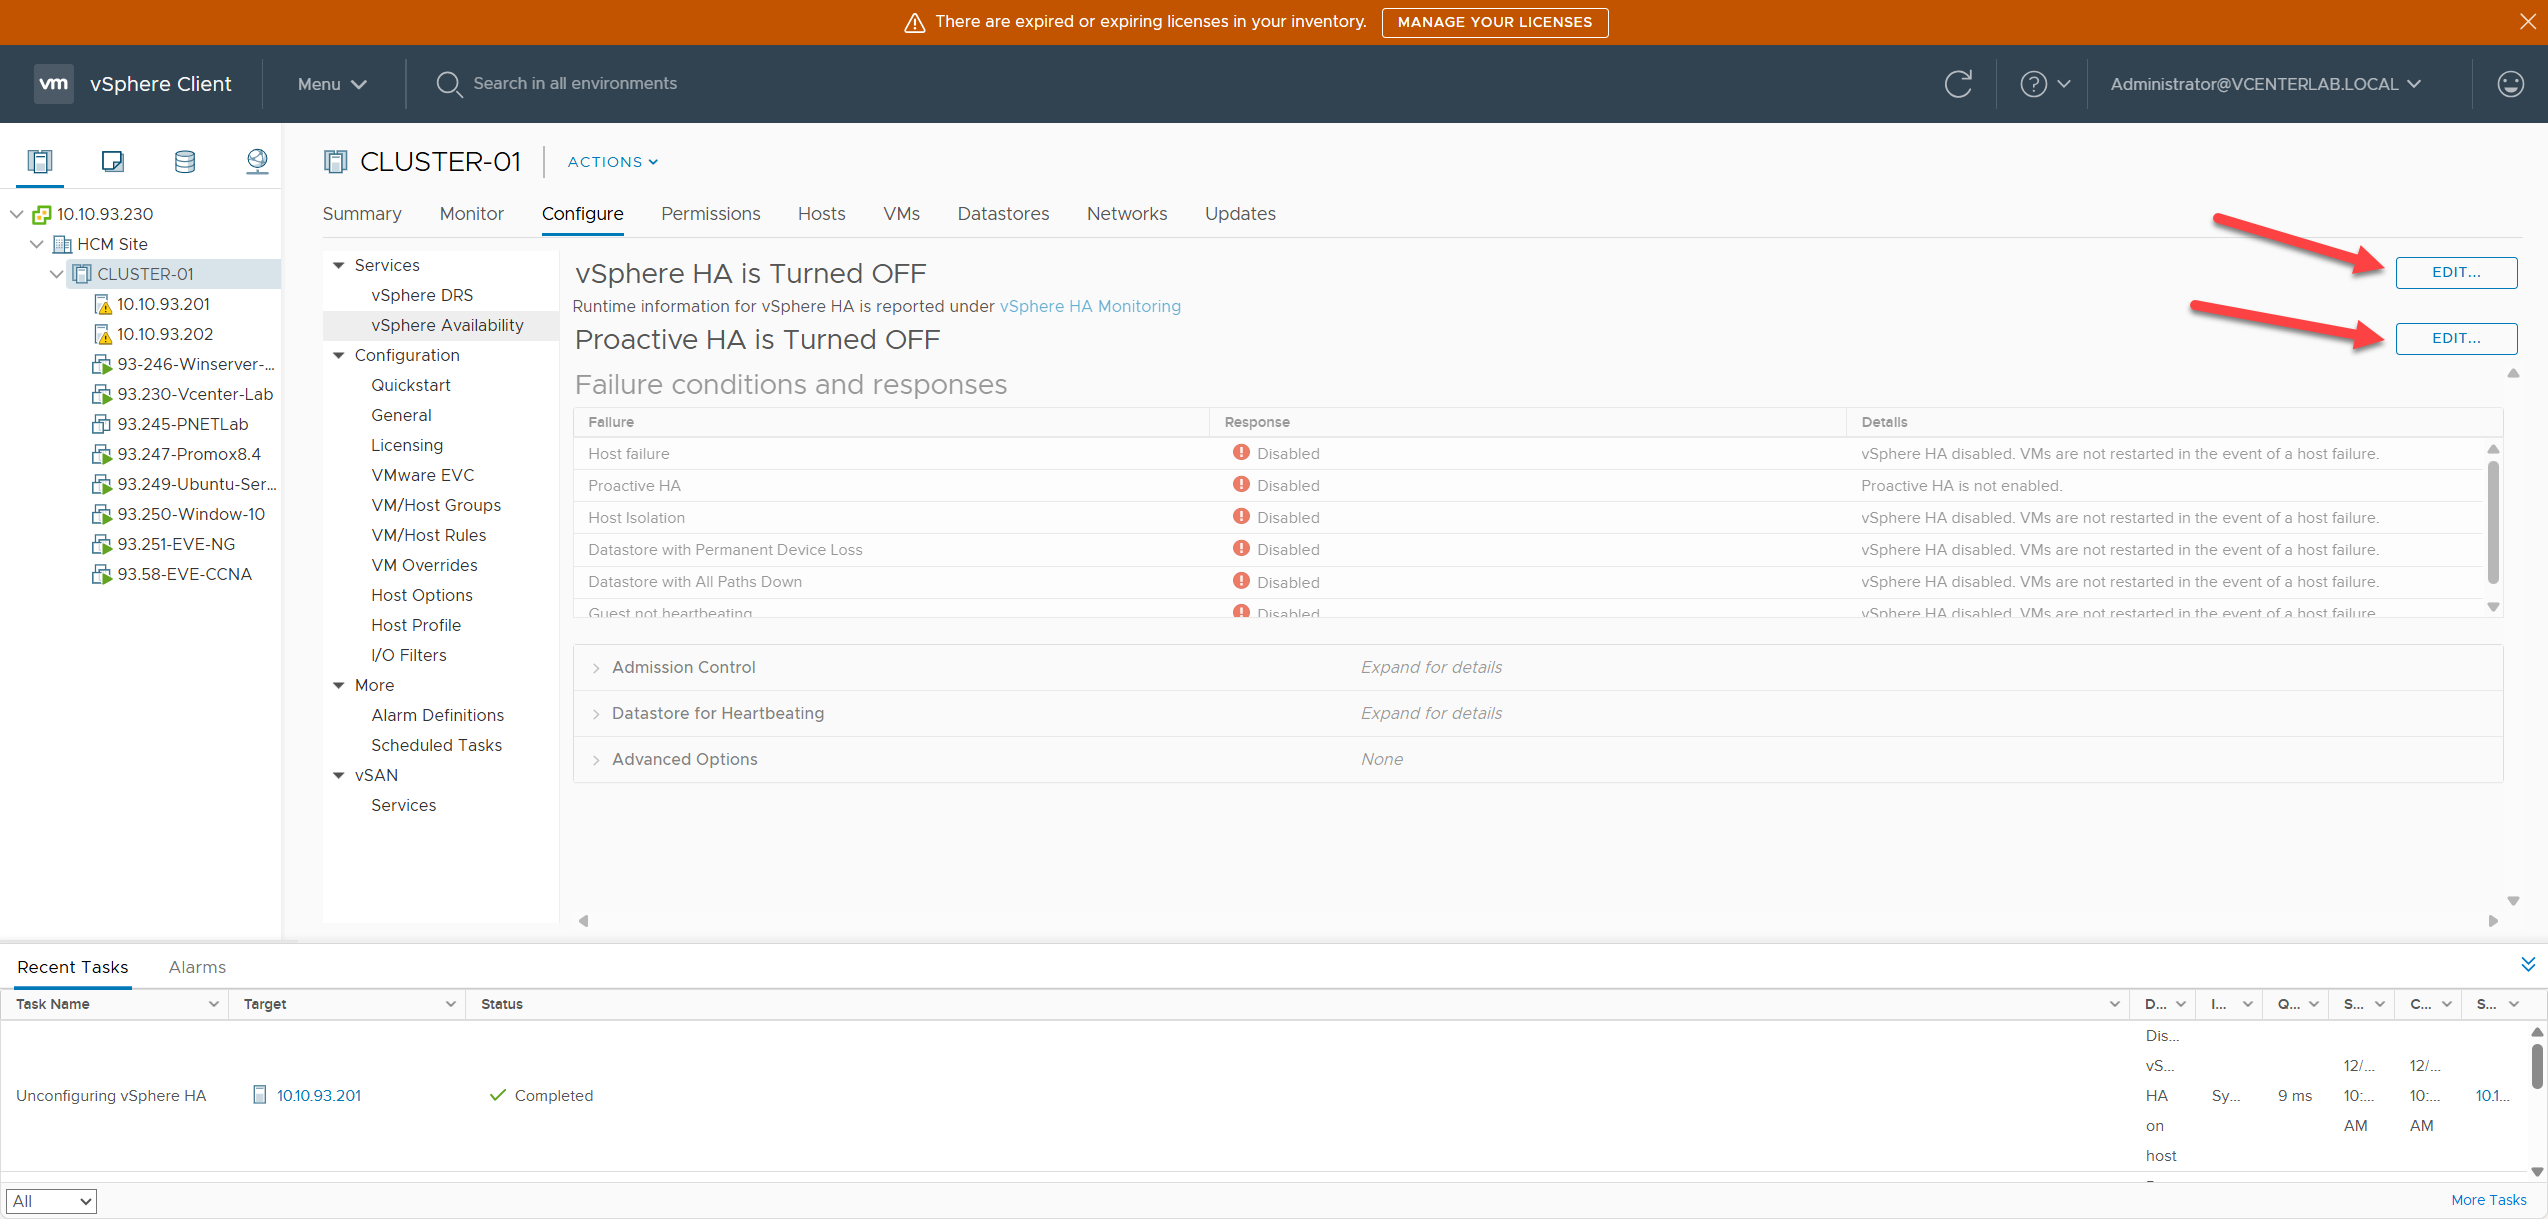
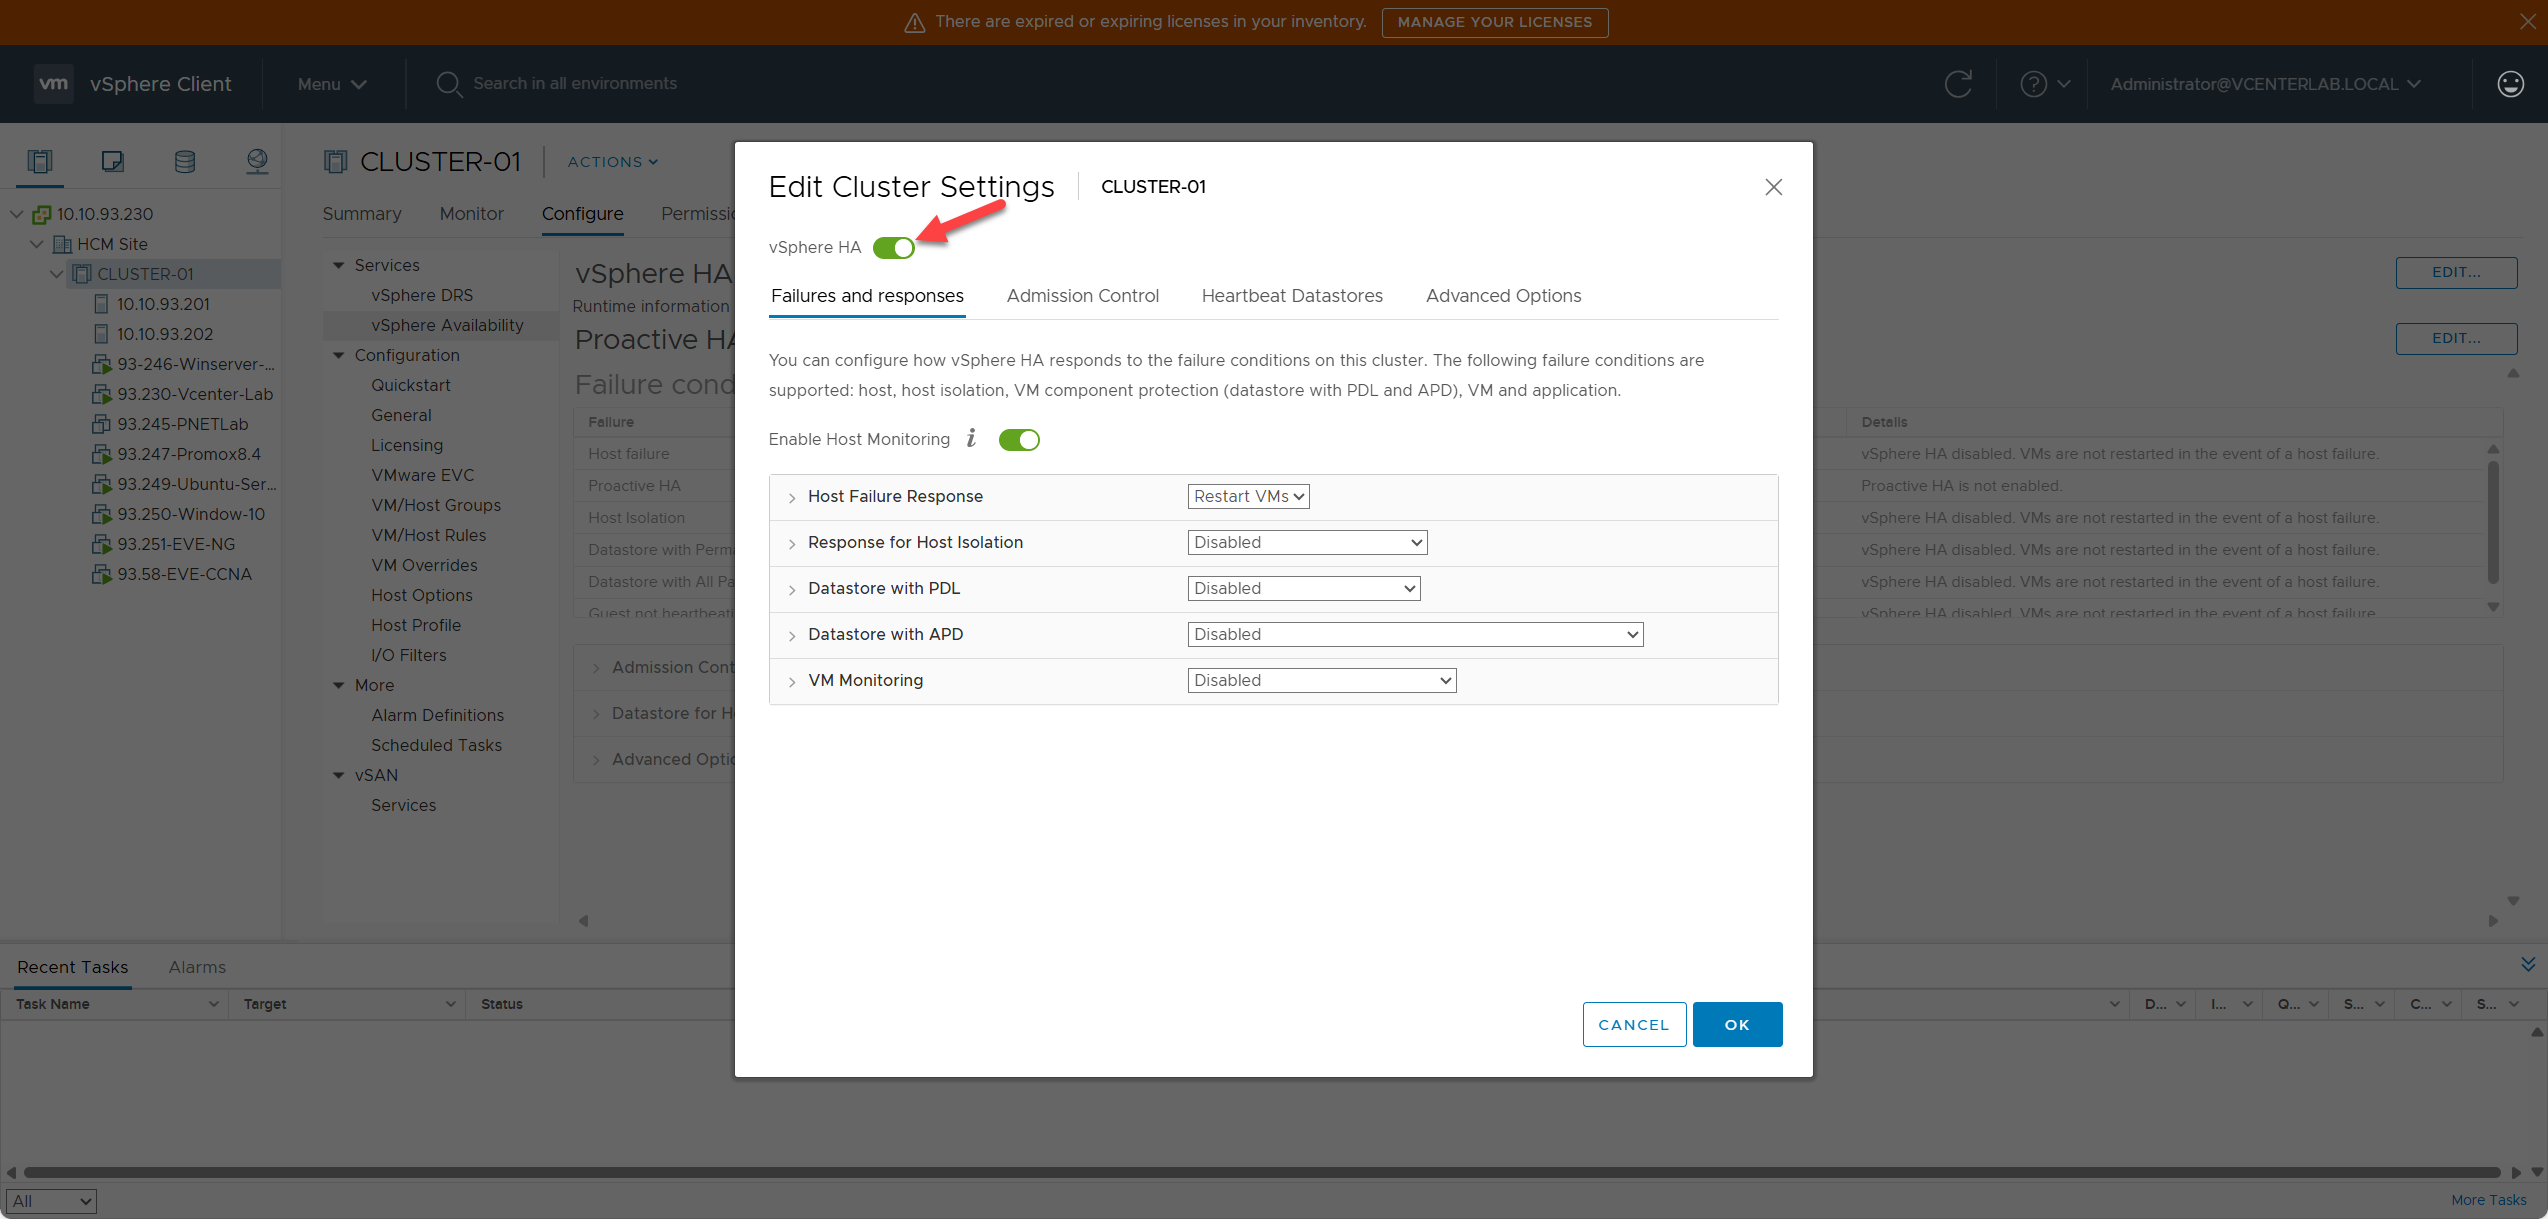
To begin configuration, click Edit to access the “Edit Cluster Setting” interface and Enable vSphere HA.
Để bắt đầu cấu hình, nhấp vào Edit để truy cập giao diện “Edit Cluster Setting” và chọn Enable vSphere HA.
2. Failures and Responses
2. Các lỗi và Phản hồi (Failures and Responses)
2.1. Host Failure Response
2.1. Phản hồi khi Host gặp lỗi
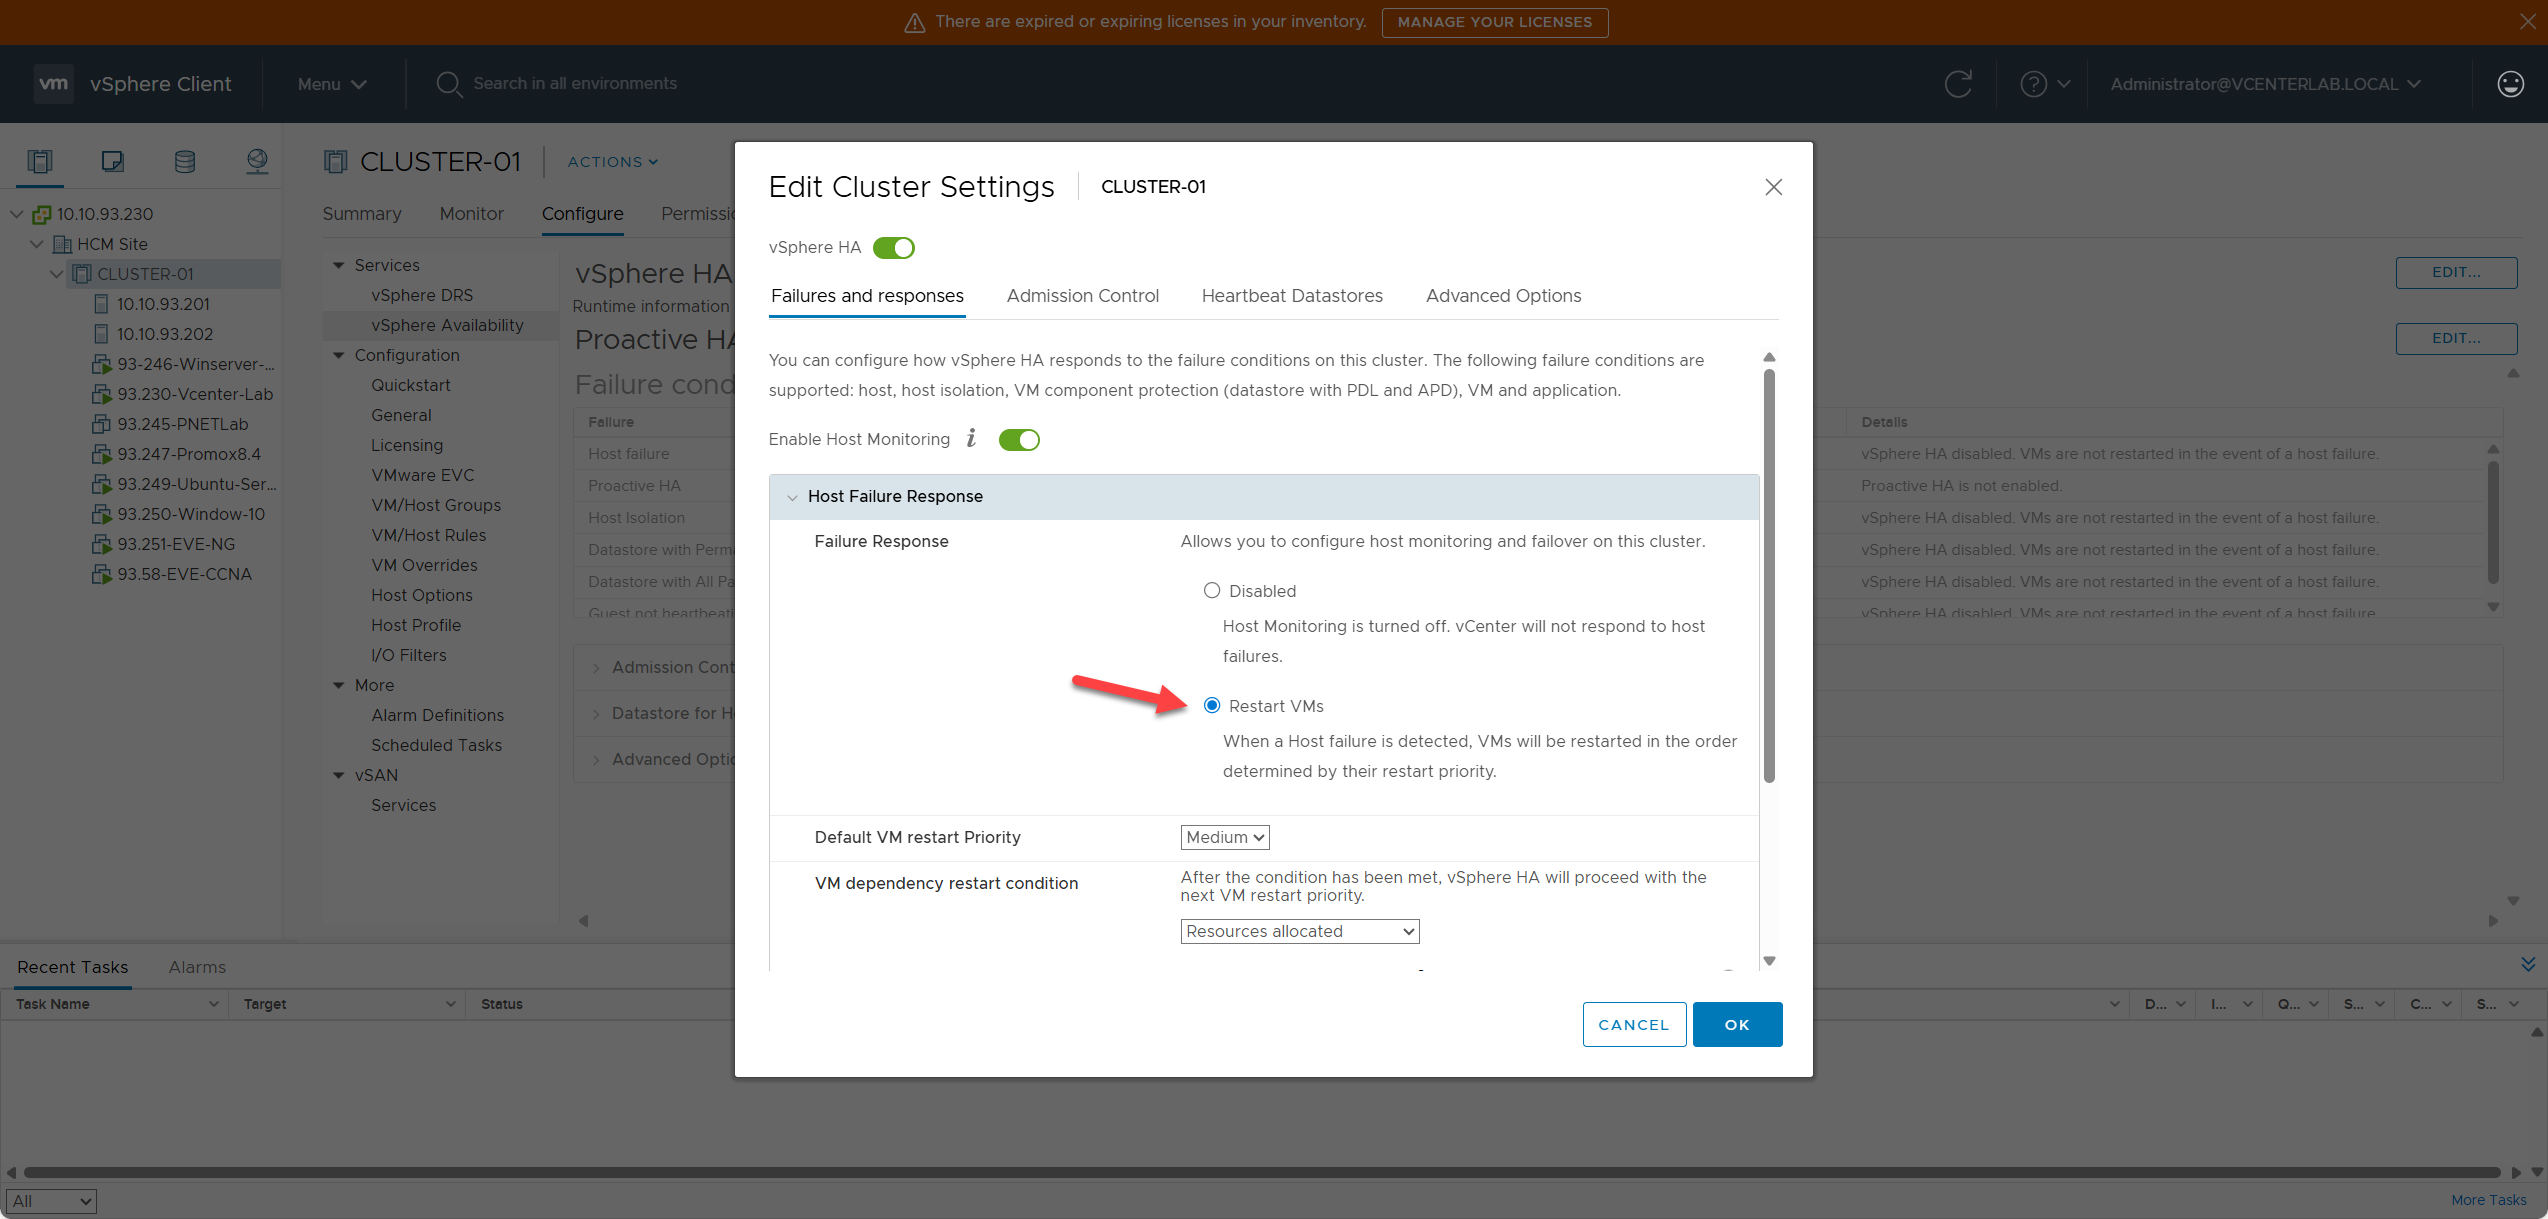
Host Failure Response determines what HA will do when an ESXi host FAILS completely (e.g., power loss, kernel crash, motherboard failure, or unresponsive heartbeats).
Host Failure Response xác định HA sẽ làm gì khi một máy chủ ESXi gặp lỗi hoàn toàn (ví dụ: mất điện, lỗi kernel, lỗi mainboard, hoặc không phản hồi heartbeat).
Host failure is detected via 2 mechanisms:
Lỗi host được phát hiện qua 2 cơ chế:
- Network heartbeat (sent via management network every 1s).
- Datastore heartbeat (written to shared datastore if network heartbeat is lost).
- Heartbeat mạng (gửi qua mạng quản lý mỗi 1 giây).
- Heartbeat Datastore (ghi vào shared datastore nếu mất heartbeat mạng).
2.1.1. Failure Response Options
2.1.1. Các tùy chọn phản hồi lỗi
| Option | Meaning | Note |
|---|---|---|
| Disabled | Do nothing – DO NOT restart VMs | ⚠️ Use only when you want to disable HA completely. |
| Restart VMs (recommended) | Power on VMs on another host | ✅ Default, Recommended. |
| Restart VMs – Conservative | Only restart if resources are guaranteed | Use when Cluster resources are limited to avoid overcommitment. |
| Tùy chọn | Ý nghĩa | Ghi chú |
|---|---|---|
| Disabled | Không làm gì – KHÔNG restart VM | ⚠️ Chỉ dùng khi muốn tắt hoàn toàn HA. |
| Restart VMs (khuyên dùng) | Bật VM trên host khác | ✅ Mặc định, Khuyên dùng. |
| Restart VMs – Conservative | Chỉ restart nếu đảm bảo tài nguyên | Dùng khi tài nguyên Cluster hạn chế để tránh quá tải (overcommitment). |
2.1.2. Default VM Restart Priority
2.1.2. Độ ưu tiên khởi động lại VM mặc định
VMware HA decides the order in which to start VMs based on priority.
VMware HA quyết định thứ tự khởi động các VM dựa trên độ ưu tiên.

| Priority | Meaning | Example |
|---|---|---|
| Highest | Restart first | AD/DNS, Database, Storage VM |
| High | Restart immediately after Highest | vCenter, API backend |
| Medium | Default (Most VMs) | Application servers |
| Low | Lower priority | Monitoring, non-critical |
| Lowest | Restart last | Test VMs, backups, templates |
| Độ ưu tiên | Ý nghĩa | Ví dụ |
|---|---|---|
| Highest | Restart đầu tiên | AD/DNS, Database, Storage VM |
| High | Restart ngay sau Highest | vCenter, API backend |
| Medium | Mặc định (Đa số VM) | Application servers |
| Low | Ưu tiên thấp hơn | Giám sát (Monitoring), không quan trọng |
| Lowest | Restart cuối cùng | Test VMs, backups, templates |
When a host fails → VMware reboots in order: Highest → High → Medium → Low → Lowest.
Khi một host bị lỗi → VMware sẽ khởi động lại theo thứ tự: Highest → High → Medium → Low → Lowest.
2.1.3. VM Dependency Restart Condition
2.1.3. Điều kiện ràng buộc khởi động lại VM
This condition determines when VMware HA is allowed to proceed to restart VMs of the next priority level.
Điều kiện này xác định khi nào VMware HA được phép chuyển sang khởi động lại các VM ở mức ưu tiên tiếp theo.

| Option | Check for what? | Wait Level | Speed | Use Case |
|---|---|---|---|---|
| Resources allocated | Only resources assigned | Lowest | Fastest | Lab, test, non-dependent workloads |
| Powered on | VM is Powered On | Low | Fast | Small production, no complex DB-App relationships |
| Guest Heartbeats | OS booted, Tools OK | Medium | Medium | Standard Production |
| App Heartbeats | App reports OK | High | Slow | Mission-critical apps |
| Tùy chọn | Kiểm tra gì? | Mức chờ | Tốc độ | Khi dùng |
|---|---|---|---|---|
| Resources allocated | Chỉ cấp phát tài nguyên | Thấp nhất | Nhanh nhất | Lab, test, workload không phụ thuộc |
| Powered on | VM đã bật nguồn | Thấp | Nhanh | Production nhỏ, không có quan hệ DB-App phức tạp |
| Guest Heartbeats | OS đã boot, Tools OK | Trung bình | Trung bình | Production tiêu chuẩn |
| App Heartbeats | App báo cáo OK | Cao | Chậm | Ứng dụng cực kỳ quan trọng (Mission-critical) |
Use Case 1: Resources Allocated
HA only needs to complete “RESOURCE ALLOCATION” for high priority VMs (CPU reserved, RAM allocated, VM assigned to host).
Use Case: Lab test with 50 VMs needing restart after host failure. Requirement to restart all as fast as possible.
Config: Priority = Medium, Condition = Resources Allocated, Timeout = 60s.
Result: HA allocates resources almost simultaneously, total time ~2-3 minutes.
Use Case 2: Powered On
HA waits for VM to reach “Powered On” state, indifferent to OS boot completion.
Use Case: Enterprise with 20 remote user VMs (Windows, Linux), no dependencies.
Config: Condition = Powered On. Priority: DC (High), App (Medium), Web (Low). Timeout = 120s.
Result: Restart by priority: High → Medium → Low.
Use Case 3: Guest Heartbeats Detected (Best Practice)
HA waits for VMware Tools to send heartbeats (OS booted, drivers OK, network stable).
Use Case: Multi-tier Production (Database → App → Web). DB must be ready before App starts.
Config: Condition = Guest Heartbeats detected. Priority: DB (Highest), App (High), Web (Low). Timeout = 300s.
Result: 1. Restart DB (Highest) → 2. Restart App (High) → 3. Restart Web (Low).
Use Case 4: App Heartbeats (Application Monitoring SDK)
HA only restarts the next group when the application reports OK (requires app agent).
Use Case: Mission-critical systems (Core Banking, Telco) requiring fully ready apps (Redis, Oracle, API engine…).
Config: Condition = App Heartbeats detected. Priority: DB (Highest), Middleware (High), Web (Low). Timeout = 600s.
Trường hợp 1: Resources Allocated (Đã phân bổ tài nguyên)
HA chỉ cần hoàn thành việc “PHÂN BỔ TÀI NGUYÊN” cho các VM ưu tiên cao (CPU reserved, RAM allocated, VM đã gán cho host).
Sử dụng: Môi trường Lab với 50 VM cần khởi động lại sau khi host lỗi. Yêu cầu khởi động tất cả nhanh nhất có thể.
Cấu hình: Priority = Medium, Condition = Resources Allocated, Timeout = 60s.
Kết quả: HA phân bổ tài nguyên gần như đồng thời, tổng thời gian ~2-3 phút.
Trường hợp 2: Powered On (Đã bật nguồn)
HA chờ VM đạt trạng thái “Powered On”, không quan tâm OS đã boot xong chưa.
Sử dụng: Doanh nghiệp có 20 VM cho user từ xa (Windows, Linux), không phụ thuộc lẫn nhau.
Cấu hình: Condition = Powered On. Priority: DC (High), App (Medium), Web (Low). Timeout = 120s.
Kết quả: Khởi động theo thứ tự ưu tiên: High → Medium → Low.
Trường hợp 3: Guest Heartbeats Detected (Khuyên dùng cho Production)
HA chờ VMware Tools gửi heartbeat (OS đã boot, driver OK, mạng ổn định).
Sử dụng: Hệ thống Production nhiều tầng (Database → App → Web). DB phải sẵn sàng trước khi App chạy.
Cấu hình: Condition = Guest Heartbeats detected. Priority: DB (Highest), App (High), Web (Low). Timeout = 300s.
Kết quả: 1. Restart DB (Highest) → 2. Restart App (High) → 3. Restart Web (Low).
Trường hợp 4: App Heartbeats (Application Monitoring SDK)
HA chỉ restart nhóm tiếp theo khi ứng dụng báo cáo OK (cần cài đặt app agent).
Sử dụng: Hệ thống quan trọng (Core Banking, Telco) yêu cầu ứng dụng phải sẵn sàng hoàn toàn (Redis, Oracle, API engine…).
Cấu hình: Condition = App Heartbeats detected. Priority: DB (Highest), Middleware (High), Web (Low). Timeout = 600s.
- vSphere 6.7: Supports all features above.
- vSphere 7.0: App Heartbeats is ⚠️ Deprecated. Option “None” added.
- vSphere 8.0: App Heartbeats is ❌ Removed.
- vSphere 6.7: Hỗ trợ tất cả các tính năng trên.
- vSphere 7.0: App Heartbeats bị ⚠️ Deprecated (lỗi thời). Thêm tùy chọn “None”.
- vSphere 8.0: App Heartbeats bị ❌ Removed (loại bỏ hoàn toàn).
3. Response for Host Isolation
3. Phản hồi khi Host bị cô lập
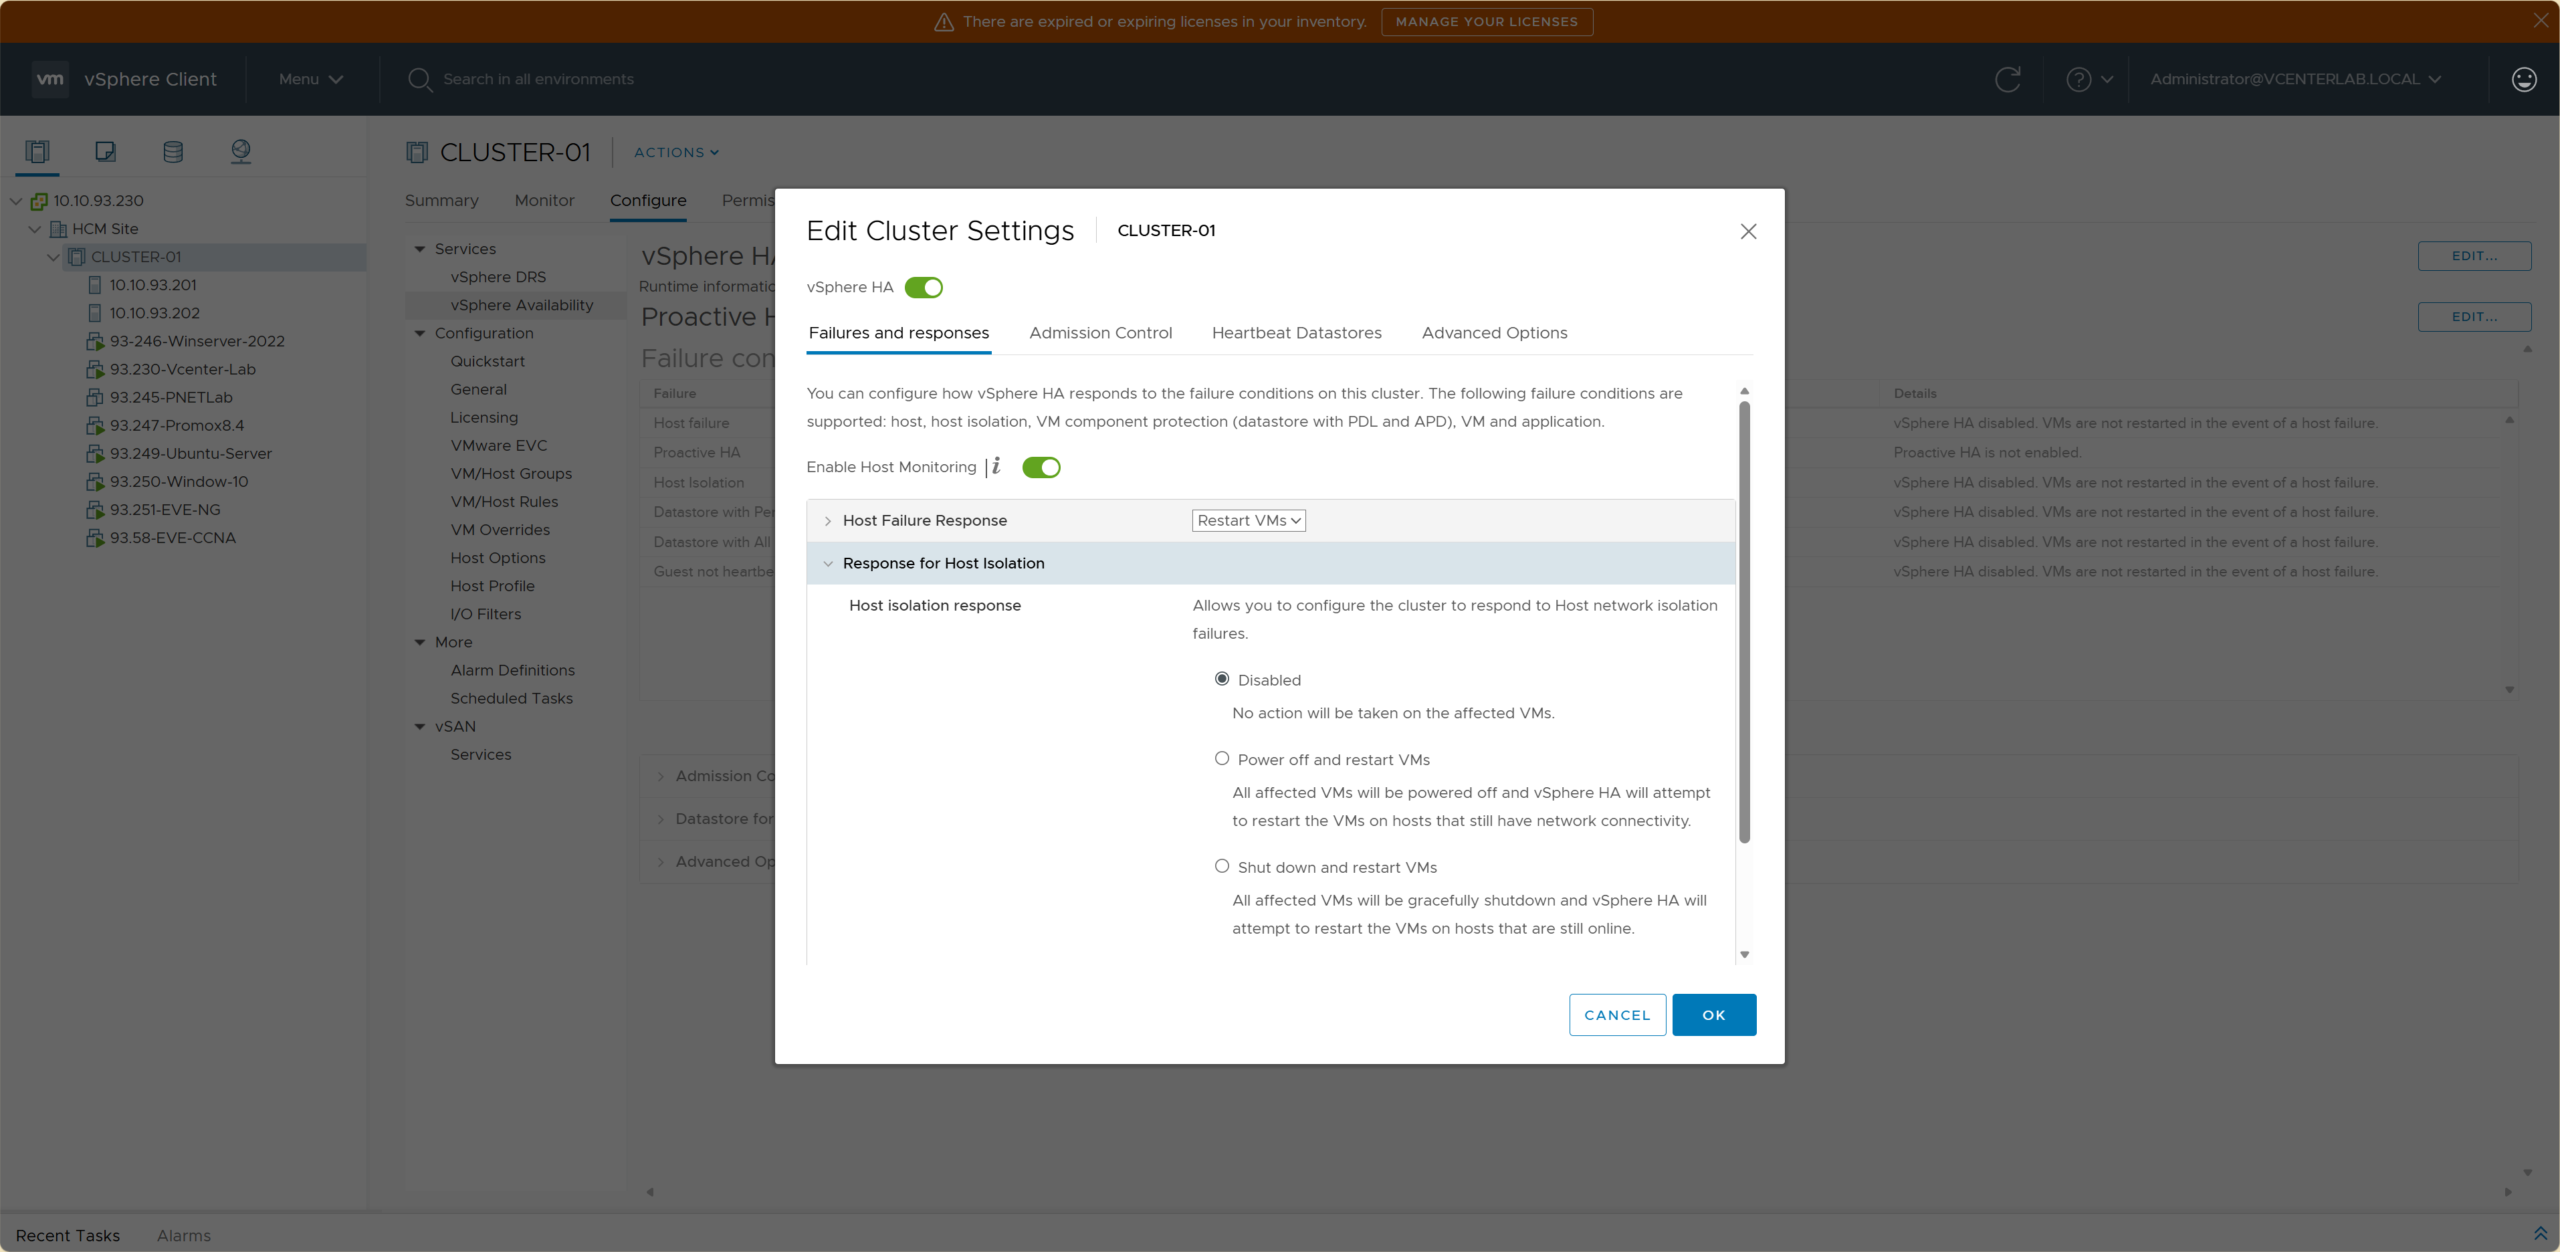
Host Isolation occurs when an ESXi host loses network connectivity to the cluster but the VMs are still running, hardware is OK, and power is ON.
Host Isolation xảy ra khi ESXi host mất kết nối mạng với cluster nhưng các VM vẫn đang chạy, phần cứng vẫn ổn, và nguồn vẫn bật.
| Option | Behavior | Data Integrity | Use Case |
|---|---|---|---|
| Disabled | VMs continue running on isolated host, HA does not restart. | ⚠️ High Risk (split-brain if shared storage) | LAB/Test only, no shared storage. |
| Shut down and restart VMs | Host sends guest shutdown command (graceful) → HA restarts on another host. | ✅ Safest (graceful) | Production running DB, Critical Apps. |
| Power off and restart VMs | Host hard power-offs VMs → HA powers them on another host. | ⚠️ Medium Risk (crash-consistent) | Stateless apps, Web servers, priority on fast RTO. |
| Tùy chọn | Hành vi | An toàn dữ liệu | Sử dụng |
|---|---|---|---|
| Disabled | VM tiếp tục chạy trên host bị cô lập, HA KHÔNG restart. | ⚠️ Rủi ro cao (split-brain nếu có shared storage) | Chỉ dùng cho LAB/Test, không có shared storage. |
| Shut down and restart VMs | Host gửi lệnh shutdown máy khách (mềm) → HA restart trên host khác. | ✅ An toàn nhất (graceful) | Production chạy DB, Ứng dụng quan trọng. |
| Power off and restart VMs | Host tắt nguồn cứng VM → HA bật lại trên host khác. | ⚠️ Rủi ro trung bình (crash-consistent) | Ứng dụng stateless, Web server, ưu tiên RTO nhanh. |
4. Datastore with PDL (Permanent Device Loss)
4. Datastore gặp lỗi PDL (Mất thiết bị vĩnh viễn)
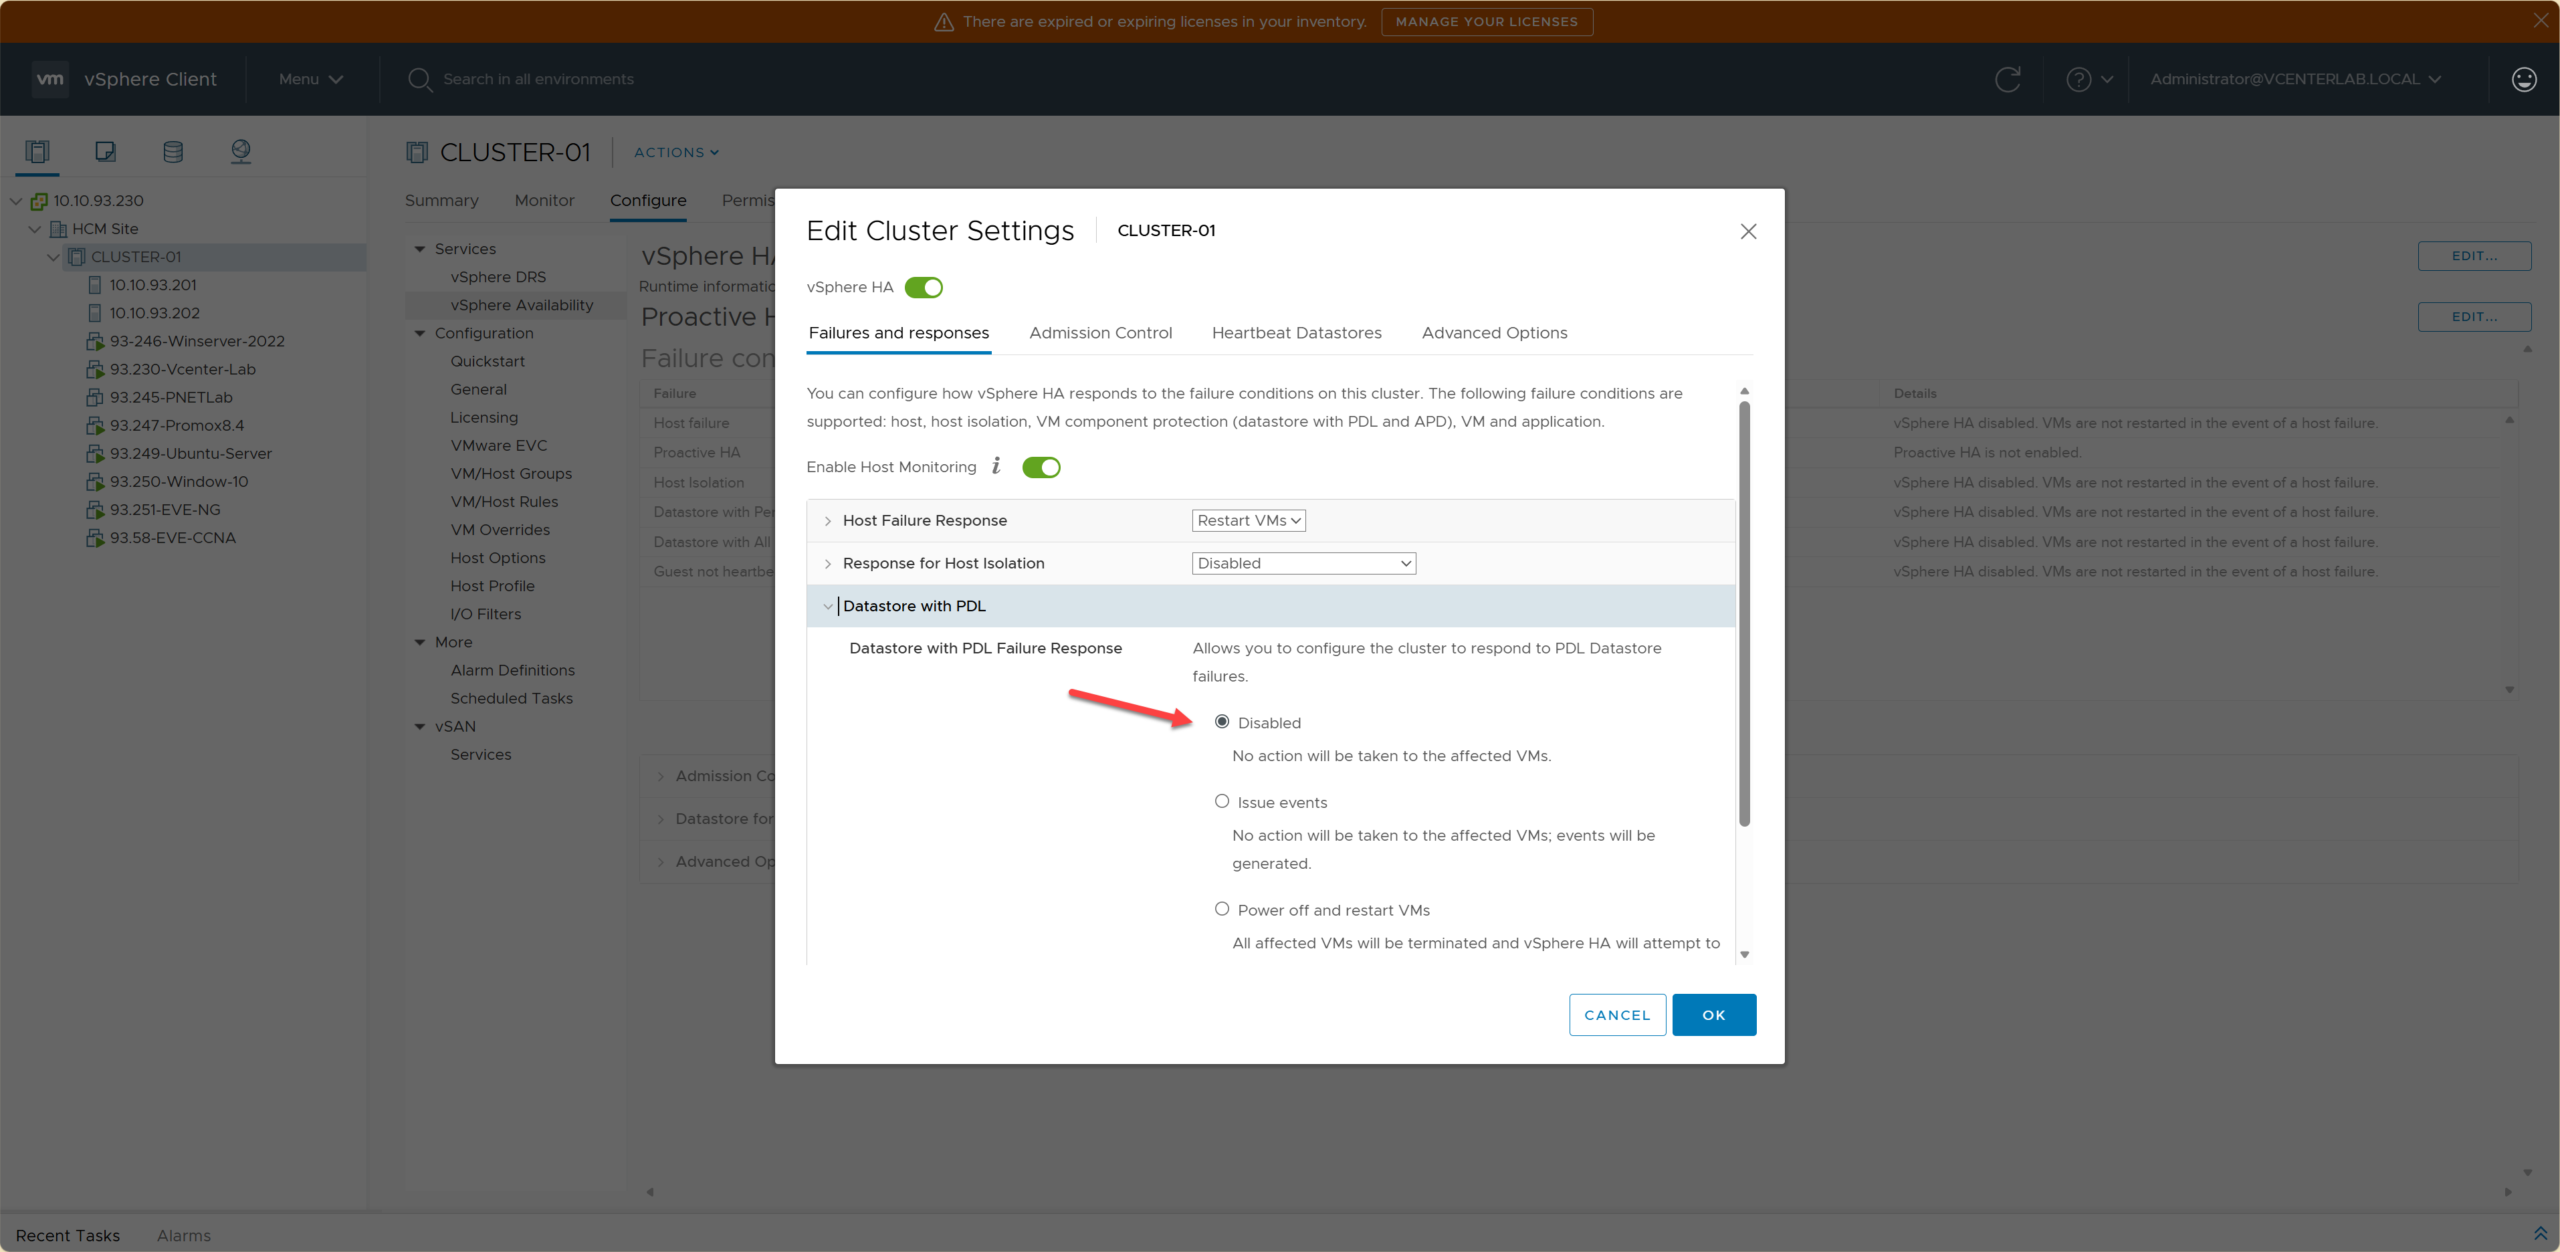
PDL is a condition where the ESXi host PERMANENTLY LOSES CONNECTION to the datastore (storage hardware failure, LUN unmapped…). HA is responsible for restarting VMs on another host that still has access to the datastore.
PDL là tình trạng ESXi host MẤT KẾT NỐI VĨNH VIỄN tới datastore (lỗi phần cứng storage, LUN bị unmap…). HA chịu trách nhiệm restart VM trên host khác vẫn còn kết nối tới datastore.
| Option | Behavior | Use Case |
|---|---|---|
| Disabled | Do nothing. VM will crash when I/O fails. | Never use in production. |
| Issue events | Send warning, DO NOT auto-restart VM. | Monitoring-only environments. |
| Power off and restart VMs ⭐ | Power-off VM → Restart on another host. | Recommended. Production requiring fast RTO. |
| Shutdown and restart VMs | Graceful shutdown → Restart on another host. | DB requiring high data safety. |
| Tùy chọn | Hành vi | Sử dụng |
|---|---|---|
| Disabled | Không làm gì. VM sẽ crash khi I/O lỗi. | Không bao giờ dùng cho production. |
| Issue events | Gửi cảnh báo, KHÔNG tự động restart VM. | Môi trường chỉ giám sát (Monitoring). |
| Power off and restart VMs ⭐ | Tắt nguồn VM → Restart trên host khác. | Khuyên dùng. Production cần RTO nhanh. |
| Shutdown and restart VMs | Shutdown mềm → Restart trên host khác. | DB cần an toàn dữ liệu cao. |
5. Datastore with APD (All Paths Down)
5. Datastore gặp lỗi APD (Mất tất cả đường dẫn)
ESXi host loses connection to datastore but DOES NOT know if it is temporary or permanent (unlike PDL which confirms permanent failure).
ESXi host mất kết nối tới datastore nhưng KHÔNG biết là tạm thời hay vĩnh viễn (khác với PDL là đã xác nhận lỗi vĩnh viễn).
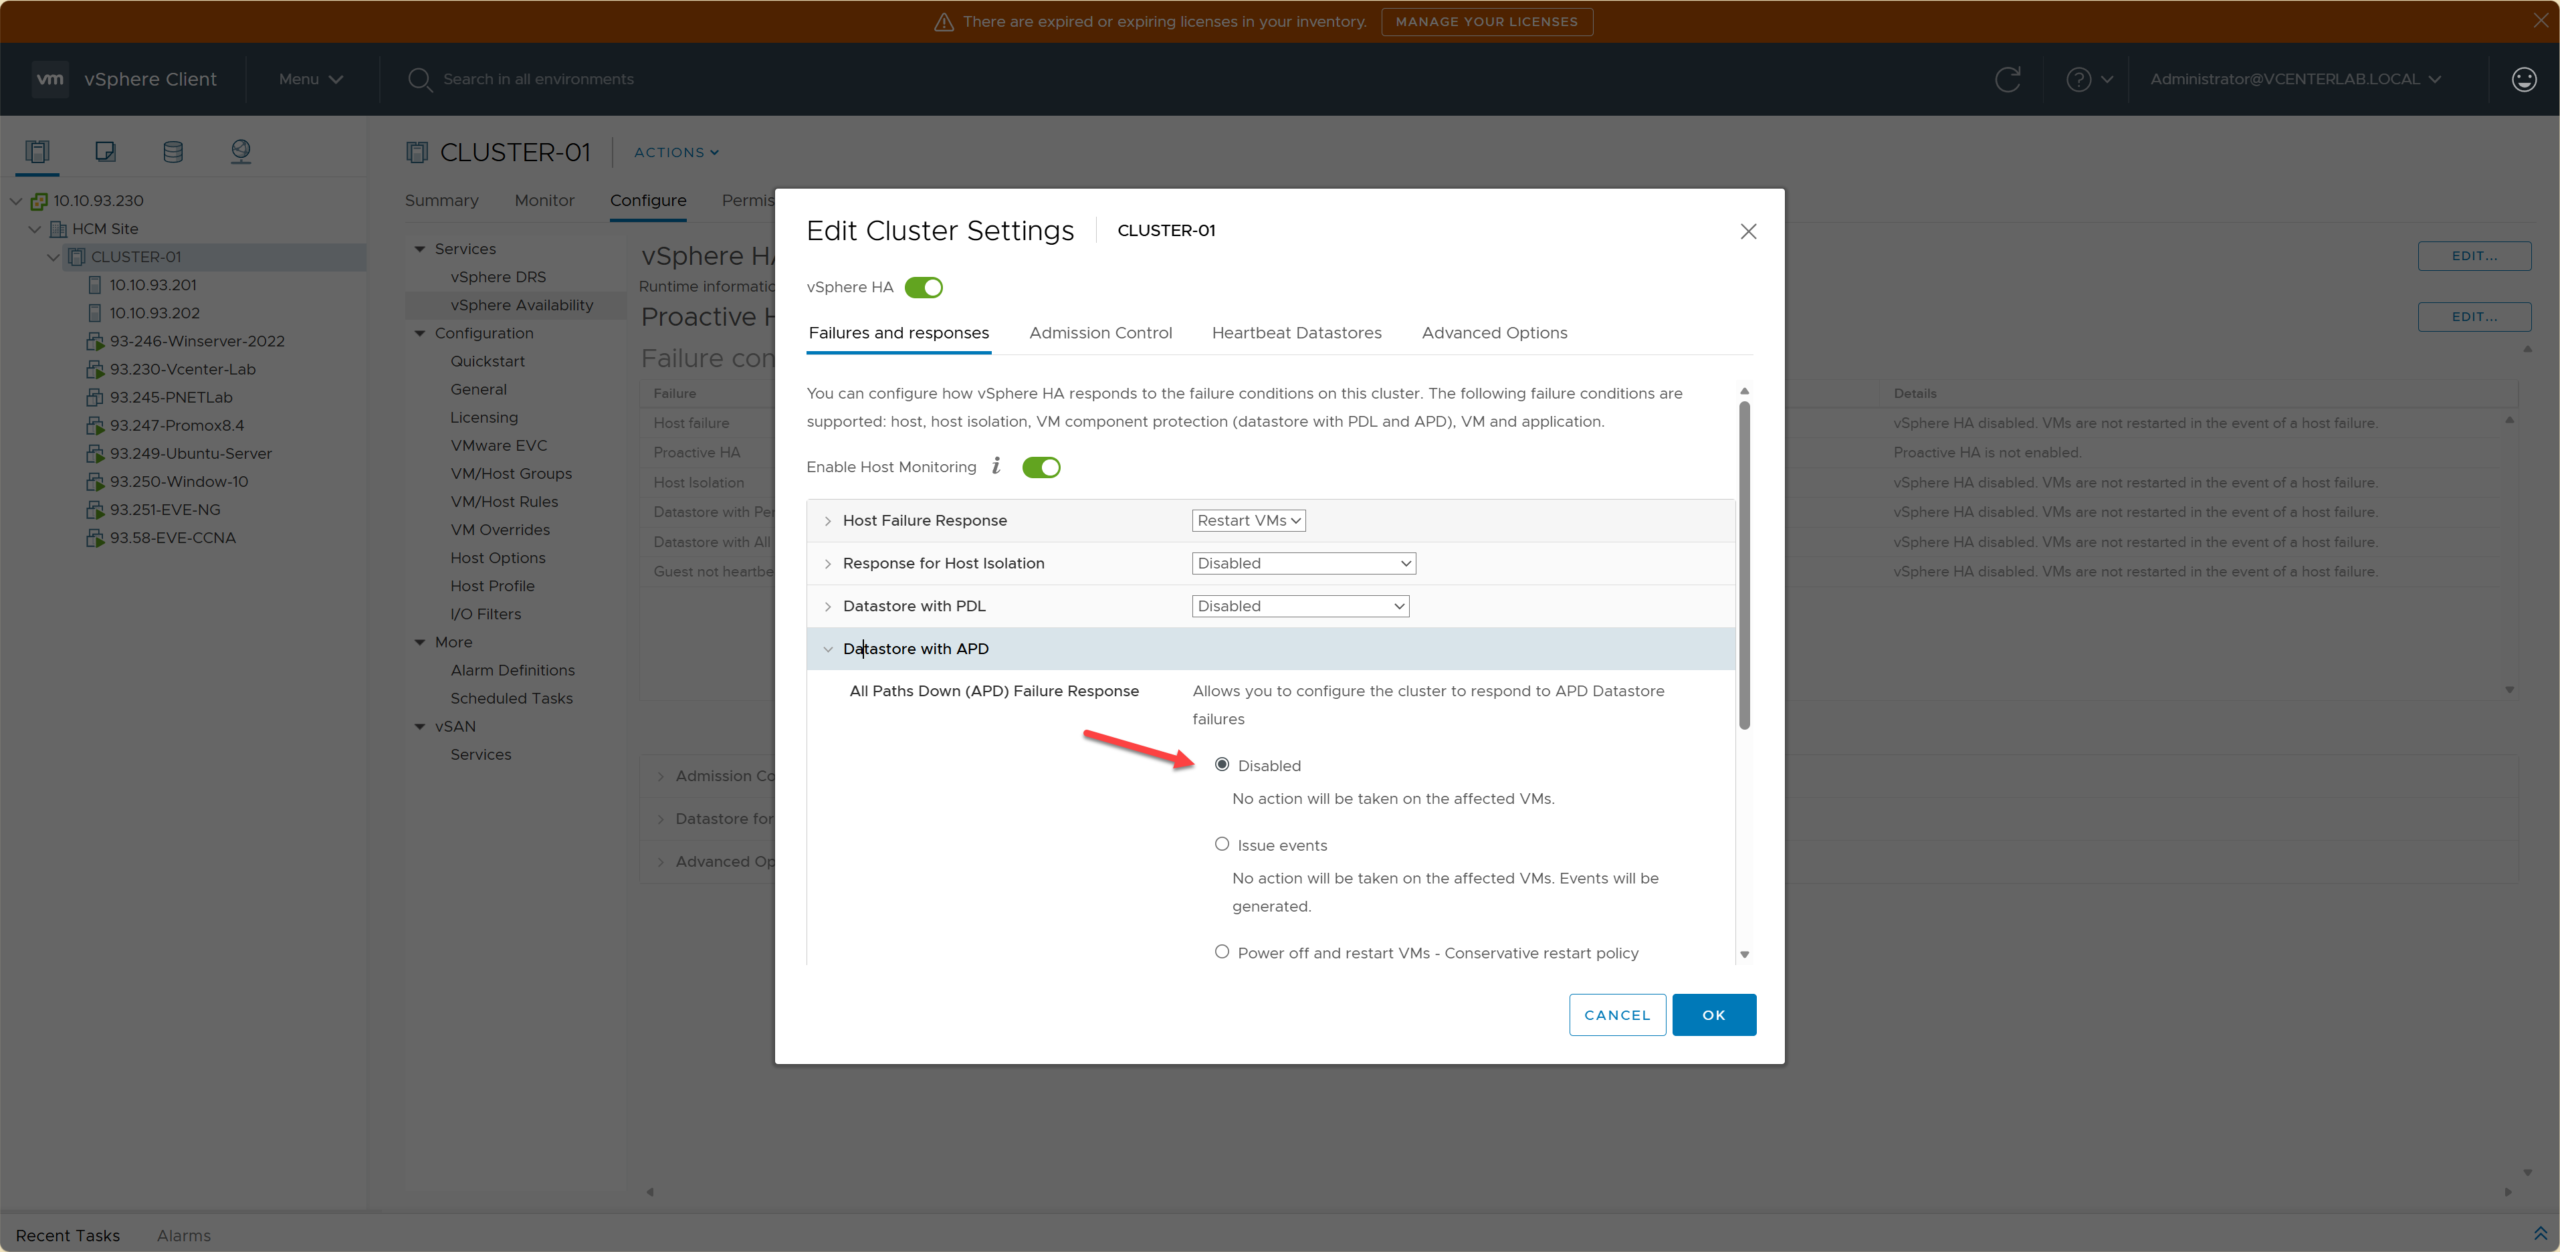
APD Operation Mechanism:
- APD Detected (0-140s): ESXi loses connection, VM hangs (I/O freeze).
- APD Timeout (140s): Determines datastore is not recovering. HA prepares to act.
- APD Recovery Window (180s after Timeout): Waits further to see if storage recovers.
- APD Declared Permanent (>180s): Marked as completely lost. HA proceeds to restart according to policy.
Cơ chế hoạt động của APD:
- APD Detected (0-140s): ESXi mất kết nối, VM bị treo (I/O freeze).
- APD Timeout (140s): Xác định datastore không hồi phục. HA chuẩn bị hành động.
- APD Recovery Window (180s sau Timeout): Chờ thêm xem storage có hồi phục không.
- APD Declared Permanent (>180s): Đánh dấu là mất hoàn toàn. HA tiến hành restart theo chính sách.
6. VM Monitoring
6. Giám sát VM (VM Monitoring)
VM Monitoring is a vSphere HA mechanism designed to detect and resolve issues such as:
- VM OS hangs/freezes.
- Unresponsive OS.
- VMware Tools failing to send heartbeats.
- Application freezes within the VM.
Action: HA automatically restarts the VMs.
How it works: HA monitors heartbeats from VMware Tools, basic Guest I/O activity, and Guest OS responsiveness status.
VM Monitoring là cơ chế của vSphere HA dùng để phát hiện và xử lý các trường hợp:
- VM bị treo OS.
- OS không phản hồi.
- VMware Tools không gửi heartbeat.
- Ứng dụng trong VM bị treo.
Hành động: HA sẽ tự động restart VMs.
Cơ chế hoạt động: HA theo dõi Heartbeat từ VMware Tools, hoạt động I/O cơ bản của guest, và trạng thái guest OS responsiveness.
6.1. Enable Heartbeat Monitoring
6.1. Bật giám sát Heartbeat

| Option | Meaning | Use Case |
|---|---|---|
| Disabled | Disables VM Monitoring | Lab, test environments |
| VM Monitoring Only | Restarts VM when OS hangs | Production (Recommended) |
| VM and Application Monitoring | Restarts VM when App hangs | vSphere 6.7 (Deprecated in 7.0, Removed in 8.0) |
| Tùy chọn | Ý nghĩa | Khi dùng |
|---|---|---|
| Disabled | Tắt VM Monitoring | Lab, test |
| VM Monitoring Only | Restart VM khi OS treo | Production (Khuyên dùng) |
| VM and Application Monitoring | Restart VM khi app treo | vSphere 6.7 (deprecated từ 7.0, removed v8) |
6.2. VM Monitoring Sensitivity
6.2. Độ nhạy của VM Monitoring
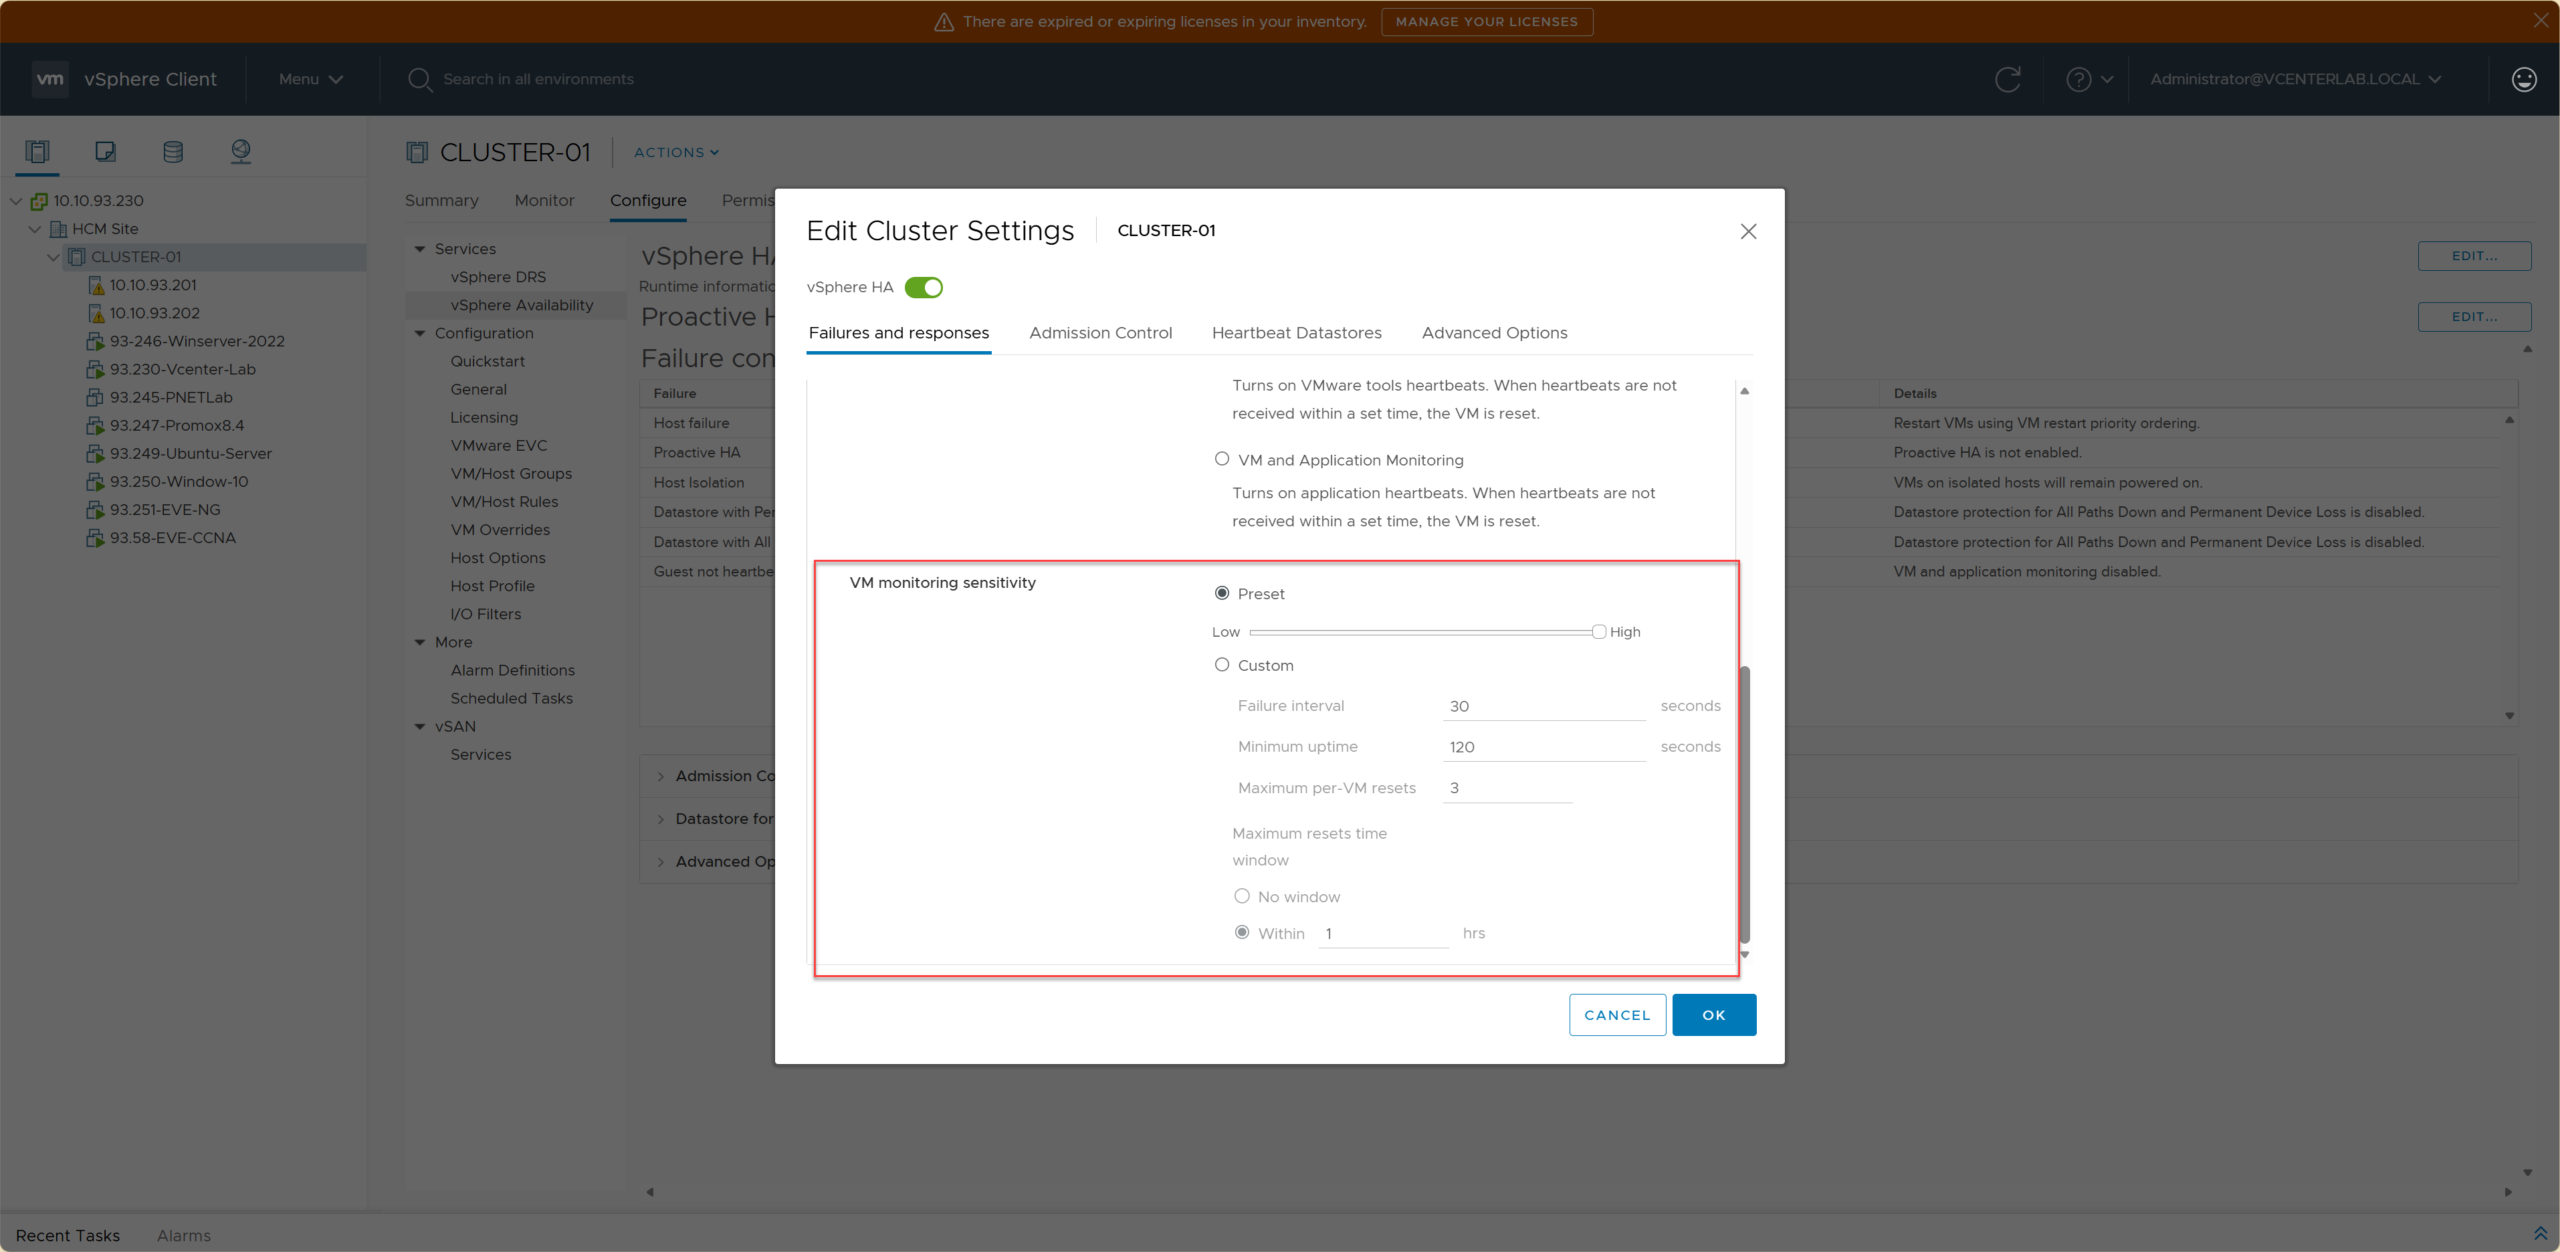
VM Monitoring Sensitivity determines how “sensitive” HA is when it detects missing Guest Heartbeats (via VMware Tools).
VM Monitoring Sensitivity quyết định HA sẽ “nhạy” tới mức nào khi phát hiện VM không gửi Guest Heartbeat (VMware Tools).
| Sensitivity | HA Reaction | Wait Time | False Restart Risk | Use Case |
|---|---|---|---|---|
| Low | Waits longer before restarting | Longest | Lowest | Heavy VMs, Large DBs, High Load |
| Medium (Default) ⭐ | Balanced wait & restart | Medium | Low | Production (Recommended) |
| High | Restarts very quickly upon lost heartbeat | Shortest | High | VDI, Stateless Web Servers |
| Độ nhạy | HA phản ứng thế nào? | Thời gian chờ | Nguy cơ restart nhầm | Khi dùng |
|---|---|---|---|---|
| Low | Chờ rất lâu trước khi restart | Dài nhất | Thấp nhất | VM nặng, DB lớn, dễ bị load cao |
| Medium (Default) ⭐ | Cân bằng giữa chờ & restart | Trung bình | Thấp | Production – khuyên dùng |
| High | Restart rất nhanh khi mất heartbeat | Ngắn nhất | Cao | VDI, web stateless |
6.3. Pros and Cons of Sensitivity Modes
6.3. Ưu nhược điểm của các chế độ
| Sensitivity | Pros | Cons | Best Fit |
|---|---|---|---|
| Low | • Avoids false restarts under high load • Data safety for DBs • Fewest false positives | • Slow detection of OS hangs • Extended downtime if VM is actually down | Databases, ERP, File Servers, Backup/AV VMs |
| Medium (Default) ⭐ | • Balance between stability & speed • Few false positives • Fits most workloads | • Not as fast as High for VDI/Stateless workloads | Standard Production, App Servers, DC, vCenter |
| High | • Very fast detection & restart • Lowest RTO • Quick user reconnect | • High risk of false restart during CPU/RAM spikes • Not suitable for DBs | VDI, Stateless Web, Session-based services |
| Độ nhạy | Ưu điểm | Nhược điểm | Phù hợp nhất |
|---|---|---|---|
| Low | • Tránh restart nhầm khi VM load cao • An toàn dữ liệu cho DB, VM nặng • Ít false positive nhất | • Thời gian phát hiện OS treo lâu • Downtime kéo dài nếu VM thật sự chết | Database, ERP, File Server, VM chạy backup/AV |
| Medium (Default) ⭐ | • Cân bằng giữa ổn định & tốc độ • Ít false positive • Phù hợp đa số workload production | • Không nhanh bằng High trong VDI/web stateless | Production thông thường, App server, DC, vCenter |
| High | • Phát hiện & restart rất nhanh • RTO thấp nhất • User reconnect nhanh | • Dễ restart nhầm khi CPU/RAM spike • Không phù hợp DB hoặc VM nặng | VDI, Web stateless, session-based services |
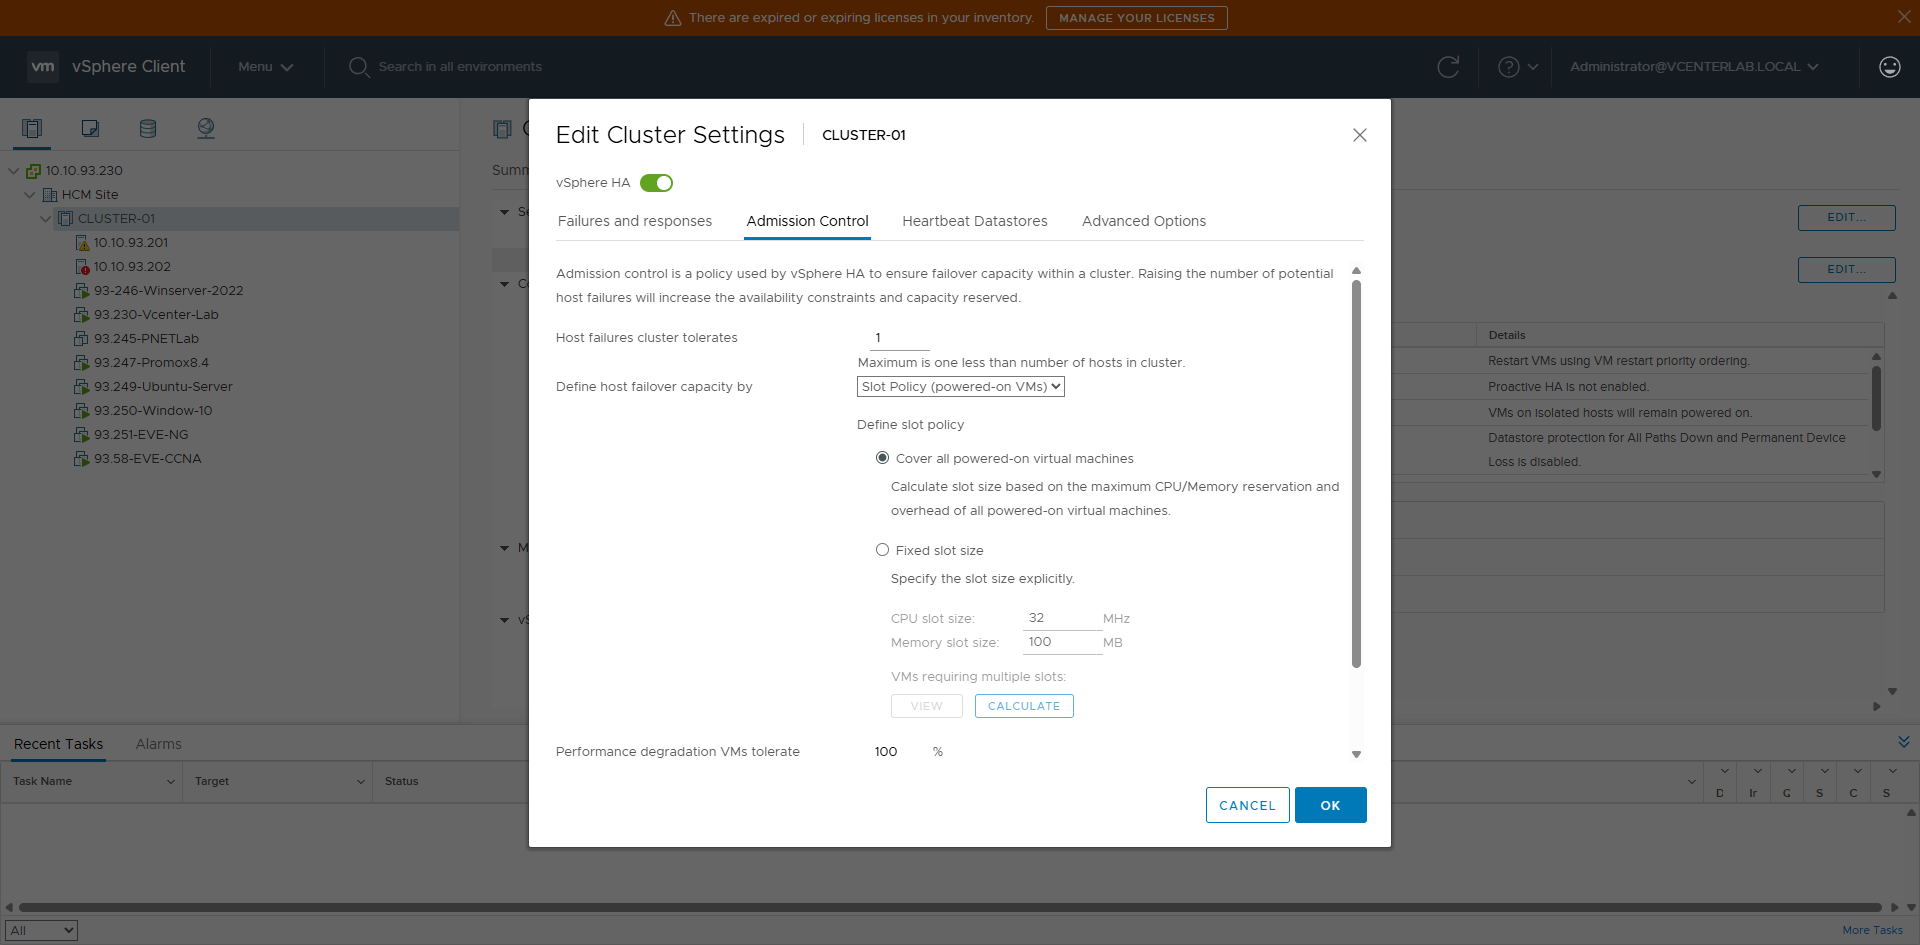
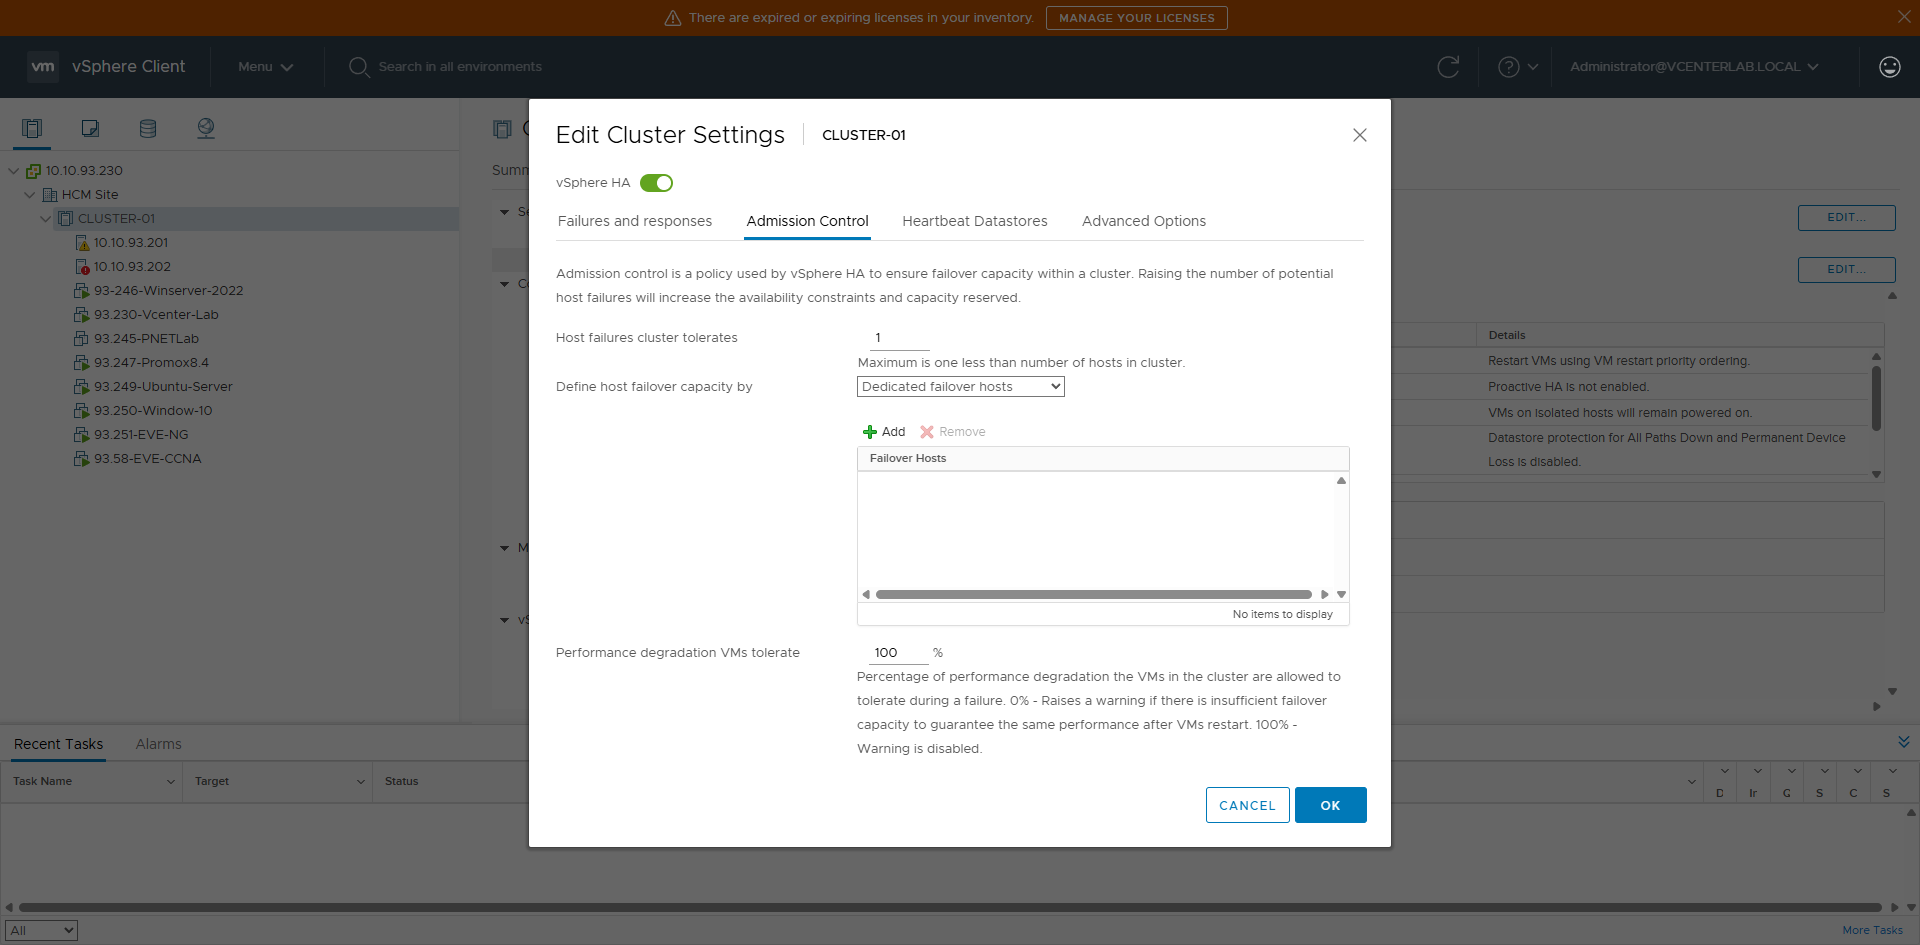
7. Admission Control
7. Admission Control (Kiểm soát Nhập môn)
Admission Control is a vSphere HA mechanism used to:
- Reserve resources (CPU/RAM) in the cluster.
- Ensure that when a host fails, HA always has enough resources to restart VMs.
Admission Control là cơ chế của vSphere HA dùng để:
- Giữ trước tài nguyên (CPU/RAM) trong cluster.
- Đảm bảo rằng khi host bị fail, HA luôn có đủ tài nguyên để restart VM.
7.1. Operation Mechanism
7.1. Cơ chế hoạt động
Admission Control DOES NOT restart VMs, it only:
- Decides whether to allow powering on a VM.
- Checks if the cluster has enough resources to tolerate host failures.
Admission Control KHÔNG restart VM, nó chỉ:
- Quyết định có cho power on VM hay không.
- Kiểm tra cluster có đủ resource để chịu được host failure hay không.

| Option | Mechanism | HA Guarantee | Resource Usage | Use Case | Pros | Cons |
|---|---|---|---|---|---|---|
| Disabled | No reservation, allows overcommit | ❌ No | ⭐⭐⭐⭐⭐ (Highest) | Lab, Test, Demo | Flexible, max utilization | HA might fail to restart VMs |
| Host failures cluster tolerates | Reserves for N host failures | ⭐⭐⭐ | ⭐⭐⭐ | Small, uniform clusters | Simple | Inaccurate if hosts differ |
| Percentage of cluster resources reserved ⭐ | Reserves % CPU & RAM | ⭐⭐⭐⭐ | ⭐⭐ | Production (Recommended) | Accurate, Flexible | Reduces usable capacity |
| Dedicated failover hosts | Specific standby hosts | ⭐⭐⭐⭐⭐ | ⭐ | Mission-critical | Guaranteed failover | Wasted resources |
| Tùy chọn | Cơ chế hoạt động | Đảm bảo HA | Sử dụng tài nguyên | Khi nên dùng | Ưu điểm | Nhược điểm |
|---|---|---|---|---|---|---|
| Disabled | Không giữ trước, cho phép overcommit | ❌ Không | ⭐⭐⭐⭐⭐ (Cao nhất) | Lab, Test, Demo | Linh hoạt, tận dụng tối đa | HA có thể thiếu tài nguyên |
| Host failures cluster tolerates | Giữ tài nguyên chịu được N host lỗi | ⭐⭐⭐ | ⭐⭐⭐ | Cluster nhỏ, host giống nhau | Dễ hiểu, nhanh | Không chính xác nếu host khác nhau |
| Percentage of cluster resources reserved ⭐ | Giữ trước % CPU & RAM | ⭐⭐⭐⭐ | ⭐⭐ | Production (Khuyên dùng) | Chính xác, linh hoạt | Giảm dung lượng khả dụng |
| Dedicated failover hosts | Chỉ định host riêng cho HA | ⭐⭐⭐⭐⭐ | ⭐ | Mission-critical | Failover chắc chắn | Lãng phí tài nguyên |
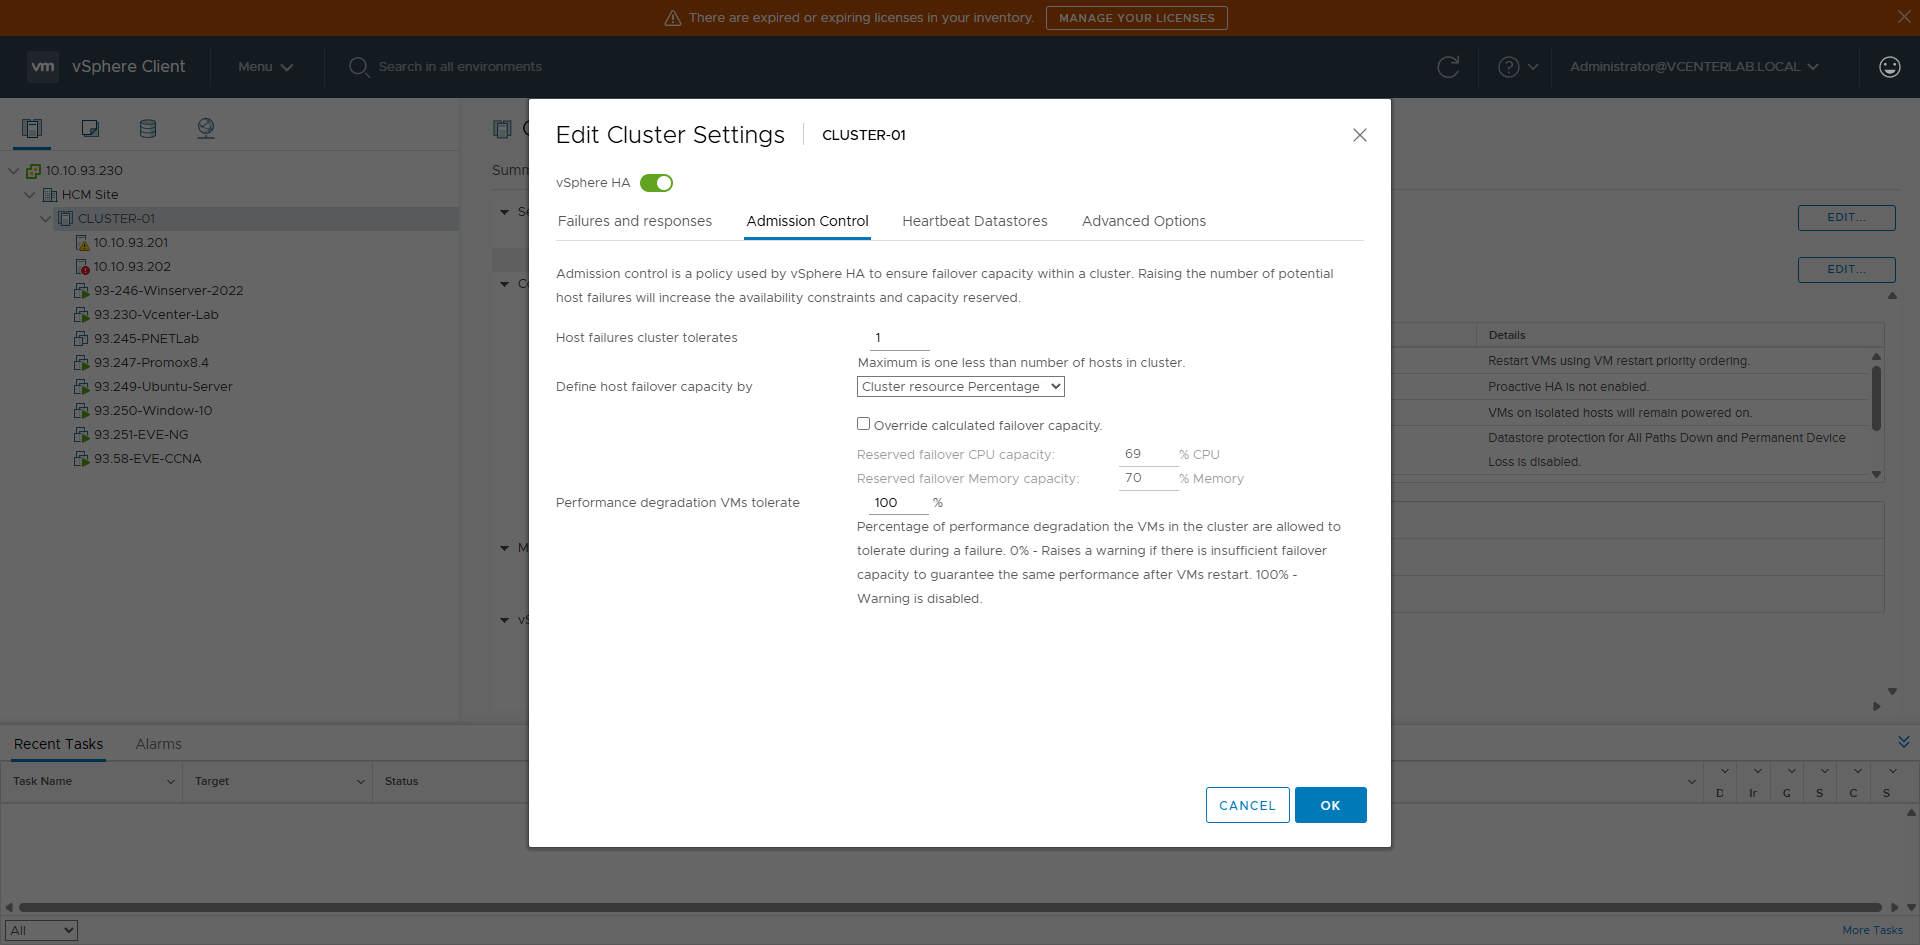
7.2. Calculating Admission Control %
7.2. Cách tính % Admission Control
Admission Control is calculated on the total cluster resources. CPU and RAM are calculated independently.
Example:
Admission Control tính trên tổng resource của cluster. CPU và RAM được tính độc lập.
Ví dụ:
| Host | RAM |
|---|---|
| ESXi-01 | 256 GB |
| ESXi-02 | 128 GB |
| ESXi-03 | 128 GB |
| Host | RAM |
|---|---|
| ESXi-01 | 256 GB |
| ESXi-02 | 128 GB |
| ESXi-03 | 128 GB |
Total RAM = 512 GB. Largest Host = 256 GB.
To tolerate the failure of the largest host, configure: 256 / 512 = 50%.
Tổng RAM = 512 GB. Host lớn nhất = 256 GB.
Để chịu được host lớn nhất fail thì cần cấu hình: 256 / 512 = 50% (RAM & CPU).
Percentage Recommendations
1 host fail: 25–33%
2 hosts fail: 50–66%
Uneven Cluster: Based on largest host
Production: Always >= 25%
Khuyến nghị cấu hình %
1 host fail: 25–33%
2 host fail: 50–66%
Cluster không đồng đều: Theo host lớn nhất
Production: Luôn >= 25%
7.3. Admission Control vs. DRS
7.3. So sánh Admission Control & DRS
| Criteria | Admission Control | DRS |
|---|---|---|
| Purpose | Ensure HA restart capacity | Load balancing |
| Active Time | Before failure | While VMs running |
| HA Relation | ✅ Yes | ❌ Indirect |
| Performance Relation | ❌ | ✅ |
| Tiêu chí | Admission Control | DRS |
|---|---|---|
| Mục đích | Đảm bảo HA restart được VM | Cân bằng tải (Load balancing) |
| Thời điểm hoạt động | Trước sự cố | Khi VM đang chạy |
| Liên quan HA | ✅ Có | ❌ Không trực tiếp |
| Liên quan performance | ❌ | ✅ |
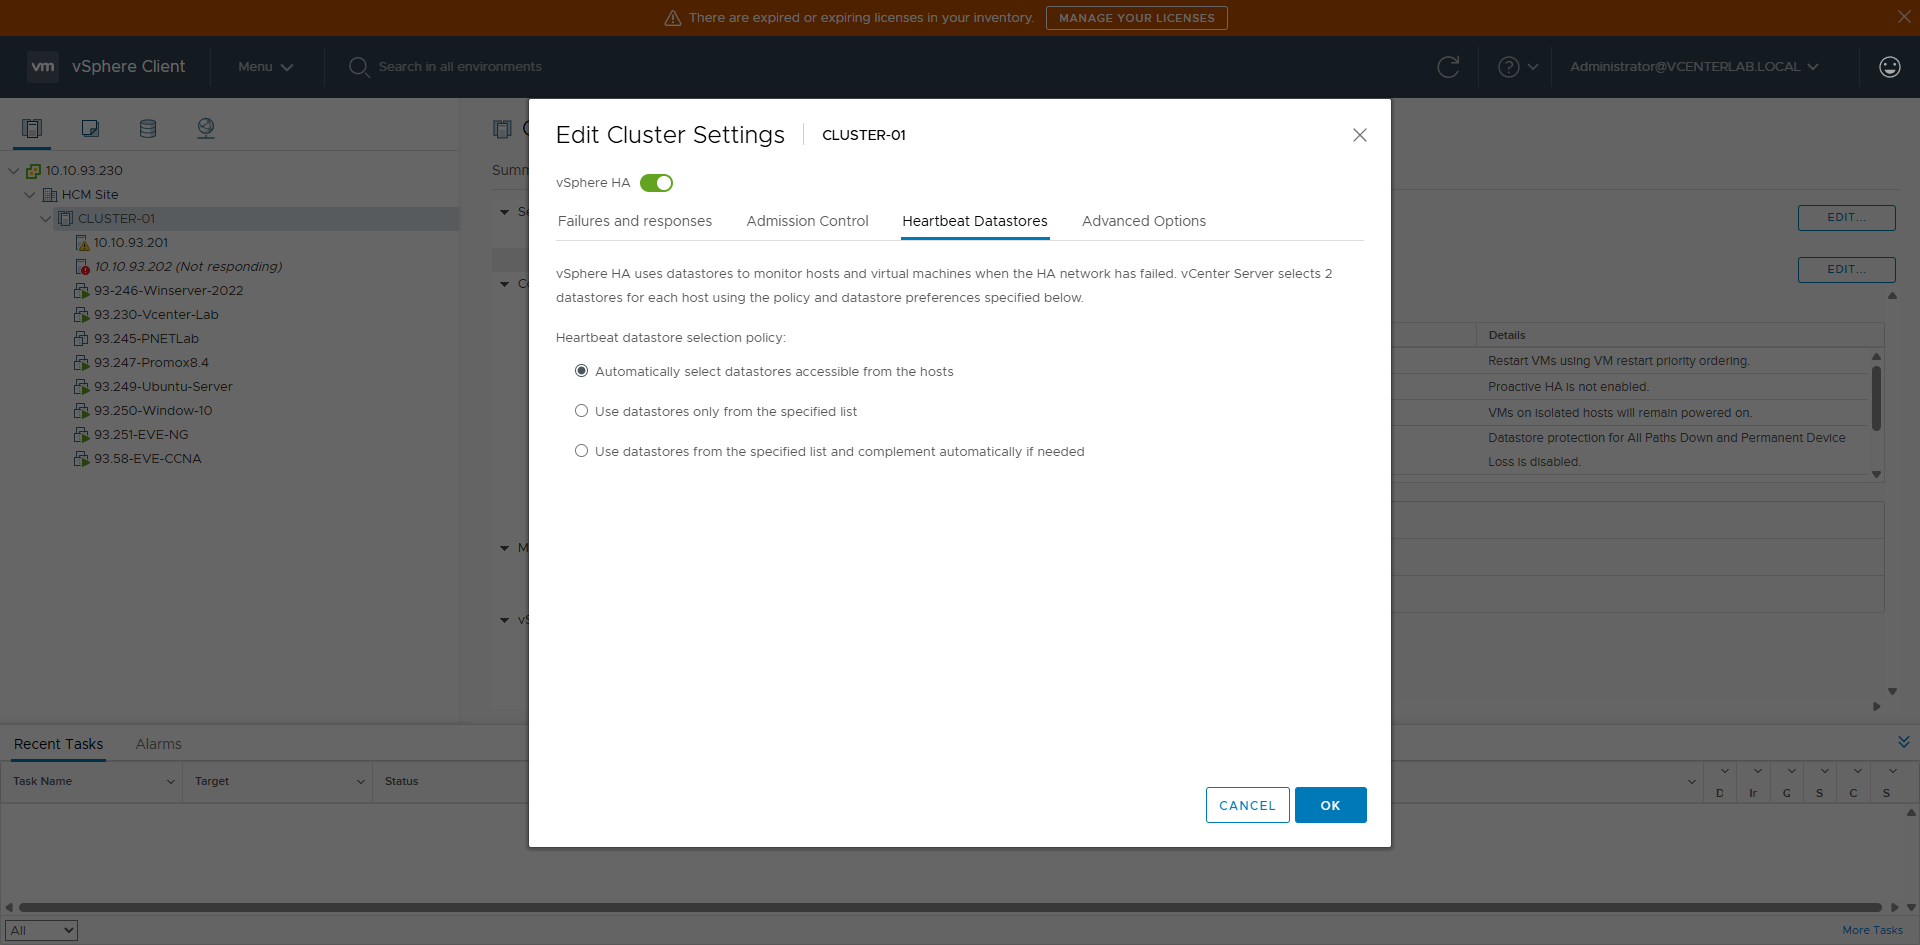
8. Heartbeat Datastores
8. Heartbeat Datastores
Heartbeat Datastores is a secondary mechanism of vSphere HA used to:
- Determine the true state of an ESXi host.
- Distinguish between a dead host and a network isolated host.
Heartbeat Datastores là cơ chế phụ của vSphere HA dùng để:
- Xác định trạng thái thật của host ESXi.
- Phân biệt host chết thật hay chỉ mất network (host isolation).
8.1. Operation Mechanism
8.1. Cơ chế hoạt động
HA uses 2 mechanisms to determine host state:
HA dùng 2 cơ chế để xác định host state:
| Policy | Behavior | Safety | Risk | Use Case | Recommendation |
|---|---|---|---|---|---|
| Automatically select ⭐ | vCenter selects datastores | ⭐⭐⭐⭐ | Low | Standard Prod | ✅ Best practice |
| Use specific list | Only admin selected | ⭐⭐ | High | Specific storage | ⚠️ Use with caution |
| Use specific list & complement | Prioritize list, auto add | ⭐⭐⭐⭐ | Low-Med | Complex Prod | ✅ Good control |
| Policy | Hành vi | An toàn | Rủi ro | Khi dùng | Khuyến nghị |
|---|---|---|---|---|---|
| Automatically select ⭐ | vCenter tự chọn datastore | ⭐⭐⭐⭐ | Thấp | Prod thông thường | ✅ Best practice |
| Use specific list | Chỉ dùng list chỉ định | ⭐⭐ | Cao | Storage đặc thù | ⚠️ Cần hiểu rõ |
| Use specific list & complement | Ưu tiên list, tự bổ sung | ⭐⭐⭐⭐ | Thấp-TB | Prod lớn, phức tạp | ✅ Khuyên dùng |
8.2. Requirements
8.2. Yêu cầu bắt buộc
| Condition | Required | Note |
|---|---|---|
| Shared datastore | ✅ | Must be mounted on ≥2 hosts |
| Local datastore | ❌ | Not used for HA |
| Minimum count | ≥2 | For redundancy |
| Stable access | ✅ | Avoid APD/PDL |
| Điều kiện | Bắt buộc | Ghi chú |
|---|---|---|
| Shared datastore | ✅ | Phải có ≥2 host mount |
| Datastore local | ❌ | Không dùng cho HA |
| Số lượng tối thiểu | ≥2 | HA dùng song song |
| Truy cập ổn định | ✅ | Tránh APD/PDL |
8.3. Role in HA
8.3. Vai trò trong HA
| Scenario | With Heartbeat DS | Without Heartbeat DS |
|---|---|---|
| Lost network heartbeat | Distinguishes isolation | Mistaken for host failure |
| Host isolation | Correct handling | Split-brain risk |
| APD | Accurate detection | False restart |
| PDL | Triggers HA | Undefined |
| Tình huống | Có Datastore HB | Không có Datastore HB |
|---|---|---|
| Mất network heartbeat | Phân biệt isolation | Dễ nhầm host failure |
| Host isolation | Xử lý đúng | Nguy cơ split-brain |
| APD | Phát hiện chính xác | False restart |
| PDL | Trigger HA | Không xác định rõ |
9. Advanced Options
9. Tùy chọn Nâng cao (Advanced Options)
Advanced Options allow overriding default HA behavior using key-value pairs.
If nothing is added → HA runs by default (VMware best practice).
Advanced Options cho phép override hành vi mặc định của HA bằng key–value.
Nếu không thêm gì → HA chạy theo default (best practice của VMware).

9.1. VM Restart & Retry Control
9.1. Điều khiển VM Restart & Retry
| Key | Meaning | Example | Use Case |
|---|---|---|---|
| das.maxResets | Max restart attempts per VM | 3 | Avoid restart loops |
| das.maxResetsWindow | Reset counter window (sec) | 3600 | Combined with maxResets |
| das.vmFailoverDelay | Delay before restart (sec) | 60 | Wait for stable storage/network |
| Key | Ý nghĩa | Ví dụ | Khi dùng |
|---|---|---|---|
| das.maxResets | Số lần tối đa restart 1 VM | 3 | Tránh restart loop |
| das.maxResetsWindow | Reset counter sau X giây | 3600 | Kết hợp maxResets |
| das.vmFailoverDelay | Delay trước khi restart (giây) | 60 | Đợi storage/network ổn định |
9.2. Host Isolation Control
9.2. Điều khiển Host Isolation
| Key | Meaning | Example |
|---|---|---|
| das.isolationShutdownTimeout | Graceful shutdown wait time | 300 |
| das.useDefaultIsolationAddress | Use default gateway as isolation address | true |
| das.isolationaddressX | Custom IP for isolation check | 10.10.93.1 |
| Key | Ý nghĩa | Ví dụ |
|---|---|---|
| das.isolationShutdownTimeout | Thời gian chờ shutdown graceful | 300 |
| das.useDefaultIsolationAddress | Dùng gateway mặc định làm isolation addr | true |
| das.isolationaddressX | IP custom để ping isolation | 10.10.93.1 |
9.3. APD / Storage Handling
9.3. Xử lý APD / Storage
| Key | Meaning | Value |
|---|---|---|
| das.maskCleanShutdownEnabled | Prevent restart of clean shutdown VMs | true |
| das.vmComponentProtecting | VM Component Protection | true |
| das.ignoreInsufficientHbDatastore | Ignore insufficient HB datastores warning | true |
| Key | Ý nghĩa | Giá trị |
|---|---|---|
| das.maskCleanShutdownEnabled | Tránh restart VM đã shutdown sạch | true |
| das.vmComponentProtecting | VM Component Protection | true |
| das.ignoreInsufficientHbDatastore | Bỏ qua cảnh báo thiếu HB datastore | true |
9.4. Heartbeat / HA Timing
9.4. Thời gian Heartbeat / HA
| Key | Meaning | Value |
|---|---|---|
| das.heartbeatDsPerHost | Heartbeat datastores per host | 2 |
| das.failuredetectiontime | Host failure detection time (ms) | 15000 |
| Key | Ý nghĩa | Giá trị |
|---|---|---|
| das.heartbeatDsPerHost | Số datastore heartbeat mỗi host | 2 |
| das.failuredetectiontime | Thời gian phát hiện host fail (ms) | 15000 |